
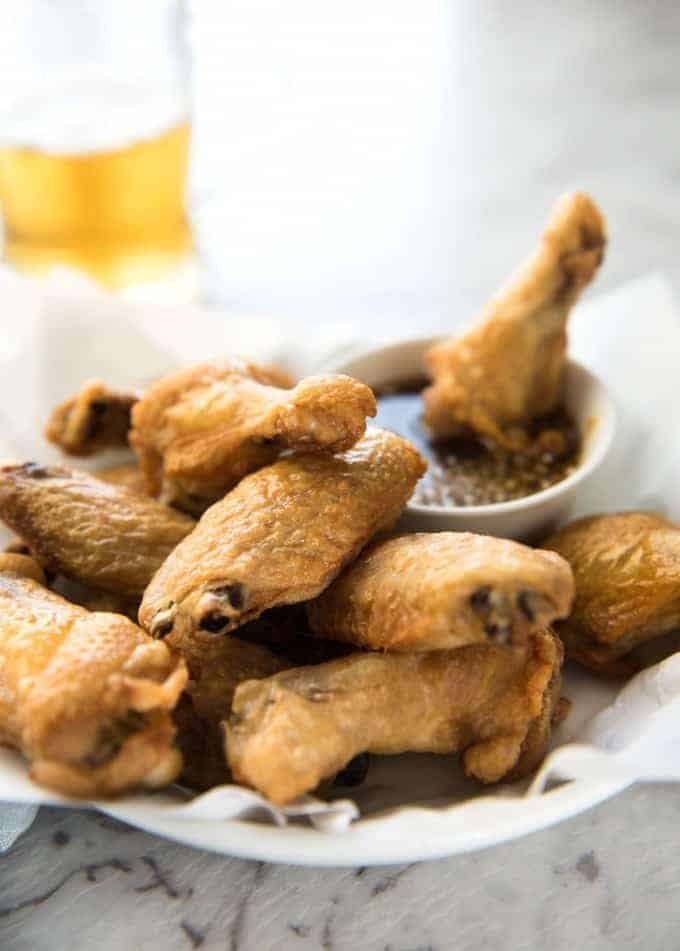
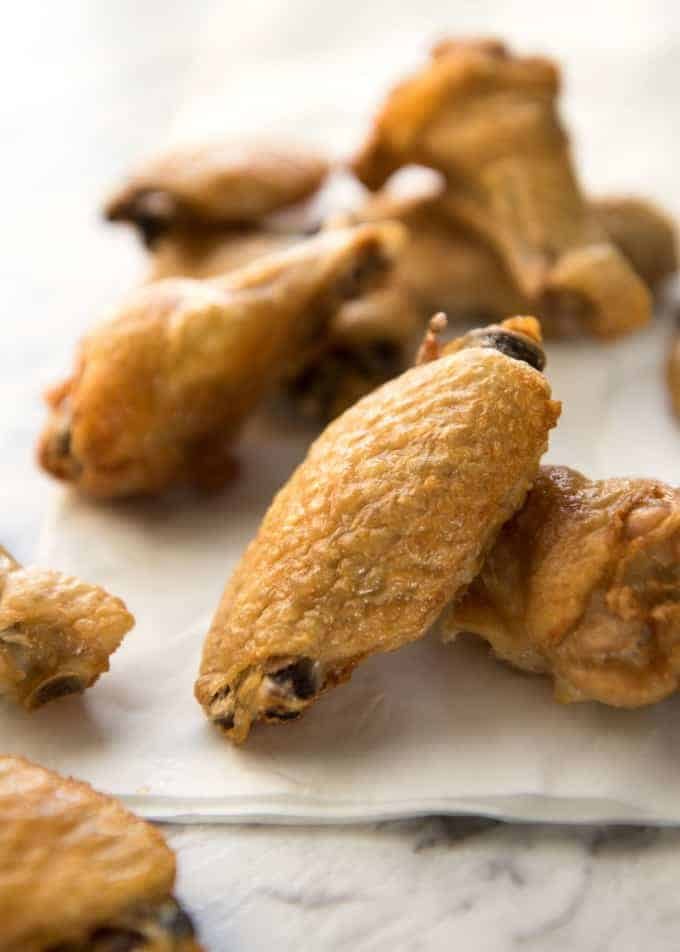
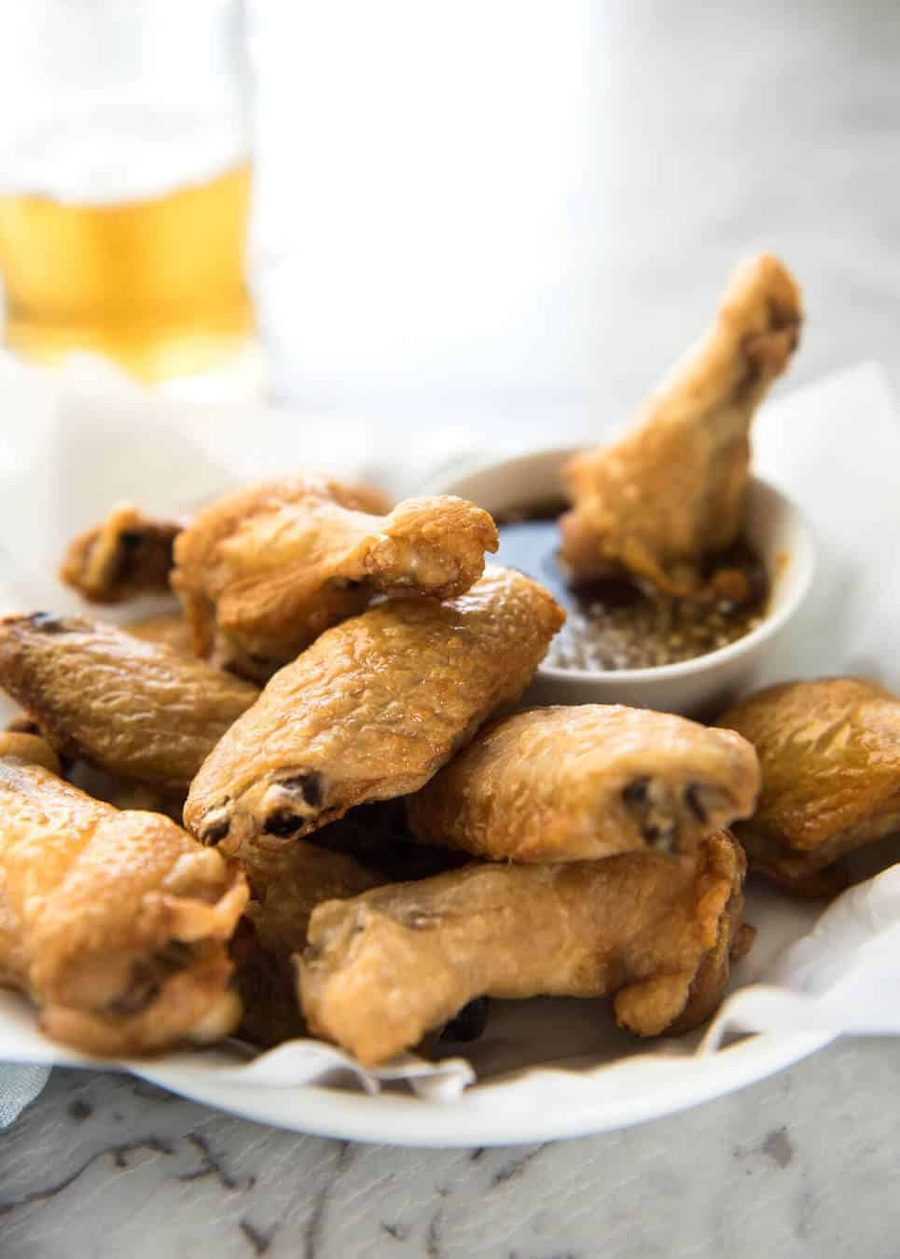
No false promises here – these crispy oven baked wings are SERIOUSLY crispy! You will be gob smacked how easy they are to make. They honestly taste like they’ve been deep fried, with a thin shatteringly crisp golden skin. You can see how easy these are to make and hear how crispy they really are in this cooking video.
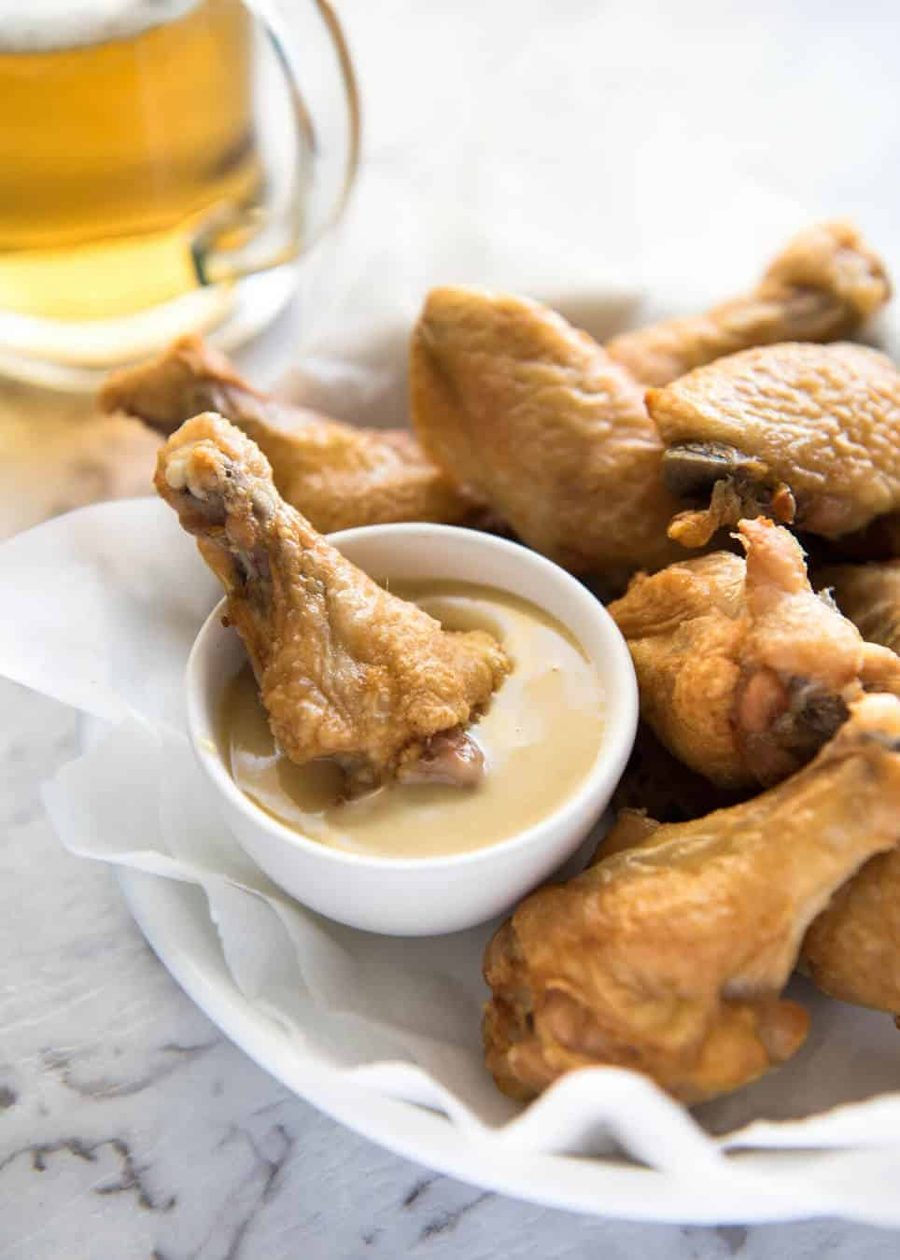
These are so good they can be eaten plain. Or toss them in your favourite sauce, or serve it on the side. I’ve provided a selection of sauces for these crispy baked wings in the recipe below!
Truly crispy oven baked wings
This recipe for how to make Crispy Oven Baked Wings is a discovery by the genius folk over at Cook’s Illustrated. Being the food nerd I am, I really enjoy how Cook’s Illustrated explains the science behind why they do things in a particular way.
And I honestly believe this to be one of their most all time most epic recipes, especially because it’s so insanely EASY!!! And today, I’m sharing the secret with you. Are you ready? 🙂
How to make crispy oven baked wings
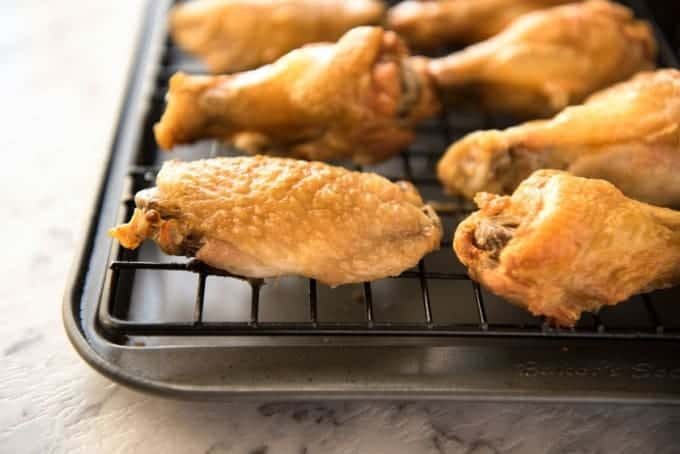
Crispy oven baked wings in 3 easy steps:
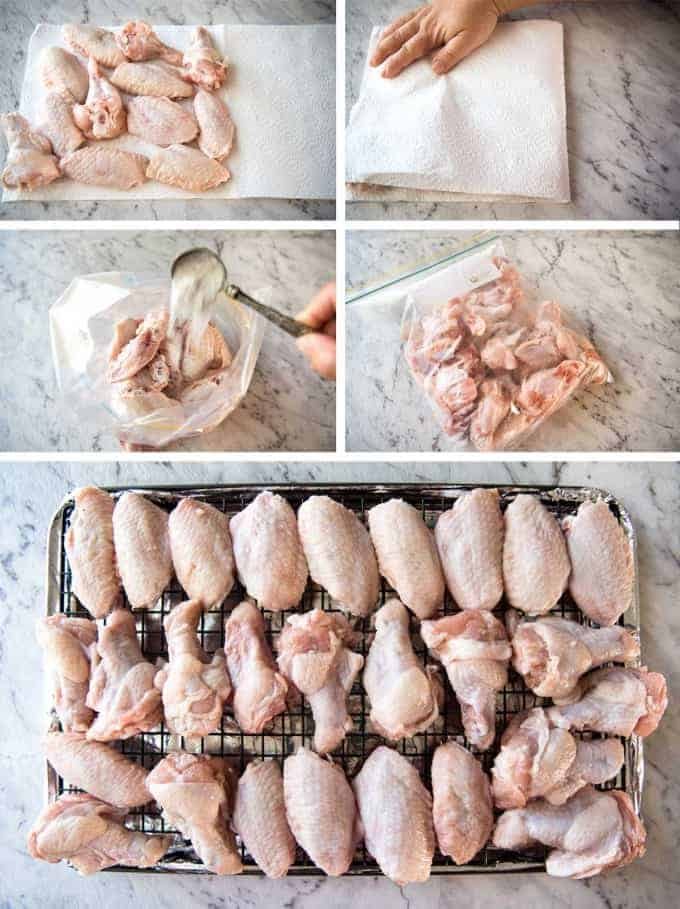
Pat wings dry with paper towels;
Toss wings in baking powder and salt;
Bake at 120°C/250°F for 30 minutes, then at 220°C/425°F for 40 – 50 minutes until golden brown and crispy.
Yes, that’s it. That’s all there is to it. 🙂

Why this recipe works
In those 3 simple steps are 2 very important things to make these truly crispy oven baked wings:
1. Coat in baking powder – yes, you read that right, baking powder! I won’t go into all the technicalities, but in a nutshell, the baking powder draws moisture to the surface of the skin so it can evaporate, thereby making the skin crispier; and
2. Bake for 30 minutes on low to melt the fat before blasting in a very hot oven to crisp up the skin. There’s a lot of scientific explanations around this and I’ll skip it because I’ll bore you! But basically, the wings are first baked on the lowest shelf in the oven at a very low temperature for 30 minutes which causes the fat under the skin to “melt”, then you move the wings up to the top shelf and crank up the heat which crisps up the skin.
The other tip is ensuring that the wings are dry. If you are organised enough, put the wings on the rack and refrigerate, uncovered, overnight. However, I neither have the fridge space nor am I organised enough, so I just dry them using paper towels (see photo below for how I do this).
When these come out of the oven and you tap the skin with your nail, you can instantly “hear” how crispy the skin is. They even look like they’ve been fried! And in case you are concerned, you don’t taste baking powder at all.
Got questions? See FAQ under the recipe card.
You will notice that the wings are smaller than you are used to. That’s because so much of the fat under the skin melts off the wings – you’ll see it all pooled on the tray. So these have the added benefit of reduced calories too!
You can toss the wings in your sauce of choice or serve the sauce on the side. I’ve also shared classic Buffalo Wings using this same method for crispy oven baked wings. For this recipe, I’ve included a few simple sauces that I like to serve wings with: Honey Garlic Sauce, Honey Mustard Sauce, Ranch Dipping Sauce.
Let’s get stuck into these wings! – Nagi x
PS I’ve now published the Buffalo Wings version! Here it is: Truly Crispy Oven Baked BUFFALO Wings.
Watch how to make it
Hungry for more? Subscribe to my newsletter and follow along on Facebook, Pinterest and Instagram for all of the latest updates.
Truly Crispy Oven Baked Chicken Wings
Ingredients
Crispy Wings
- 4 lb / 2 kg chicken wings , cut into wingettes and drumettes (Note 1)
- 5 teaspoons baking powder (NOT BAKING SODA / BI-CARB SODA!!)
- 3/4 teaspoon salt
- Oil spray
Instructions
Crispy Wings
- If you are organised enough, uncover the chicken wings and leave them in the fridge for a few hours to dry out. Otherwise, use a paper towel to pat the wings dry.
- Adjust oven racks to upper-middle and lower-middle positions.
- Preheat oven to 250F/120C (all oven types – standard/convection/fan).
- Line a baking tray with foil, then place a rack (like a cooling rack) on the foil. Spray the rack with oil spray.
- Place wings in a large bowl or in a ziplock bag. Add the baking powder and salt, then toss to coat evenly.
- Place the wings on the baking tray in a single layer with the skin side up. They should just fit snugly. They will shrink when they cook because the fat renders out so don’t worry if they look too snug.
- Place wings on the lower middle oven rack and bake for 30 minutes.
- Move wings up to the upper middle rack and increase the oven temperature to 425F/220C. Bake for 40 – 50 minutes, rotating the tray halfway through.
- Remove baking tray from the oven and let it stand for 5 minutes.
- Toss wings in sauce of choice or serve it on the side to dip / drizzle on the wings, then serve.
Recipe Notes:
* Honey Garlic Sauce: Mix together 4 tbsp honey, 2 tbsp soy sauce, 2 tsp white vinegar (or sub with any other vinegar except balsamic), 2-3 garlic cloves, minced. Use for dipping OR tossing.
* Honey Mustard Sauce: 1/4 cup Dijon mustard, 1/4 cup mayonnaise 1/4 cup honey
* Ranch Dipping Sauce: Mix 1/3 cup mayonnaise, 1/3 cup sour cream, 2 tbsp milk, 1 tsp lemon juice, 1/4 tsp EACH dried dill, parsley, chives, onion and garlic powder, salt & pepper to taste.
* Spicy Creamy Dipping Sauce: 3/4 cup mayo, 1/2 tso garlic powder, 1/8 tsp paprika, 3-4 tbsp sriracha, salt & pepper
* Pink Sauce: 1/2 cup mayonnaise, 2 tbsp sweet chilli sauce, 2 tbsp ketchup, 2 tsp garlic powder, 1 tbsp sriracha (or other hot sauce) 7. Nutrition: The nutrition is per serving, assuming 8 servings. Note that the calories is HIGHER than it actually is because so much fat is rendered out (melted) and discarded which is not reflected in the nutrition below. I measured the discarded fat once and calculated that it should be 60 calories LESS per serving (around 1/4 cup fat in total was discarded).
Nutrition Information:
Originally published in November 2014, updated with fresh new photos and step by step photos!
Frequently asked questions
I don’t have a rack. Does this cause a problem? The skin will still be crispy but the bottom of the wings that is in contact with the tray will be oily. This is because the purpose of the rack is to elevate the wings off the tray and allow the chicken fat to drip down.
One way to get around an oily underside is to take the wings out after around 35 minutes during the high temp cooking. Drain the oil out of the tray then return to the oven to finish crisping/browning. You could also drain the excess oil from the wings on paper towels before serving.
Can I make ahead? These stay crispy for as long as the wings are warm, so around 20 – 30 minutes. After that, the skin starts to wrinkle and soften. However, I was shocked how well they reheat! Just allow the wings to cool (uncovered), then cover and refrigerate. Spread wings out on tray, skin side up, and bake for 5 to 8 minutes at 200C/390F. The skin smooths out and puffs up, just like when they were baked fresh. Other than to you (if you’ve made as many wings as me!) and true hard core Wings experts, the difference in juiciness and crispiness is barely noticeable – my friends never notice when I reheat!
The skin stays crispy for around 10 – 15 minutes after tossing in the sauce, then after that they start to soften but not go soggy, up to around 30 minutes. If you reheat after tossing in sauce, they go soggy.
Please do not toss in baking powder then refrigerate or freeze, this won’t work (makes the wings sweat too much to become crispy).
Can I add seasonings? You sure can! It does marginally reduce the actual skin crispiness but a crust forms from the extra seasonings/spices and adds more crunch. I did a lot of testing around this and I can assure you it works really well!
There was a lot of smoke! Help! A few readers have had this problem and I don’t think it’s from the chicken wings because I’ve made a ridiculous amount of these wings (in my kitchen and others) and never had the problem. The problem may be: a) spillage of chicken fat onto the oven burners when transferring from the lower to the upper shelf or b) there already was fat on the oven burners. I can’t think of anything else. While the smoke point of chicken fat is below that of the high oven temperature used in this recipe, the fat is not in direct contact with the heat because it’s shielded by all the wings and diluted by chicken juices dripping into the fat.
You really don’t need to flip? Really! Even if you don’t use a rack, the underside will get crispy.
Can I make this with other cuts of chicken? Yes BUT the crispiness will only work on the skin. So it works best on wings because they are almost fully enclosed by skin. With drumsticks, thighs and skin on breast, they are not fully encased with skin when raw and the skin shrinks while cooking. But the actual technique works super well! For 1 kg / 2 lb drumsticks or other cut of chicken, using 2 tsp of baking powder and 1/4 tsp salt – less than the recipe for wings because there is less skin surface area.
Life of Dozer
No wings for Dozer – cooked chicken bones are dangerous for dogs! How about a Honey Prawn instead??

Hi Nagi,
If I marinated the wings with shrimp paste overnight and then use the baking powder, would the chicken be as crispy? Actually would they be edible the mixture of baking powder and the marinated chicken pieces? Thank you!
Hi Chia-Yi! I’m sorry, I do not think that will work, it will impact the “science” that creates the crispy skin. Because even when I use dry spices on the skin, it makes it less crispy so using a wet paste will make it even less crispy. 🙂
I cant wait to try this, but I’m still confused. so, the wings get placed directly on the lowest oven rack? then I use a pan underneath the wings to catch the fat? what do I need the tinfoil for?
Hi Amy! You need to put a rack – like a cookie cooling rack – on a baking tray, then put the wings ON the rack which is on the tray. That way the wings are elevated above the tray and the fat drips onto the tray. If you don’t do this, the wings will be sitting in a pool of fat and the wings won’t be as crispy underneath 🙂 The sides and top is still super crispy though! I have made it before without using a rack. Hope that helps!
My family loves cicken wings and this seems like the best alternative to frying. Cant wait to try them. Can you soak them in buttermilk first?
Hi Janet! I tried that and unfortunately the level of crispiness is quite substantially reduced because it alters the “science” behind it as well as adding moisture into the wings. SUCH a bummer!!
Turned out perfectly… Will not make wings at home any other way. Thanks!
SO GLAD!! Thank you very much for coming back to share your feedback! 🙂
Loved them! Will try using this technique on small pieces of chicken thighs/breasts as nuggets for my grandchildren, they will think they are deep fried. Can you add a small amount of chilli to the baking powder to spice them up? Maybe try next time, not for the grandchildren, I hasten to add!
Hi Diane! I am SO glad you enjoyed them!! Unfortunately though, this won’t work on thighs / breast because you need the skin that you get on wings. i.e. the baking powder draws moisture out of the chicken skin to make it crispy. Sorry to be the bearer of bad news! Having said that though, I have a technique for making CRUMBED chicken that is virtually mess free and comes out properly golden and crunchy all over. I’m planning to share that recipe next week and it’s PERFECT for nuggets!
I love crispy chicken wings. I definitely need to try this recipe! Looks absolutely, positively delish!!!
Hi Linda! Happy Easter to you and your family! I hope you do try this, you will honestly be AMAZED how crispy they are!
Silly question!! So the wings (uncooked) go on the RACK and the tray kind of just sits underneath in the oven? I’m so excited to try this I’m nervous about messing up!! Hahaha!
Hi Fatima! No such thing as a silly question 🙂 I mean a rack like a cookie cooling rack that sits on the baking tray. Then you put the wings on the rack. This allows the fat from the chicken to drip onto the tray which makes it crispy. No need to be nervous, it is super easy! Just set the timer so you get the roasting time right and make sure you use baking POWDER (i.e. the stuff you use for pancakes and muffins) NOT baking SODA / bicarb soda (which is the stuff you use for cleaning!!). 🙂
Hi Nagi!!
Thank you for the quick reply!! Ohhhh! I don’t have one of those where I am. I’m using the actual oven rack and placed the tray underneath. It’s still dripping onto the tray so I’m hoping it’s still doing the trick! I made sure to get baking soda! So far…so good!
Hi Fatima! That will work JUST FINE! Anything to elevate the wings so the fat drips off rather than sitting in the fat while it cooks. And NOOOOO!! NOT baking SODA!! You must use Baking POWDER! PLEASE PLEASE PLEASE DOUBLE CHECK the label on the jar!
If you use Baking soda, it will be inedible! 🙁
Nagi!! OOOPS!!! I’d seen so much “don’t use baking soda” on the website that I accidentally typed “baking soda”!!! Hahahahaha!! I got baking powder!! I made sure to underline it when I was making my grocery list!! I promise, I got baking POWDER!!! 🙂
Phew! You had me stressed for a moment there!! 🙂
Never heard of using baking powder on wings. Did a google search and found your site. Will try this soon! Yummo!
Hope you do try it! It really is amazing how crispy these come out 🙂
We recently moved to the US west coast from New York state. We really miss the wings from NY and haven’t been able to find anything even close here. Until now! Thank you for this recipe, it was just what we were craving. Super crispy. Made your sauce and a buffalo sauce. I also used seasoned salt with the baking powder. Excellent.
Thank you Melissa! I hope you got a taste of NY with these 🙂 If I ever move to the states, NYC is definitely where I would live! I keep meaning to share a buffalo version of this recipe, thank you for the reminder! So glad you enjoyed these 🙂 Hope you are having a great weekend!
Hi. If I only have half the chicken weight approx 1kg with 12 full whole wings, do I use half the quantity of baking powder to 1 tbsp. Or does the weight not matter because its more about the number of wings.
Hi Shin! Weight does matter because it’s relate to surface area of wings 🙂 Yes, if you are using 1 kg of wings, definitely halve the baking powder!
Hi and thanks for sharing the recipe,
UNFORTUNATELY……I made the “baking soda” mistake and to say it was awful is an understatement….!
(I say that smiling and laughing at myself btw…and by no means hope you feel bad in anyway what so everhowever my tummy is kinda churning all about from my attempt of finishing my first and only one…. thank god I only cooked x6 lol)
You live and learn though and I am looking forward to trying these again. I wonder if you are able to “fool proof” the ingredient / method in an effort to save other unsuspecting victims.
For what its worth I can tell you the bottle I used reads “Bi-Carb Soda” then under that is “Baking Soda” none of which I now understand is written the recipe…..however that said though I want to share with you my mistake in an attempt to prevent others wasting food.
My first mistake was that I was one very hungry cave-man who incidentally made a tincy wincy clerical error through my own lack of knowledge of the pantry / pharmaceutical / voodoo ingredient “baking soda”.
My second mistake was I usually read the comments of others before cooking from a recipe on the net…..In this case I see I am not the first to go go down this path…
So I was thinking, maybe just maybe if it were clear in the section 1 to state “Do not use Baking Soda” must be baking powder…..
giving 5 stars because I know I will love this when done correctly.
It is Friday the 13 here so maybe that also had something to do with it!
Oooh….THAT EXPLAINS it! It wasn’t just you that had a disaster yesterday….I tossed an entire 3kg roast pork because it was an inedible disaster!! (And even more devastating, all the crackling too…the best but of pork was burnt to a charred mess that even my DOG turned his nose up at!)
Nicholas – oh no oh no!! I am so sorry that you made that mistake…because I have done it myself and I know: a) how disgusting it tastes and b) how disappointing it is when you are looking forward to wings and they are a disaster!!
THANK YOU for that tip to make it really clear! In Australia, it is the same re: Baking Soda in small letters, but I didn’t think of that because no one refers to it as Bi-Carb! I will update the recipe right now 🙂
I wish I could have been there to yell out to you when you picked up the wrong jar! – Nagi
Tried this tonite so yammiii so amazing!!!!! We loved it
Hip hip hurrah! I am so glad you enjoyed it!! 🙂 Thank you for coming back to share your feedback!!
I helped hubby outdoors today right up til 5 and he was still game to wait while the chicken wings cooked, but he said “you aren’t going to use your usual recipe, are you?” HA So I got on the internet and found your recipe and read the comments and thought, I’m trying this. Gutsy of me, cuz he hates baking powder in baked goods. But…..there were such positive raves after your post!!! I adjusted for 2 lbs. of wings and it seemed to take forever, but they were delicious! It was rather unique to taste real and tender chicken with just a little salt flavor. And the kitchen does smell almost like I fried something, but I’m okay with that. He did not taste the b.p.! I thought I did once. I used paper towels to pat the wings really dry, and you could see the powder/salt dusting all over the wings. YAY Now I need to find the Cooks Illustrated article and read all the whats and whys…that is a neat magazine.
Hi Ginnier! Thank you for coming here to share your thoughts!! You have a hubby that doesn’t like baking power in baked goods? Does that mean no cupcakes, muffins etc?? How DOES he survive?! I’m so glad you enjoyed it!! When I first made them, I was really cautious about tasting baking powder, but really truly cannot taste it. Mind you, I really do toss it well. If it’s not tossed well and the powder isn’t dusted (like what you saw) and instead you have clumps of the powder, then yes you will taste it. But not if you toss it properly, like you did!
Thank you again for coming back to share your comments! And YES, go find that article! If you can’t, let me know, I am sure I have it bookmarked. 🙂
I really really wanted to like these, but all I tasted was the baking powder. Maybe I used too much.
Hi Steph – oh no! That’s terrible! All I can think is that you either didn’t use enough wings or too much baking powder? OR….did you use baking SODA accidentally? It is really disgusting if you use soda – I’ve made that mistake!! I have made this many times and both family and friends have tried it and everyone says that you can’t taste baking powder. And many of the comments below and emails I have received from readers say the same thing, plus this has come from America’s Test Kitchen / Cook’s Illustrated! So I’m confident it works. I’m sorry it didn’t work for you though – wish I was in your kitchen so I could troubleshoot! 🙂
Wow…I’ve had this recipe pinned for a while. We made these tonight and they were abso-freakin-lutely amazing. We love wings and NEVER do fried wings so this recipe intrigued me. Rendering the fat out and cooking them at a higher temp is genius. They were so crispy but still moist and sooooo tender. Thanks for my new favorite recipe. You are a rock star!
Oohhh…meant to ask…do you think this would work with chicken legs/thighs? Can’t imagine why not…
Hi Susan! It works with drumsticks, you need to bake it for around 15 / 20 minutes longer (I roughly split the extra time half on the low temp and half on the high). I haven’t tried it with thigh! In theory it should….the only thing I would say is that thighs are so much bigger than wings, it might be a bit bland. Crispy, but the inside wouldn’t have flavour infused. BUT….you have inspired me to see if I can invent a Southern “fried” chicken using this technique! I will try marinading the chicken thighs to infuse them with flavour and tenderise them, then bake it using this recipe. Thanks for the idea!! 🙂
Thanks so much for your wonderful feedback Susan! I can’t take credit for the oracle technique, it is all thanks for Cook’s Illustrated for discovering it. It’s amazing how crispy it is, isn’t it?!! I am addicted to this recipe! Thanks again for coming back to leave feedback Susan!
Hi Nagi, your recipe calls for 2 tablespoons of baking powder for 4lb of wings but you told Samantha on February 15th that 2 tablespoons for 1lb. was a light dusting. Can you tell me which is correct so I don’t use to much baking powder
Gaaaah, sorry Jay, typo in the response to Samantha! I will fix it. It is as per the recipe – 2 tbsp for 4 lb / 2kg of wings. And yes, that is a light dusting – not very much powder for A LOT of wings! 🙂
I saw this recipe yesterday and being a woman who doesn’t cook much at all, I wanted to try something special and new for my family. I was so excited because it seemed rather simple and looked amazing. I also wanted to prove to my cook of a boyfriend that I could in fact whip up something amazing and show a somewhat domesticated side to me. I started off great with my glaze and then prepped my chicken and popped it in the oven. Needless to say I was UBER excited when I saw the crisp wings, unburnt and so deliciously golden come from me. EPIC FAIL! I used baking SODA instead of baking POWDER!!! The embarassment haunting me all day as I think of my boyfriends face when we were forced to order chinese, lol. My dissapointment, unexplainable but a valuable lesson learned. I have been researching the difference between the two all day, lol. I don’t want to give up on proving to him that I am not a one trick fast food ordering pony, but my confidence is a bit shaken behind the $12.00 in chicken that went to waste. I’m going to try again with the proper ingredient but are you sure we won’t taste it? I still can’t get that horrible taste of baking soda out of my mind and I don’t want to blow it again. Is it also true that you can use plain flour instead or will it have a different affect on the end products crispness. PLEASE HELP! signed down and out but not defeated. P.S. please don’t judge me people, lol.
Oh no, oh no!! Baking soda is TERRIBLE TERRIBLE!! I know because I have made that mistake myself! I swear you cannot taste the baking soda. Another blogger picked up this recipe (my friend Marissa from Pinch and Swirl – http://pinchandswirl.com/2015/01/crispy-baked-buffalo-wings-homemade-buffalo-sauce/) and made the same mistake, but then made it with baking powder properly and loved it so much she blogged it too!
This is a perfect recipe for someone who does not cook much because it is actually really easy (assuming you use POWDER instead of SODA!! He he!!) and you really will knock the socks off your boyfriend. There is simply no other method that compares to make crispy chicken in the oven. There is science behind why baking powder on the chicken skin makes it crispy, and flour does not work nearly as well, I have tried it many times.
I do hope you try it again! I am sorry about your epic fail, but I can promise you this – as someone who has made that mistake before, you will NEVER make it again!! 🙂
I made the wings tonight and they were really good. My husband and teenage boys really enjoyed them. They were easy to make, although the bottom of the wing that was on the rack wasn’t totally crisp and I wonder if next time I make them, maybe they should be turned over. And the kitchen got kinda smoky from the fat smoking on the bottom of the pan. Did that happen to anyone else? The sauce was delicious! Will definitely make again.
Hi Becky – I agree the bottom does not get quite as crispy as the top but it was still pretty crispy. I haven’t tried turning them over, I will try that! It would need to be cooked for longer though because you need the time per the recipe to get the top crispy, then additional to try to crisp the bottom. And no, I can honestly say I have never had the smoking problem. I am wondering if you spilled any on the bottom of the oven accidentally? THAT definitely has caused my oven to smoke before (not this particular dish, but another one!)
Hi, I am trying this out tonight and I just wanted to check (although probably a silly question!) but when you say to rotate the tray halfway through baking, you don’t mean to actually rotate the wings individually do you? My oven is fan forced so I am not sure if rotating the tray will make a difference?
Thanks so much!
Hi Wendy! There is no such thing as silly questions 🙂 No, I do not mean rotate the wings (way too fiddly!). Just rotate the tray. My oven is fan forced and I still find the back is slightly hotter than the front but if yours bakes really evenly, then you don’t need to rotate! (And I wish I had your oven!) 🙂
I interpreted the tray rotation as turning over the wings halfway through. They were crispy on both sides.. were still perfect to me. I’m making this dish for the 3rd time since Super Bowl Sunday, but with regular size whole wings (as I type). If it’s not broken don’t fix its is my stance on the rotation. I’ll be back with an update on the full sized wings.
Note: cooking time will definitely differ for the full wings…
Shawn – you rock! Thanks for your tip – I will try turning them over next time too! As for full sized wings, I added 5 minutes on the lower temp and 10 minutes on the high. That gave me the same crispiness. Thanks again for your feedback!! (PS 3rd time? That’s all? I’ve made this about 15 times just in the last 3 months!!)
These came out absolutely D E L I C I O U S! My husband and my kids couldn’t get enough! Thank you so much for this wonderful recipe that I will be using again and again. P.S. The second time I made them, I added oregano, pepper, garlic powder, onion flakes & Bay seasoning to the baking powder & they were also very delicious. Thanks again.
I also forgot to mention that we didn’t add the sauce, they were so good, they didn’t need it!
I agree!! But some people seem to really need a sauce, so I always throw some on the side as an option!! 🙂
THANK YOU for your wonderful comment, I am so so pleased you enjoyed it!! I am with you – I think they are so good plain, the sauce isn’t needed! But then again, it is so easy to make, I do like having it as an option for people to dip in 🙂 Thank you again for sharing your thoughts!!
I was disappointed.
Were the wings crispy? Absolutely!
Was the sauce yummy! Yes, best part of the dish.
The problem? The baking powder left a weird taste. Yes, I used baking powder not baking soda. Yes, I followed the measurements. Maybe my wings were smaller or had less fat or the baking powder clumped or something…but it left an aftertaste. Also, in any crevices or wrinkles…the baking powder piled up more and left a powdery texture to the skin. The skin was so crispy but we ended up just peeling it off because we couldn’t stand the taste of it. Sad.
My other problem was that the sauce was delicious… Seriously so good…but it didn’t stick to the wing like I’d hoped so you only got the faintest of flavor from it. I even tried baking some into it for the last two minutes but the sauce just ran off the edges of the wings and pooled on the plate/pan.
Hi Samantha – I’m so sorry this didn’t work out for you….it does sound like something went really wrong. Firstly, the sauce should DEFINTATELY stick to the wings because it has honey in it so it is sticky so I can’t imagine it not sticking (to almost anything!). If they didn’t stick, it sounds to me like the texture of the wings must’ve been really wrong, and I can’t imagine the texture required in order for the sauce NOT to stick.
If you were able to taste or see a powdery texture from the baking powder, which should definitely NOT be the case because 2 tbsp of baking powder for 4 lb/2kg of wings is an EXTREMELY light dusting, I am wondering if you used too much baking powder? Because there has been so much feedback confirming that you cannot taste the baking powder – and America’s Test Kitchen has validated and tested this to death too!
Sorry it didn’t work out for you, hard to trouble shoot from Down Under but happy to correspond more on this if you want! 🙂
These came out perfect! Will this work with boneless chicken breast as well? Reducing the time by half maybe?
I’m so glad you enjoyed it Mandy! Unfortunately this won’t work with chicken breast because it doesn’t have the fat or skin. This method of using baking powder and low then high baking is specific to cuts of chicken with skin and fat. So it is best for chicken wings but also works for drumsticks, you just need to bake it for longer. 🙂