
This is a handy recipe for crispy quesadillas baked in the oven. Which means you can make 3, 4 or 8 at a time instead of pan frying one by one! Stuffed with my favourite taco beef mince (ground beef) though you can use chicken, turkey, lamb or pork. Super quick and easy!
Crispy oven baked beef quesadillas
Recipe writers “always” trumpet on about how quick and easy quesadillas are to make (yours truly included). Which they are, if you’re cooking for one or two people.
But if you’re cooking for 3 or 4 or 5 – and throw a hoard of hungry teenagers into the mix – who’s got time to pan fry them one by one? Nobody I know in the real world!
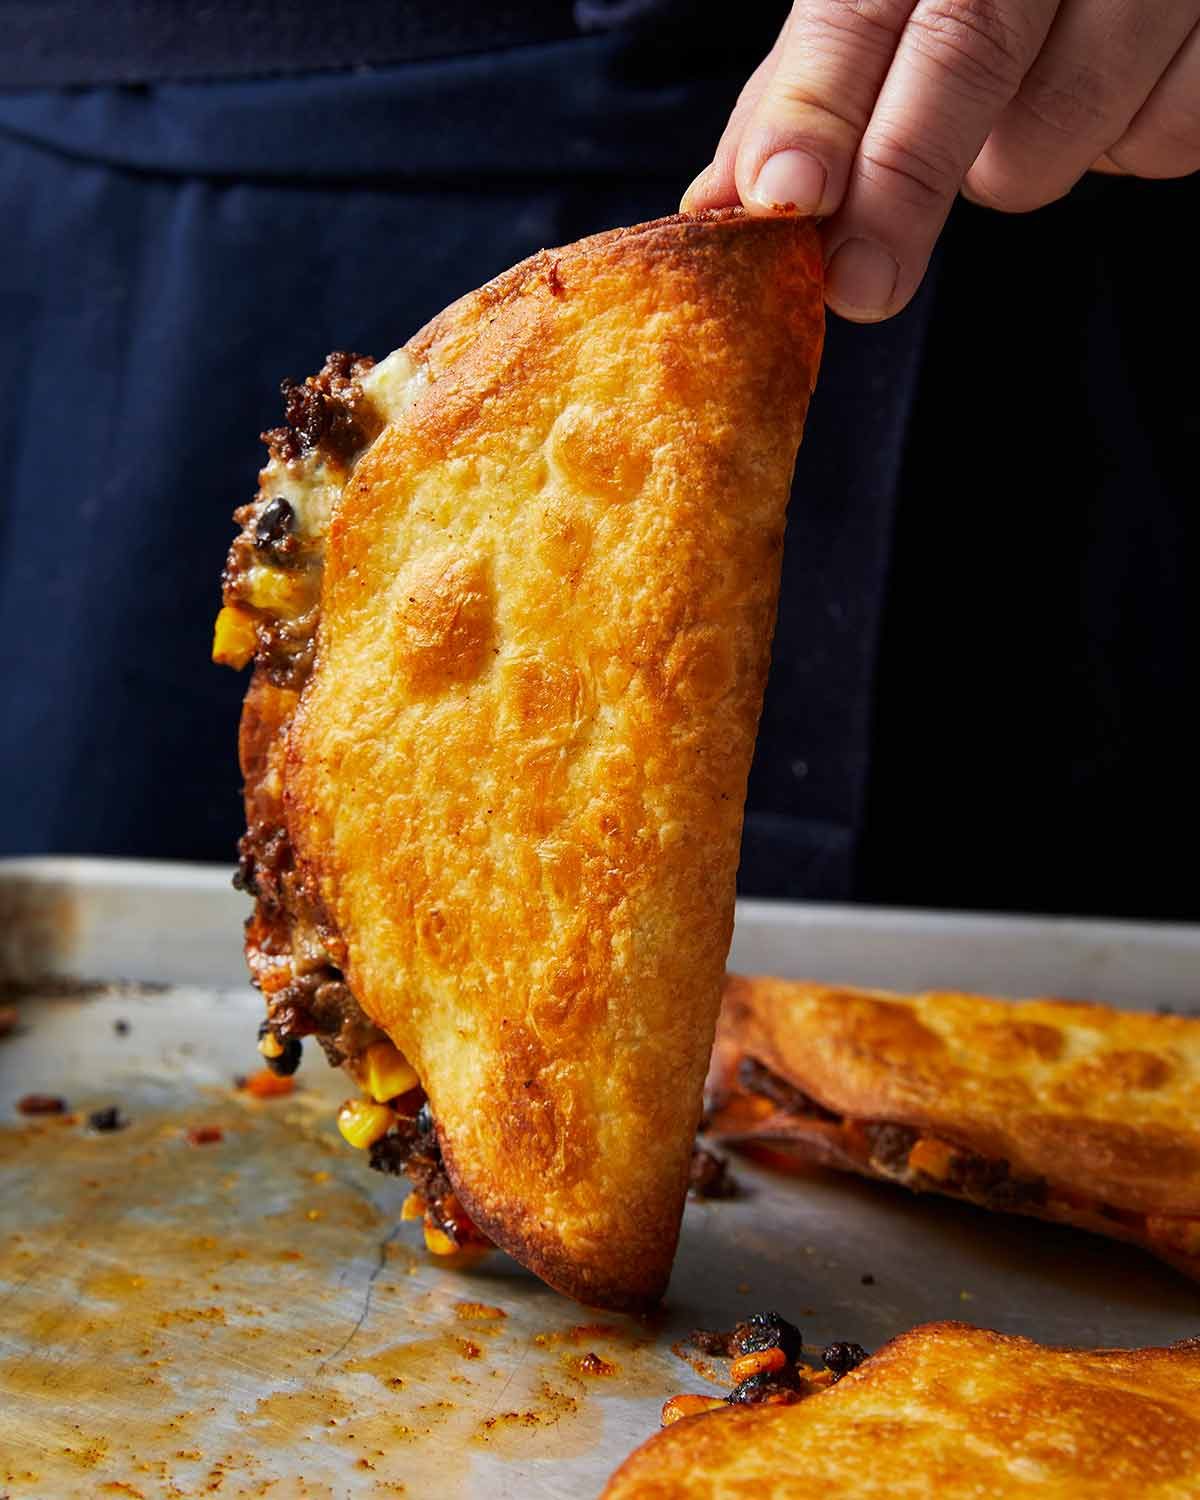
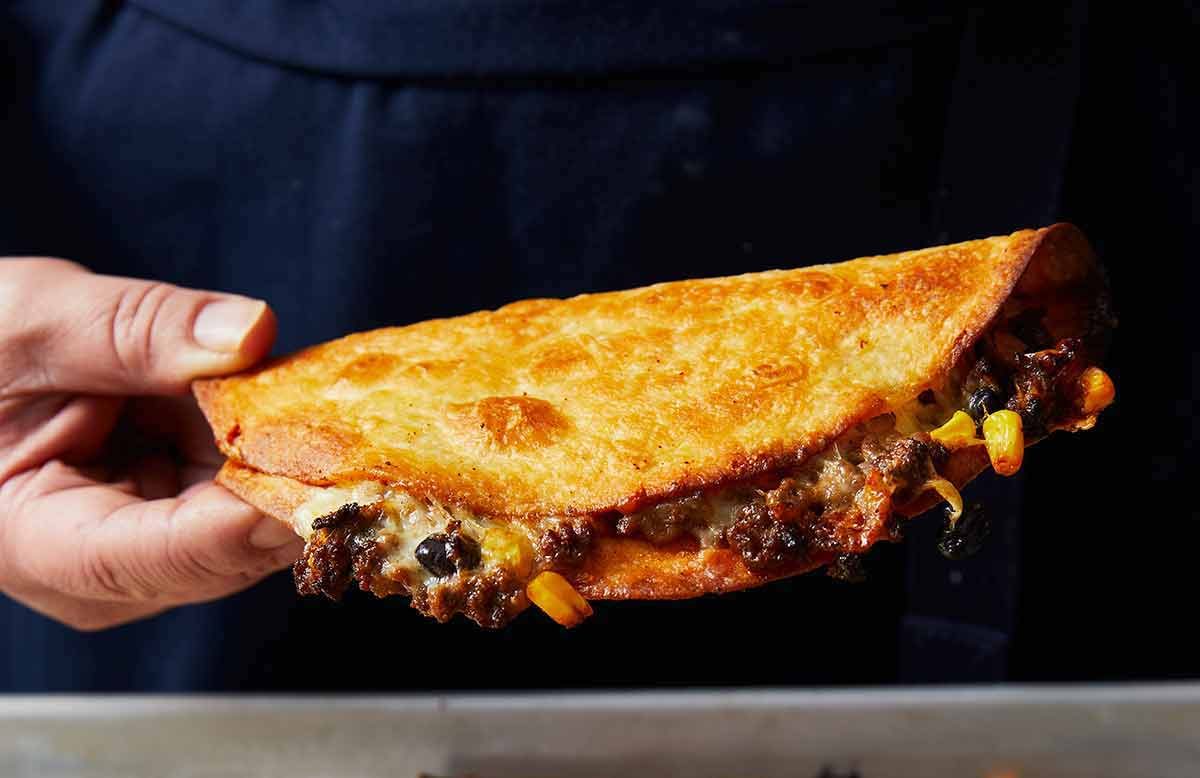
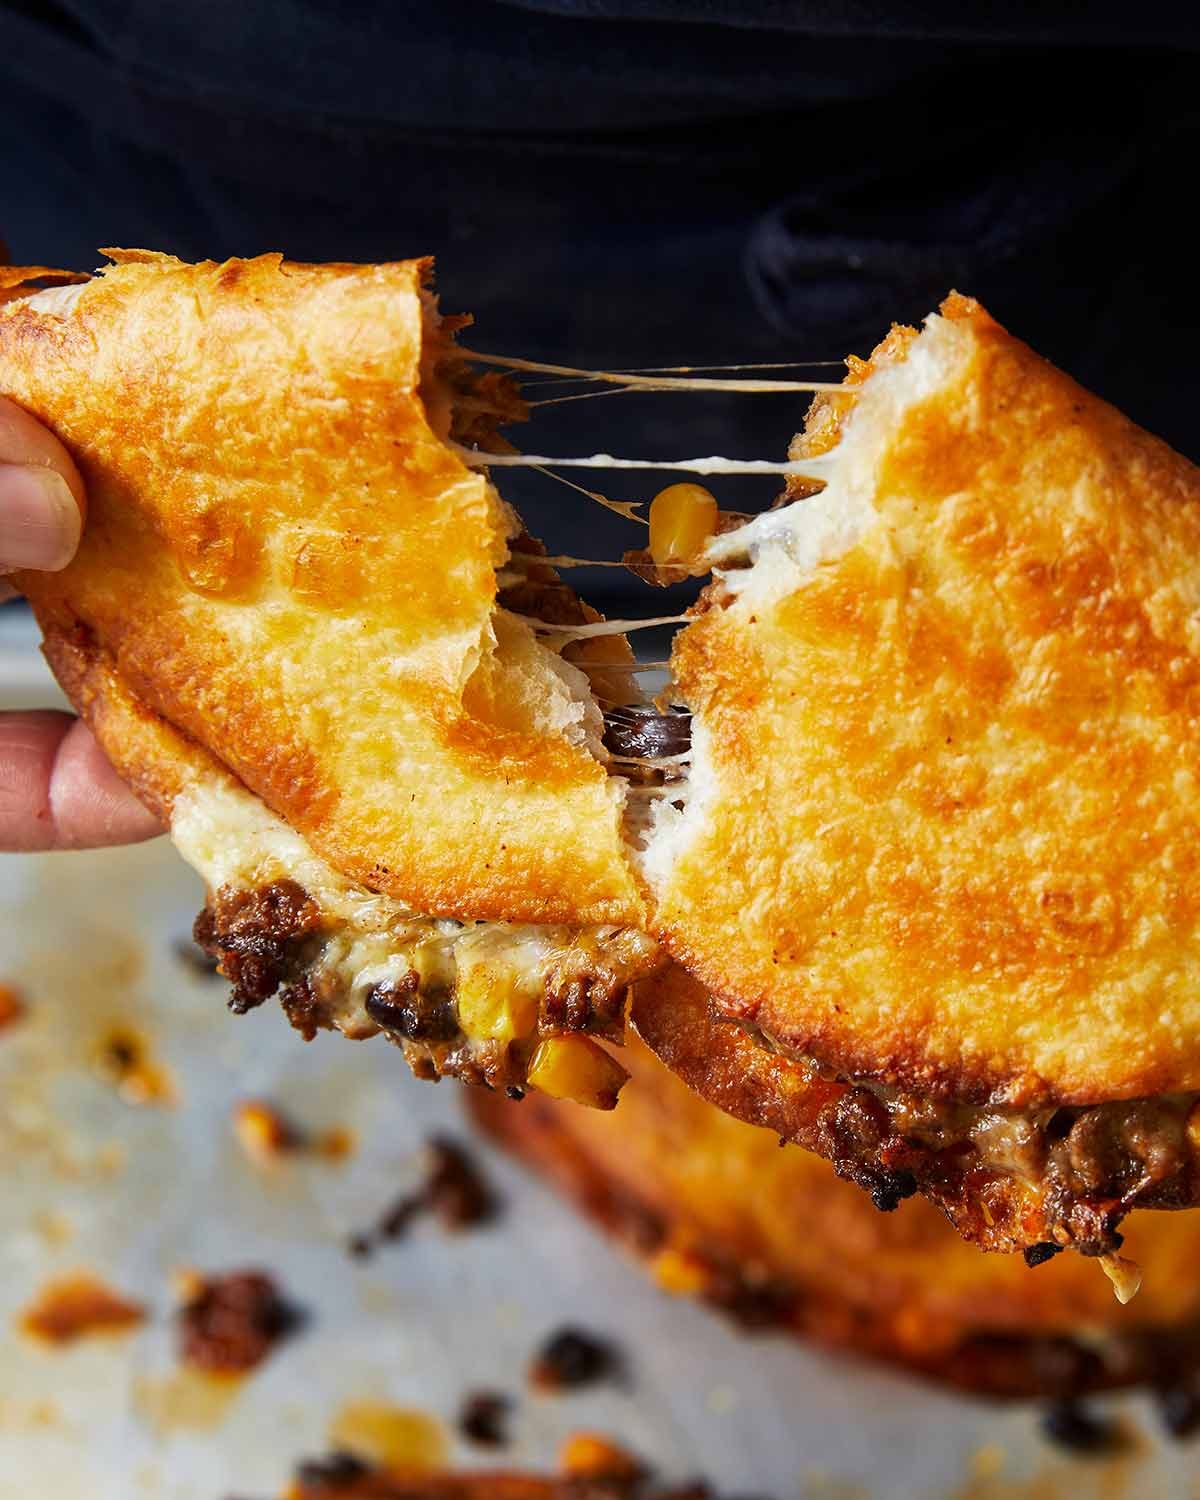
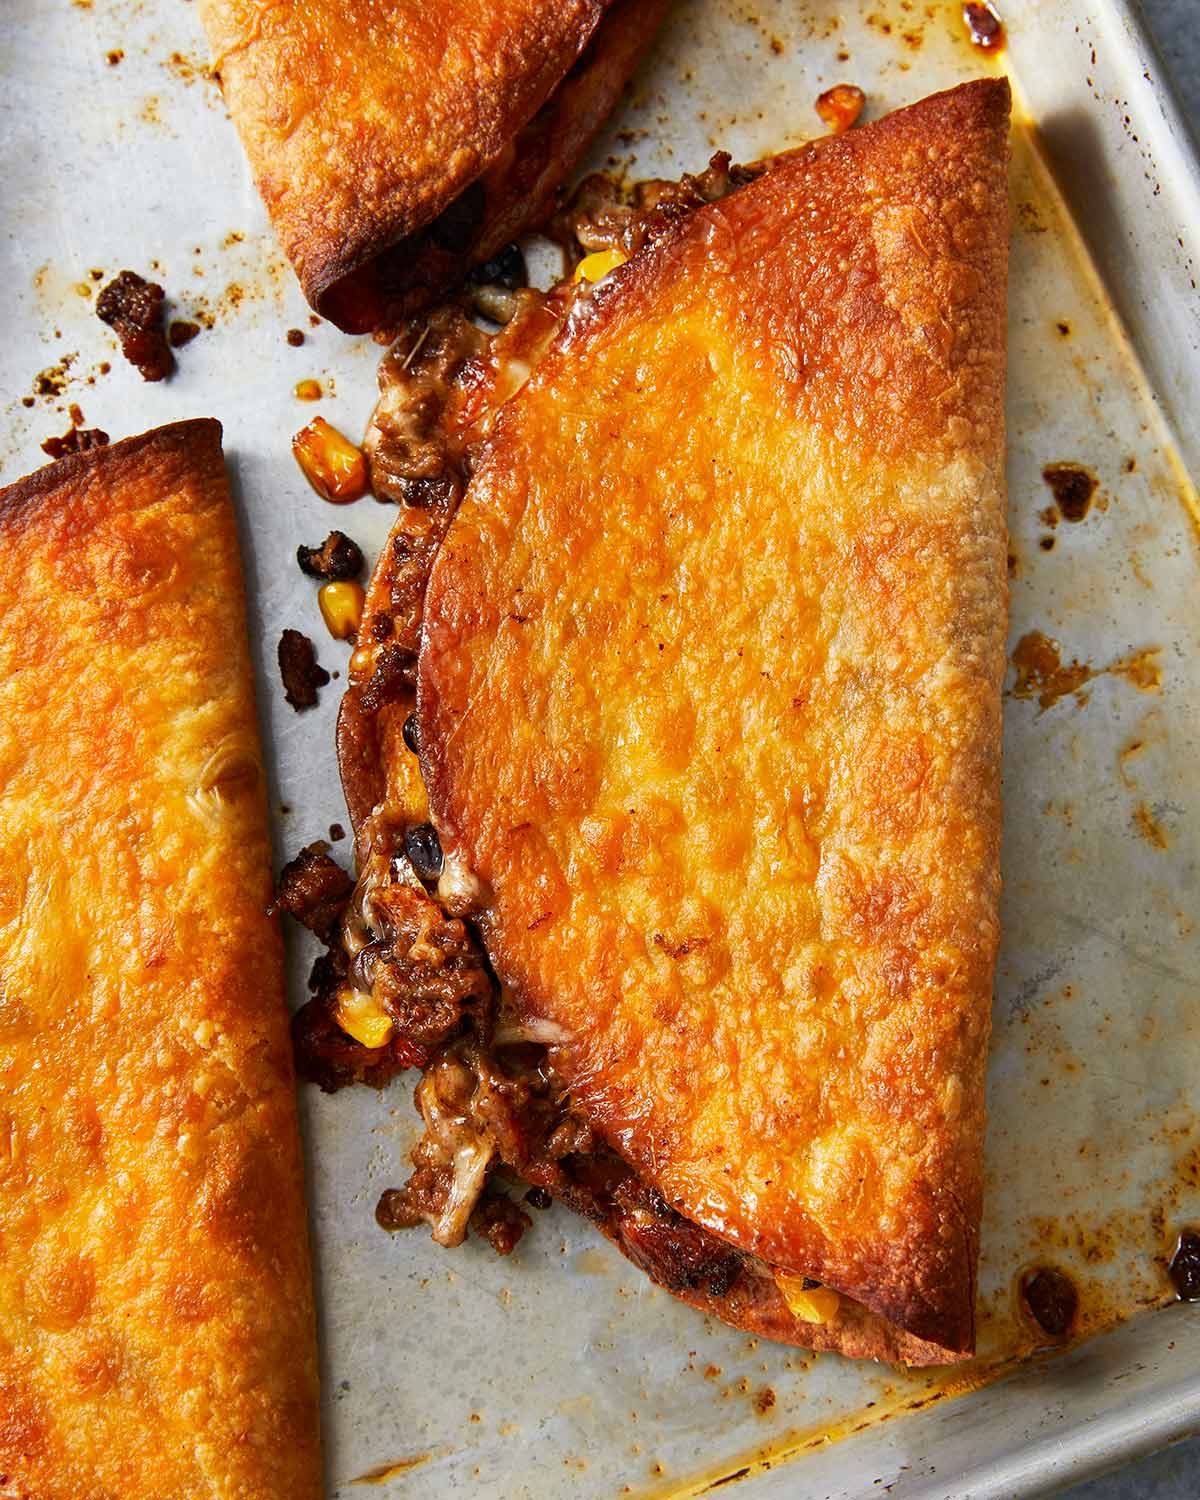
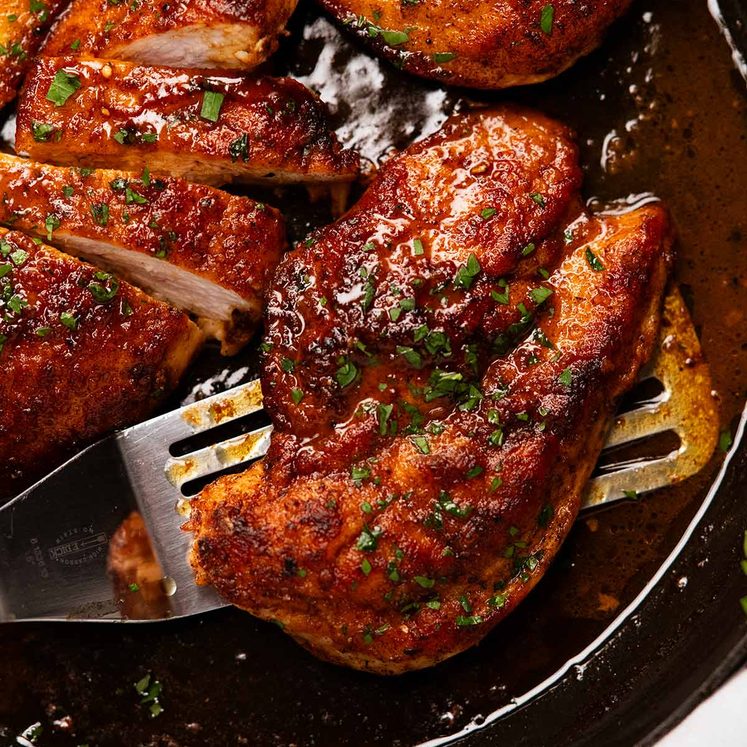
Solution: Use the oven. They are truly crispy and everything you want in a quesadilla, stuffed with a taco-flavoured meaty filling studded with corn, beans and oozy cheese. My favourite part is the edges where the melted cheese goes crispy!
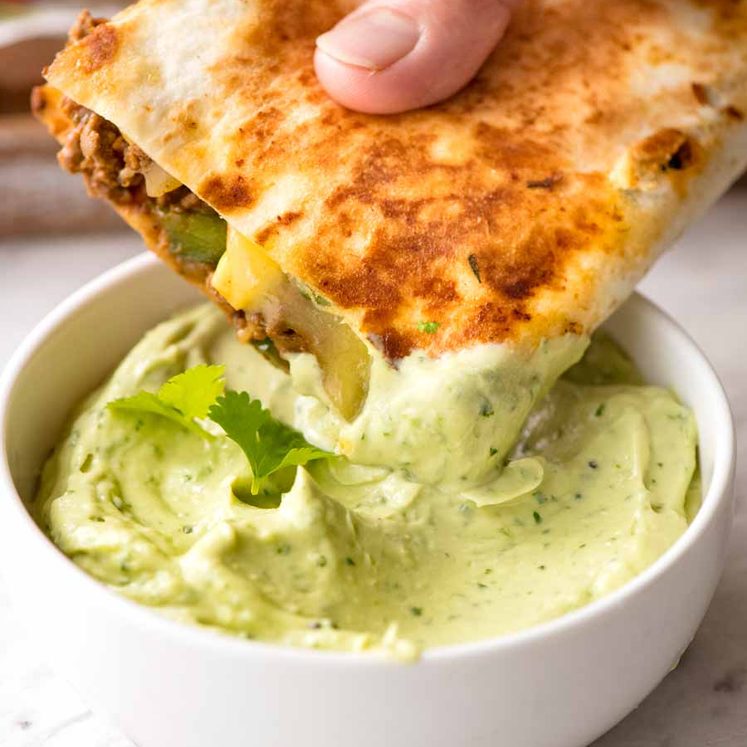
Just in case you doubt me – more proof of crispy:
That’s crispy!!
Ingredients for crispy oven baked quesadillas
You can use this recipe as a template for whatever filling you want. Though to ensure it goes crispy, you need to ensure the filling isn’t too watery. Mince works well because it can be juicy without being watery, and it’s great to cook up with a tasty Mexican seasoning. Also, the surface of the quesadillas stay nice and flat (compared to, say, irregular size chunks of chicken, like in this baked chicken quesadilla) which equals crispier surface.
the beef quesadilla filling
Here’s what goes into the taco flavoured beef filling. It’s the same seasoning I used for my old school beef tacos which I adore!
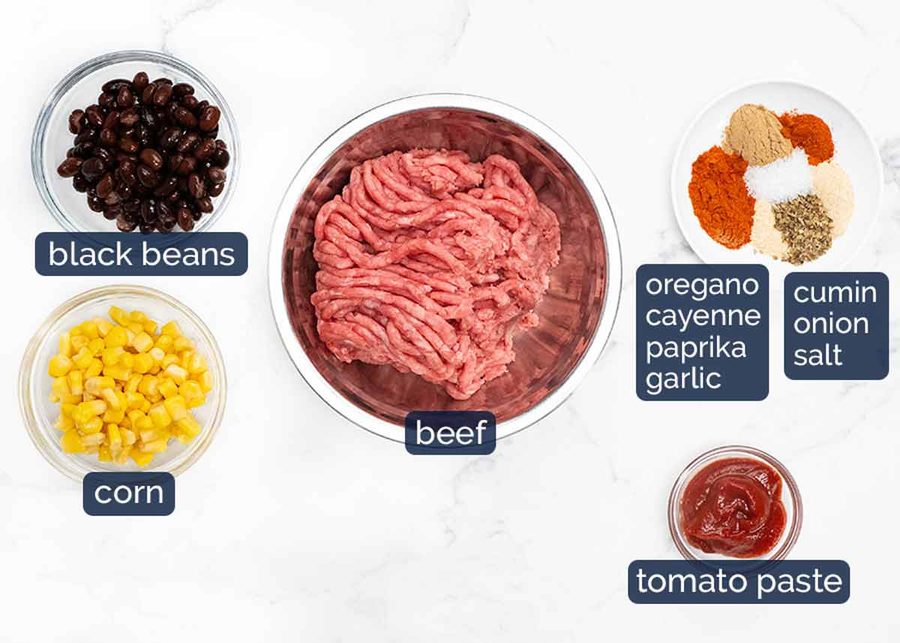
Beef mince (ground beef) – This recipe will work with any type of meat though you will find chicken and turkey is drier than beef, pork and lamb. Beef is my favourite – because I do have a very big soft spot for old school Beef Tacos (crispy taco shells and all!).
Taco seasoning – This is the blend I use for my Beef Taco Filling, made with simple pantry staples. If you’re tempted to use a store bought packet for convenience, go ahead. But when you have time, use this homemade mix and notice how it doesn’t have that artificial edge! I think you’ll enjoy it. 🙂
Tomato paste – This is to add a little flavour, bind the filling and juice it up a bit. Without, the beef is a little dry and crumbly, I find.
Corn and beans – This is to add some bulk and different texture into the filling, rather than just using meat. I use canned, though you can use frozen corn as well. (Use leftovers in a salad or freeze flattered in ziplock bags so you can snap off a bit more the next time you make this!).
The quesadillas
Here’s what you need to assemble the quesadillas.
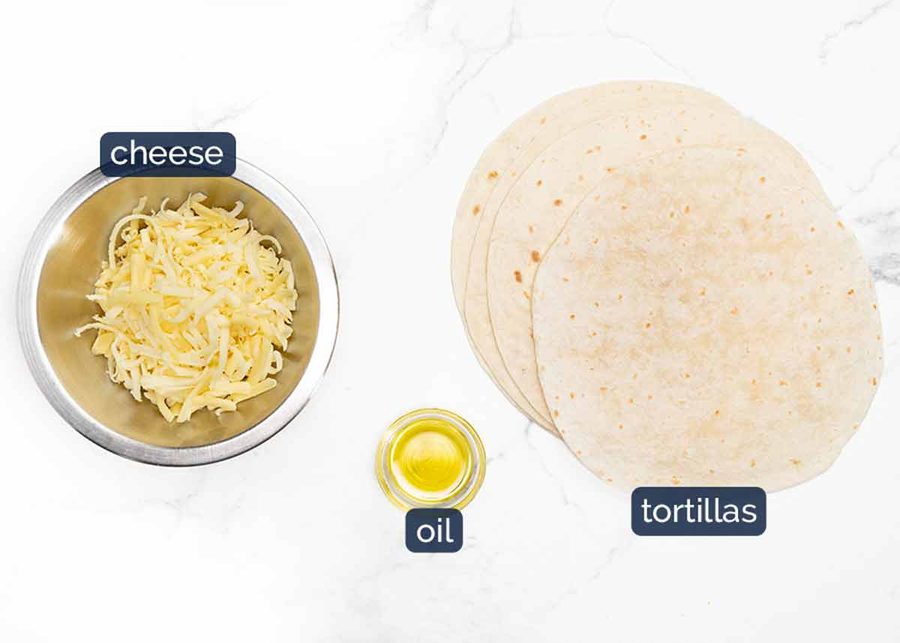
Flour tortillas – Use flour tortillas around 20cm/8″ wide. I’ve tried this with all sorts of brands from and they all baked up lovely and crispy with the exception of Old El Paso. These tortillas labelled as “super soft and flexible!” which works against us here! They do go quite crispy but they take an extra 3 to 5 minutes, but still not as crispy as all the other brands I tried (Mission, Coles and Woolworths brands, La Banderita).
Whatever brand you can get, I still think this is still worth making. Firstly, it’s quick. Secondly, even if not as ultra crispy as pictured, it should crisp up a decent amount and it will be a tasty trial-and-error to find the tortilla brand that works best.
Cheese – Use any melting cheese you want. I use Colby, cheddar, tasty cheese (an Australian cheddar-like cheese) and Monterey Jack, all of which are staples in my fridge. I wouldn’t choose to use mozzarella as it doesn’t have as much flavour but if that’s all I had, it wouldn’t stop me.
Olive oil – You need it, if you want crispy! Just 1 teaspoon to grease the tray and some for the quesadillas ( just 1/2 teaspoon each).
How to make crispy oven baked quesadillas
You will notice that there is less filling than traditional pan fried quesadillas because the more filling there is, the less it crisps up in the oven.
Also – don’t skimp on the oil drizzled on the tortillas. Oil = crisp!
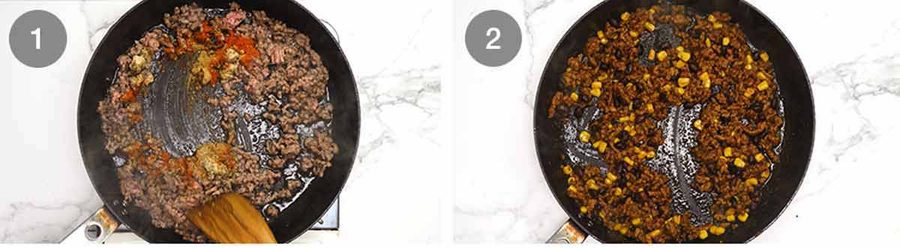
Beef filling – Cook the beef first, breaking it up as you. Then when the red (raw) colour is just about gone, add the Taco Seasoning and cook it for 1 minute which will bring out the flavour. Add the tomato paste and stir for another 1 minute to cook off the sour raw flavour. Stir in the corn, beans and water. The water will “juice up” the filling a bit without making it watery (which will compromise crispiness).
Cool the filling for 15 minutes. If it’s too hot, it will steam inside the quesadillas which makes the tortilla soggy = compromises crispiness (do you see a theme in today’s recipe? 😂).
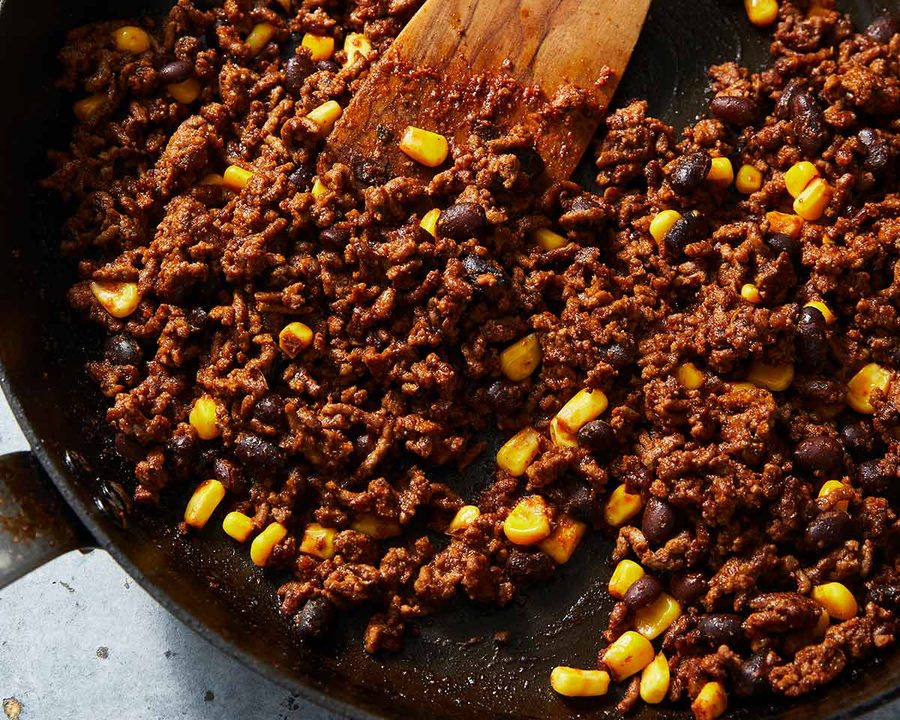
This is what we’re after – not dry and crumbly, but it’s not watery:
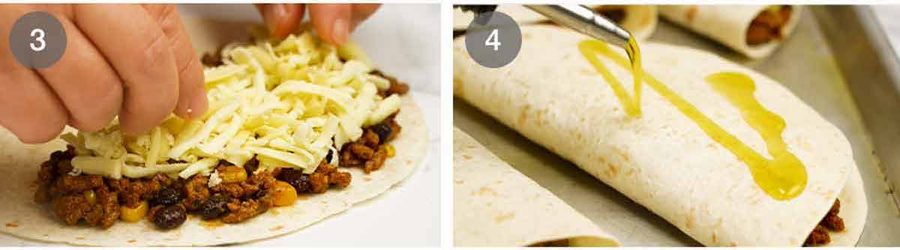
Assemble quesadillas – Spread the filling across half of each quesadilla and top with cheese. Spread evenly to make the quesadillas as flat as possible.
Prepare for baking – Grease a tray with olive oil (just 1 teaspoon is enough), then place the quesadillas on the tray. Drizzle the surface with oil then spread across the surface and sides (I use my hands). Oil is essential for oven baked crispiness. Don’t be tempted to skimp on the oil!
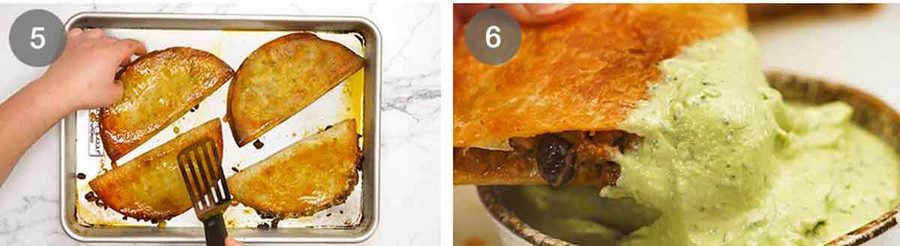
Double flip bake – Bake in a hot oven (220°C / 425°F (200°C fan-forced)) for 8 minutes. Flip, bake for 5 minutes, then flip again and bake for a further 2 minutes or until it is golden and crispy. The third flip is key! The tortilla gets stained with red oil from the beef which crisps up beautifully, and it’s extra tasty.
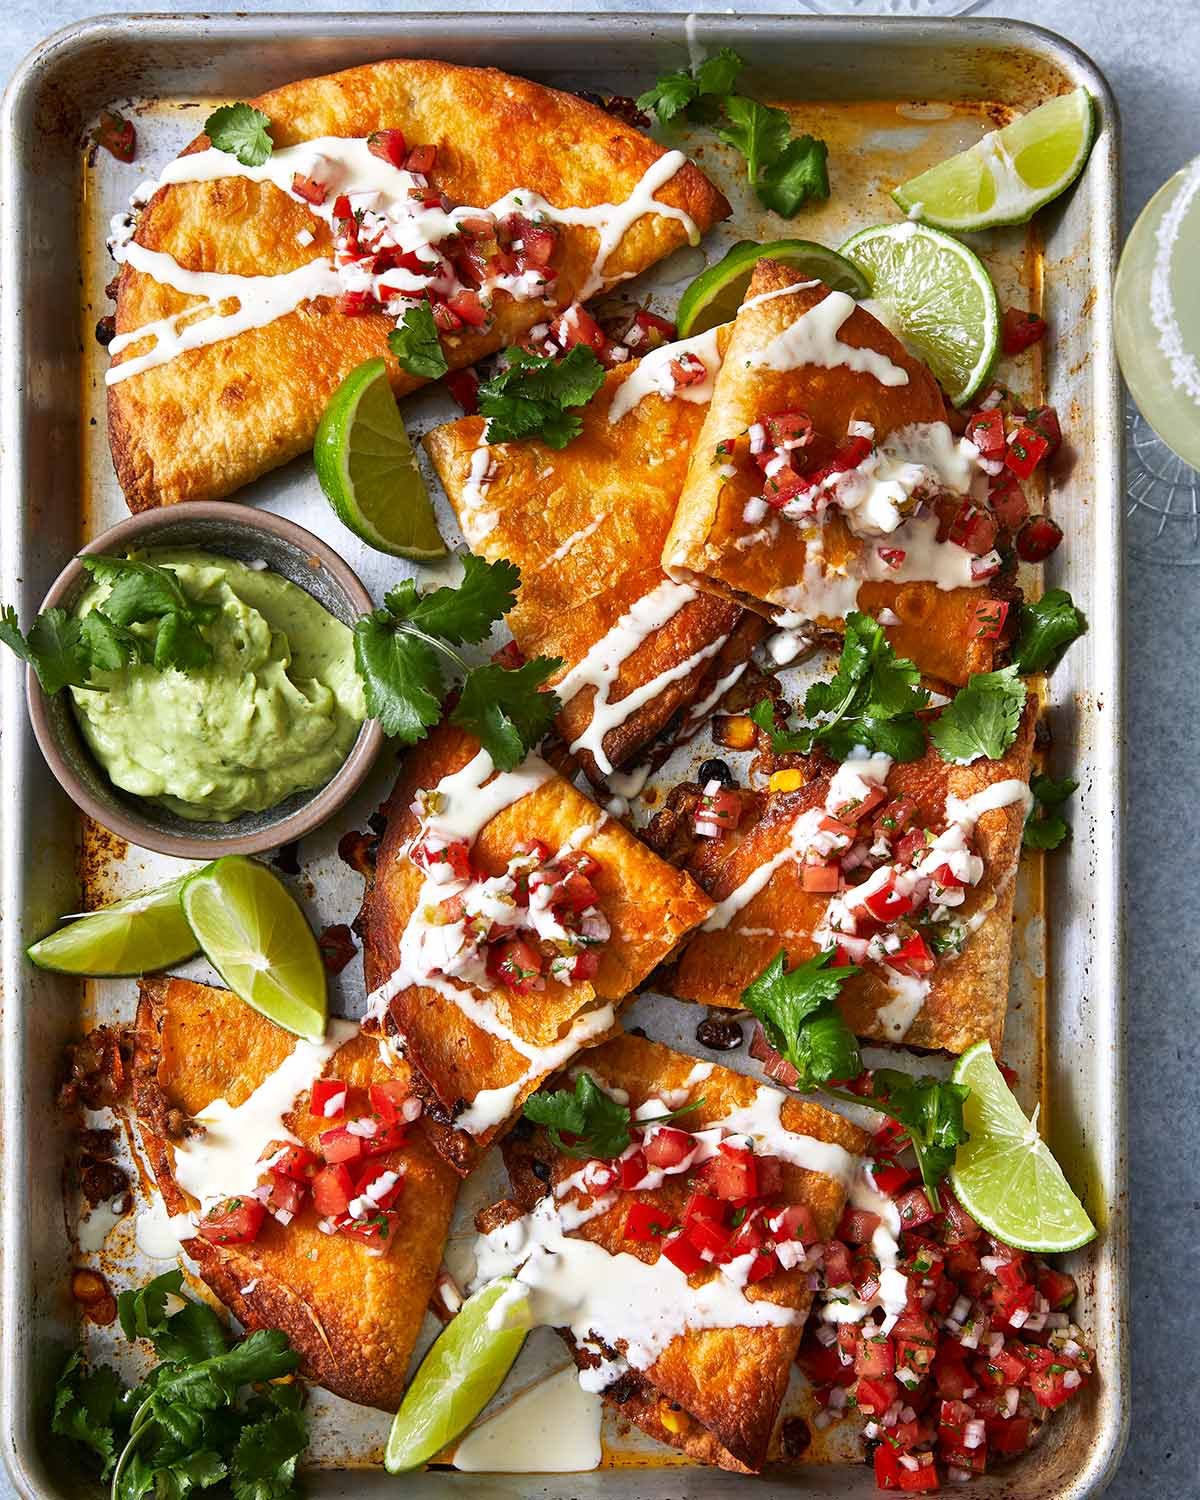
Serve immediately! Cut the quesadillas in half then serve with your dipping sauce / toppings of choice. (More on this below).
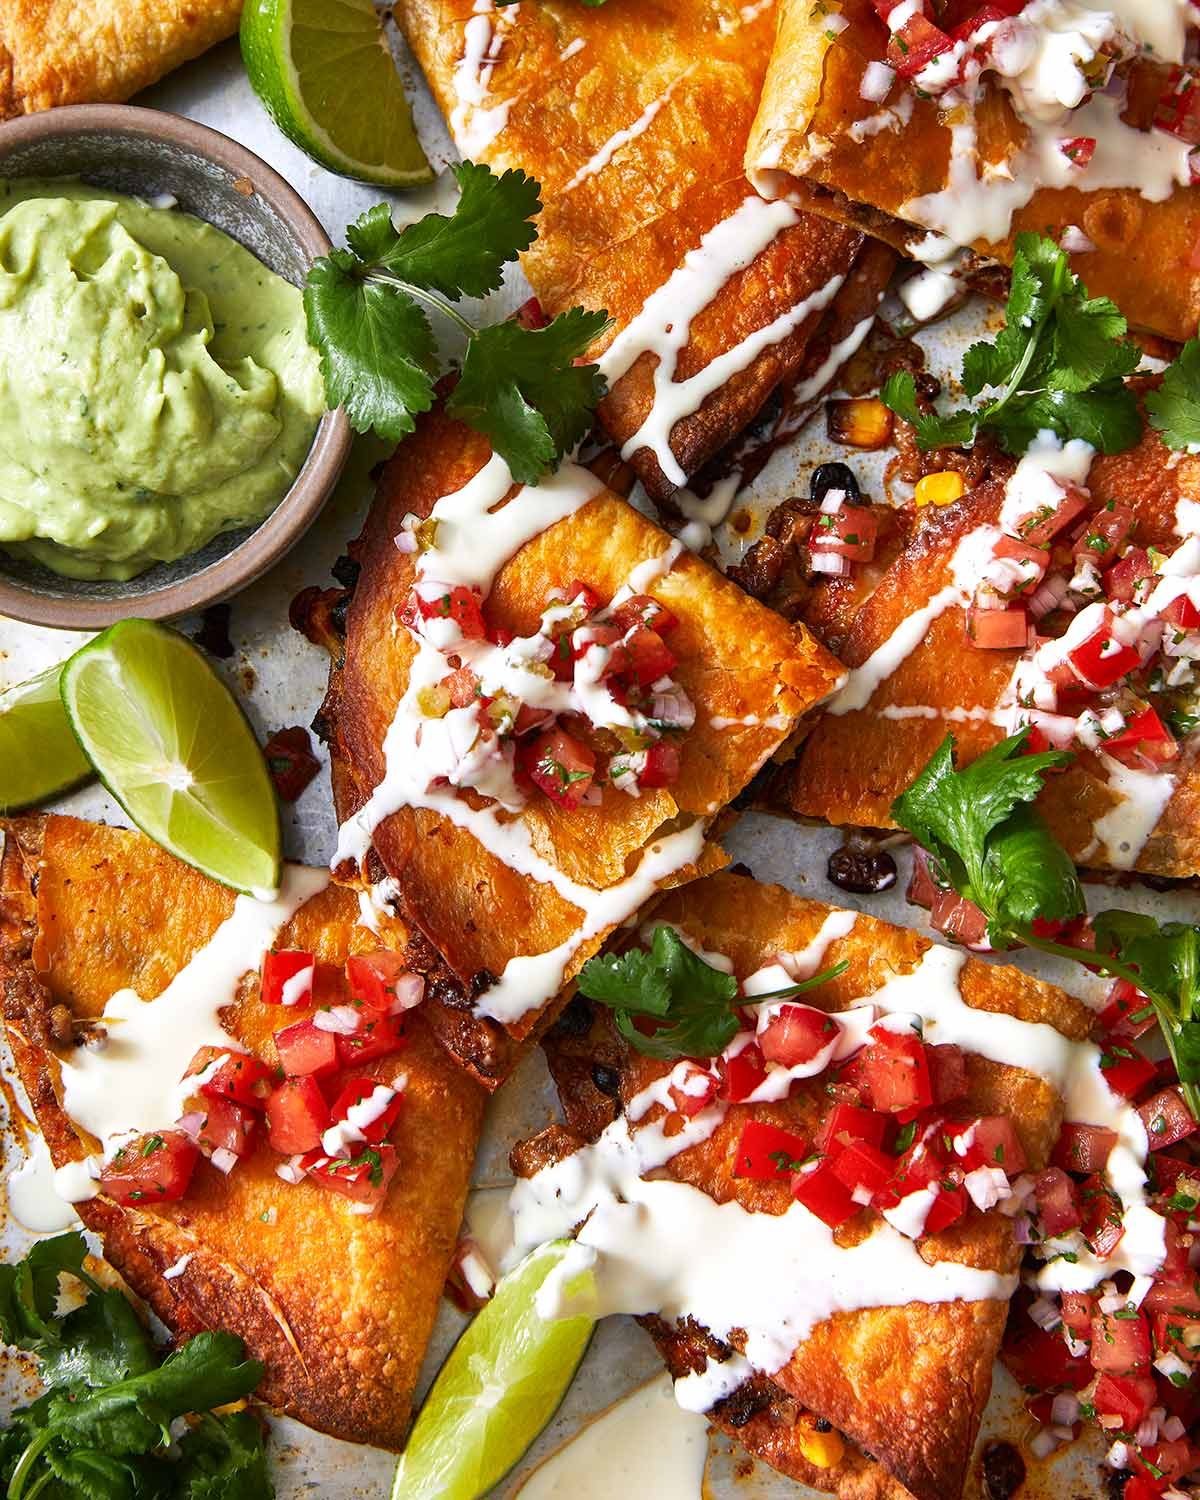
Dipping sauces and toppings for quesadillas
Confession: more often than not in a I need something to eat, stat! situation, I will munch on these plain or, at best, sour cream for dunking.
Though when energy-levels and time-scrambling permit, Avocado Sauce is my dipping sauce of choice. Firstly, it’s fast. Avocado, sour cream, lime, coriander -> blitz. This easily happens while the quesadillas are in the oven.
And secondly, I like that it’s creamier than guacamole so it’s easier to dunk.
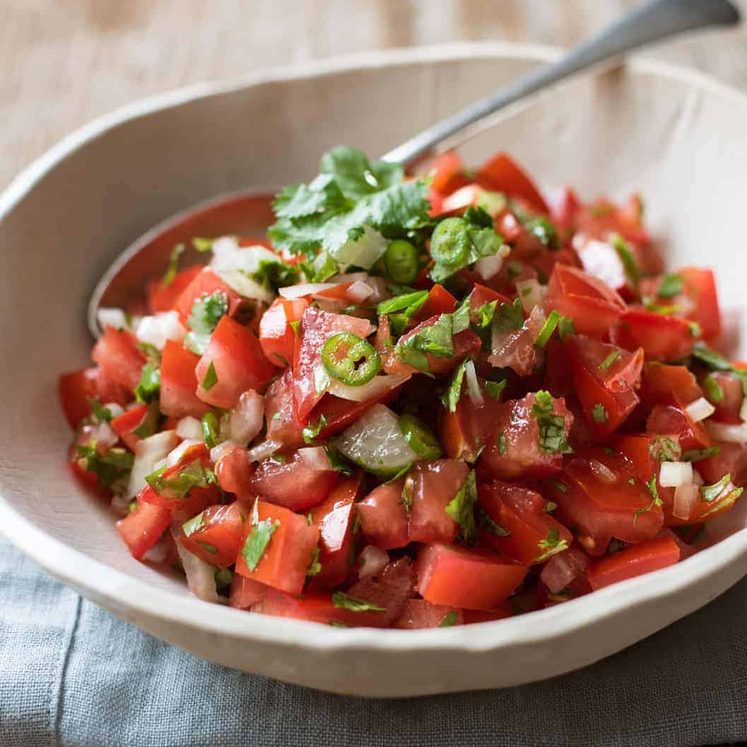
As for Pico de Gallo, it is an excellent finishing touch to add some freshness to quesadillas and to round out the meal with some fresh vegetables. But – I’ll be honest. It doesn’t usually make an appearance when I’m making quesadillas midweek, because I’m usually in a fridge clean-out or speedy meal scenario! – Nagi x

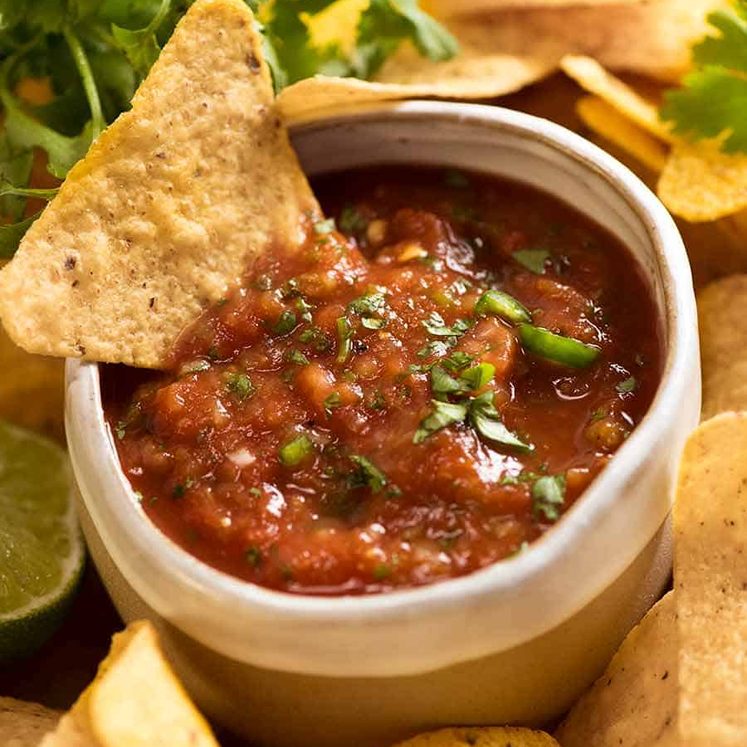
PS Just had a thought – a restaurant style smooth tomato salsa dip is also an excellent dipping option. And some more dip suggestions:

Watch how to make it
Hungry for more? Subscribe to my newsletter and follow along on Facebook, Pinterest and Instagram for all of the latest updates.

Crispy oven baked beef quesadillas
Ingredients
- 2 tsp olive oil
- 250g/ 8oz beef mince (ground beef) – or chicken, turkey, pork, lamb
- 1 tbsp tomato paste
- 1/3 cup corn kernels (canned, drain, or frozen)
- 1/3 cup black beans (caned, drained)
- 2 tbsp water
Quesadillas:
- 4 flour tortillas (20cm/8"), Mission crisps best, Old El Paso the least (Note 1)
- 3 tsp olive oil
- 1 1/4 tightly packed cups shredded cheese – cheddar, colby, tasty cheese, Monterey jack (not mozzarella)
Homemade taco seasoning:
- 1/2 tsp EACH ground garlic , onion, dried oregano
- 1 tsp EACH cumin , paprika powder
- 1/8 tsp cayenne pepper , optional
- 1/4 tsp cooking salt / kosher salt
Serving:
- Avocado sauce or Guacamole
- Pico de Gallo
- Sour cream
- Nothing (I happily eat it plain!)
Instructions
- Filling – Heat the oil in a non stick pan over high heat. Add the beef and cook, breaking it up as you go, until the red colour is mostly gone. Add the Taco Seasoning and cook for 1 minute. Add the tomato paste and cook for 30 seconds. Stir in the beans and corn, then add the water and stir. The filling should be juicy (not dry) but not watery (compromises crispiness!). Remove into a bowl and cool for at least 15 minutes.
- Preheat the oven to 220°C / 425°F (200°C fan-forced). Grease a metal tray with 1 teaspoon of olive oil (I use my hand).
- Assemble quesadillas – Spread the filling on one side of the quesadilla. Top with cheese, fold to cover. Place on tray, repeat with remaining quesadillas.
- Drizzle the top of each with 1/2 tsp olive oil then spread using your hands (top and sides, not underside). Press the quesadilla down to flatten the surface.
- Bake for 8 minutes. Flip the quesadillas, bake for 5 minutes, flip again then bake for a further 2 minutes or until crispy. (Sometimes I spritz with oil to give it a helping hand)
- Serve – Cut each into half and serve immediately with dipping sauce/toppings of choice.
Recipe Notes:
1. Use flour tortillas around 20cm/8″ wide. Best brand – Mission is my favourite. I’ve tried every brand I could find here in Australia and they all bake up crispy with the exception of Old El Paso, labelled as “super soft and flexible!” which works against us here. They do go quite crispy but they take an extra 2 to 3 minutes with an extra spritz of oil, but still not as crispy as all the other brands I tried (Mission, Coles and Woolworths brands, La Banderita). Whatever brand you can get, this is still worth making because it’s quick and even if not as ultra crispy as pictured, it should crisp up a decent amount and it will be a tasty trial-and-error to find the tortilla brand that works best! Corn tortillas don’t work as well, they tend to split when baked. 2. Make ahead – Cook filling and shred cheese, then refrigerate separate, assemble just prior to baking. Assembling quesadillas ahead not recommended as the filling will soak the tortillas = compromise crispiness. Cooked quesadillas will keep for 3 days, re-crisp in the oven. Nutrition per quesadilla excluding dipping sauces / toppings.
Nutrition Information:
Life of Dozer
This week we had Dozer’s first public appearance since he got sick earlier this year – so exciting!

The event was a reader dinner at one of my favourite local restaurants, Boronia Kitchen. The evening kicked off with canapés and cocktails outdoors even though it is the middle of winter just so people had a chance to meet Dozer before we headed inside for dinner.


Unfortunately when we headed inside for dinner, Dozer was sent home. To be honest, 30 minutes of meet-and-greet is more than enough excitement for him for one day. He was ready for bed!
And, even though these photos don’t belong in the Life of Dozer section, a couple of photos of the dinner. What a night! A huge thanks to the incredible team at Boronia Kitchen – especially the restaurateur Chef Simon Sandall – for going above and beyond to put on such a special and spectacular evening. I had so much fun, and I especially loved that the event was small enough so I had time to go around and spend time at every table.


super easy, super delicious & ‘crispy’ just as in video – a big hit here. Unfortunately I didn’t have corn or beans but I doubled the recipe and fried a finely chopped onion to add a little bulk before adding the beef – enough to generously fill 7 of the Mission tortillas. Thank you Nagi for figuring out such a brilliant short cut to cooking these.
So glad they crisped up nicely!! N xx
Added a heaped teaspoon of Mexican chilli powder, it made all the difference!
They were fantastic.
Mmmm YES to a hit of heat, always! N x
I have not made this yet but I
will. Love your cook book I
purchased. The Dozer looks great. I make a lot of Mexican Food.
I’m so glad you’re enjoying my cookbook Barbara! N x
Can these be stored in the fridge or meal prepped
Mish! Thanks for the question, I wouldn’t recommend that as the filling will soak the tortillas which will make it less likely to crisp up. But you can make the filling and shred the cheese ahead then assembling is a breeze! N x
These were great Nagi! Easily adaptable too. Made just cheese ones for my daughter and tried her with cheese and corn, just mince and cheese for my son and we enjoyed your version. So filling for not a huge amount of meat too so pretty economical. We added a few more beans because like them. Had salsa, sour cream and an avocado mix to dip with.
I’m so glad to hear that Erin! And yes, I do like how this uses less meat per head than the typical western meals. I also bulked out later batches with extra beans leftover from the initial can I opened 🙂 N x
Has anyone made ahead the ingredients before putting them in the quesadillas to bake and they still turn out ok?
Good morning Phelicia! I tried but they didn’t bake up as crispy. Just keep the cooked filling separate until you’re ready to cook then assemble just prior to baking. 🙂 N x
Gave these a go tonight. Love the technique and will apply it other fillings!
That’s great to hear Becky! Love to hear what else you put in them 🙂 I’ll share some more! N x
Nagi we just binge watched season 3 of Barbecue Showdown on Netflix and it was sooooo good. I thought of you a lot throughout and just wanted to recommend you watch it. Xx
Katie, how did you know I’ve been trying to find something to watch??? I had a dismal sofa slothing weekend TV surfing and finding nothing! N x
Another family hit in Friday evening! Even without close essentials – lime juice and coriander, it tastes as authentic as one can get here 😛
Thanks a lot Nagi! Wish Dozer and you happy, healthy life so that you can keep going on 😉
So glad you enjoyed it Nari! Excellent Friday night food 🙂 N x
Recently made the beef, rice, moussaka. Big hit with a group of African soccer players! So easy and tasty to make!
Oooh! I love hearing that Maureen – excellent fuel food! 🙂 N x
These are delicious. Making them for the second time tonight. Added some diced green pepper and sautéed onion the second time. We cut them in half to fix in the sheet pan.
Ooooh YUM!!! Peppers always excellent in quesadillas 🙂 N x
Absolutely delicious and so easy…
great breakfast while watching Euro 2024!
I can’t do the early starts or late nights!! Such a nana 😂
Nagi your recipe doesn’t have all the ingredients for the homemade taco spices.
Also mine didn’t look like yours!
Hi Helen, I just checked and the recipe has all the ingredients listed! Try refreshing your screen?? N x
Helen I think it might be that some of the spices listed are in italics. Tripped me up at first glance too 🙂
Has any body tried with clarified butter instead of olive oil?
No but in theory it will work and add amazing buttery flavour 🙂 Any pure fat / oil is fine (but not butter because it has water in it so it won’t crispy up as well!) N x
Hi Nagi. Have you tried these with corn tortillas? How do they turn out? They look delicious but I’m gluten intolerant and can’t eat the flour tortillas.
Hi Monie! The method works with corn tortillas BUT they sometimes split in the oven (not always, sometimes, and extent of splitting varies). Discovered this over many years determined to try healthier baked methods of things like taquitos! I do think it’s still worth making though. Making rather than folding try sandwiching the filling between two taco size corn tortillas? That might reduce splitting risk? N x
I made these with corn tortillas today, they split in half when I folded them over but still cooked up nicely!
I’m glad you enjoyed them still! Yes, corn tortillas have a tendency to split in the oven 🙁 N x
Nagi, you are so funny. I watched the video (always a favorite feature of your postings) and laughed again and again. Those quesadillas are the crispiest I’ve EVER HEARD! Can’t wait to try this recipe soon.
Any suggestions for our gluten free friends?
You should’ve seen the clips where I ATE them on camera to prove the crispiness!!! But I was such a grot I had to cut it from the video, too off-putting! 😂
Dozer looks not so excited about the festivities. Maybe someone should have made him a high faluting doggy bag to eat before bedtime.
Congratulations on the gathering.
Had these for dinner tonight!! Quick and easy and so yummy!!
Had all the ingredients for this recipe (quesadillas) on hand so whipped up an order….yum yum
Can I use an air fryer for this recipe? If so what temp should I use?
Again you have inspired me to cook something today. Quesadillas coming up. As usual, looks do-able and delicious. I’m on the CSIRO Total Well Being Diet and your recipes seem to work – sometimes with a little bit of tweaking. Thank You Nagi and woof to Dozer.