
A Baked Sweet and Sour Chicken recipe that shows you how to make the Chinese takeout favourite Sweet and Sour Chicken in the oven so the chicken is CRISPY but not dried out inside. Coated generously in a sticky sauce with a perfect sweet-sour balance!
I don’t like to shout out from the rooftops “this is the BEST baked Sweet & Sour Chicken!” because who’s to say that theirs is the best? But this is a darn good recipe. And it’s MY favourite way of making Sweet & Sour Chicken in the oven. Here’s why:
Not sickeningly sweet. It’s made with 1/2 cup of sugar which is still a lot compared to my usual midweek meals. But it is less than the 3/4 to 1 cup that you’ll see in many recipes.
Not eye-squintingly sour. I don’t know how to properly describe my reaction when I accidentally eat something far too sour! Suffice to say this is tart, not overly sour. 🙂
The Sauce tastes like restaurant sauce. Many Sweet & Sour Sauce recipes taste like they’re missing “something”. Usually that “something” is either Worcestershire Sauce and/or oyster sauce (sometimes also soy sauce). You can omit one of these but don’t leave out all of them, the sauce will taste very “flat”.
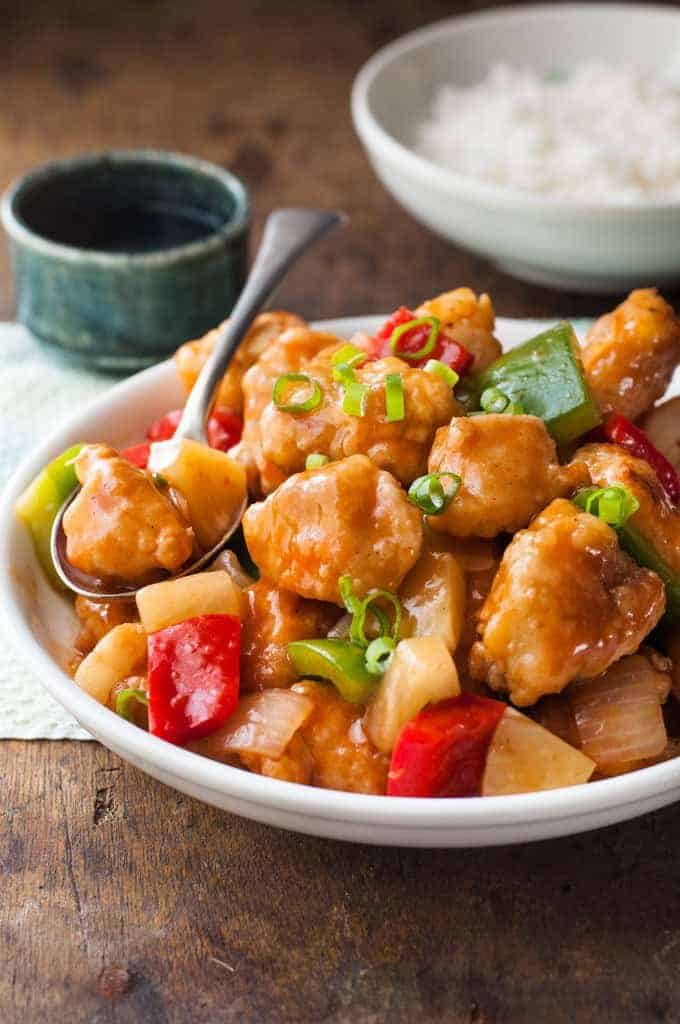
The chicken really is crispy! The fact is, you will never be able to make chicken in the oven that is truly as crispy as deep fried (except wings – see my recipe for Truly Crispy Oven Baked Wings!). But this is pretty darn close.
The chicken is NOT DRY. I have seen recipes that call for the chicken to be baked for 45 minutes to 1 hour which I find dries out the chicken. I’m really fussy about dry chicken! Mine is baked for 20 minutes – tops. That’s all you need.
Pretty hard to pick what I love more about this – the Sweet & Sour Sauce, or the crispy chicken! The chicken itself is so yum, it’s hard to resist nicking the pieces straight off the baking tray before they even make it to the sauce.
Try to resist! I promise it’s worth the wait. 🙂 – Nagi x
PS Oh, the other little thing I think makes quite a difference is using some of the pineapple juice in the can for the sauce. It adds that little touch of fruitiness that I really think makes the sauce similar to Chinese restaurants!
Hungry for more? Subscribe to my newsletter and follow along on Facebook, Pinterest and Instagram for all of the latest updates.
Baked Sweet and Sour Chicken
Ingredients
Chicken
- 1 lb / 500 g chicken breast , cut into bite size cubes
- 1/2 tsp salt
- 1 large egg or 2 small eggs , lightly beaten (enough to coat chicken)
- 1 cup cornstarch / cornflour , placed in a large ziplock bag
- 3 to 5 tbsp oil (vegetable, canola)
- Oil spray
Stir Fry
- 1/2 tbsp oil
- 1 garlic clove
- 1 small onion , cut into large dice
- 1/2 red bell pepper , cut into bite size pieces
- 1/2 green bell pepper , cut into bite size pieces
- 1 can (8oz/250g) canned pineapple pieces in natural juice. Separate pineapple from juice.
Sauce
- 1/2 cup sugar (white or brown – I use either)
- 1/3 cup apple cider vinegar
- 2 – 3 tbsp pineapple juice (from the canned pineapple pieces)
- 3 tbsp ketchup (Australia: tomato sauce)
- 1 tsp Worcestershire sauce (Note 1)
- 1 tsp soy sauce (Note 1)
- 1 tsp Oyster Sauce (Note 1)
- 1/4 tsp salt
Thickener
- 1 tbsp cornflour / corn starch + 4 tbsp water , mixed together
Instructions
- Preheat oven to 200C/390F.
- Place chicken in a bowl, sprinkle with salt then add the egg. Mix to coat all chicken with egg, then drain out excess egg. (Note 2)
- Working a handful at a time, shake excess egg mixture off chicken then place chicken in ziplock bag. When all the chicken is in the bag, seal (trap as much air in it as you can to make a “balloon”) and shake well to coat chicken in cornflour. Discard excess cornflour.
- Heat oil in a large skillet on high. Add chicken (in 2 batches if your skillet is not big enough) and cook briefly for 2 minutes, turning, just to make the outside light golden and a bit crispy. The chicken should be raw inside.
- Transfer to baking tray, spray with oil and bake for 15 to 20 minutes until it becomes a little more golden brown and is crispy.
Sauce
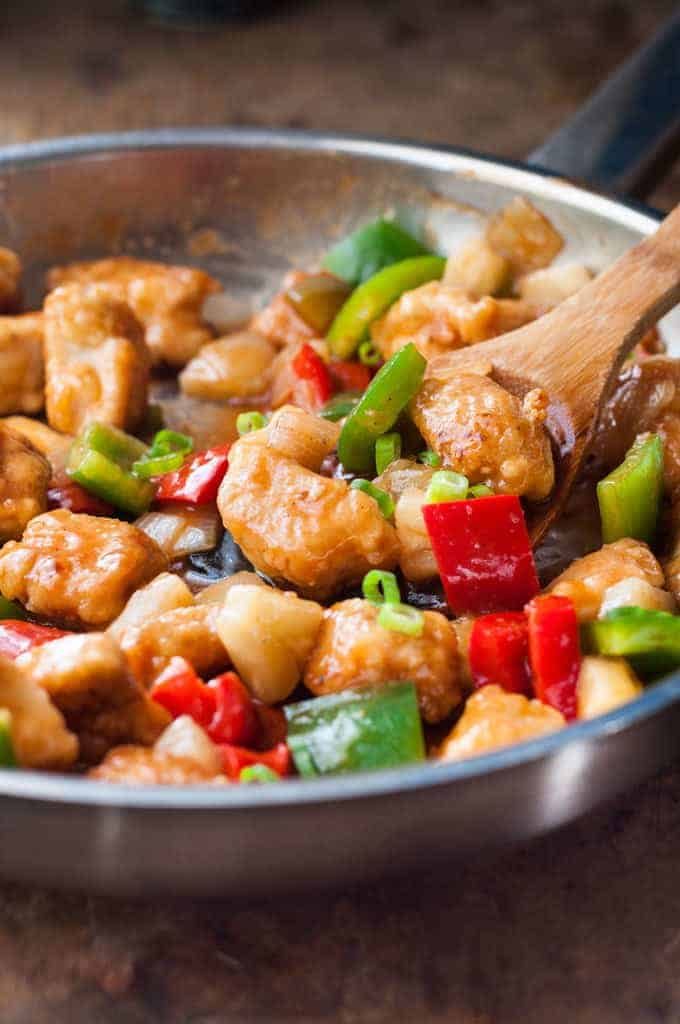
- Meanwhile, discard oil in the skillet and wipe briefly with paper towels. Reduce heat to medium high and heat 1/2 tbsp oil. Add garlic and sauté for 20 seconds, then add onion and cook for 2 minutes.
- Add bell peppers and cook for 1 minute.
- Add Sauce ingredients. Stir until sugar has dissolved and the sauce begins to bubble.
- Add Thickener. Bring to simmer, stirring constantly. Then cook until it thickens to a syrup consistency – about 3 minutes.
- Stir through pineapple pieces (just to warm) and remove from stove.
- When the chicken is done, add it into the skillet and toss to coat in the sauce.
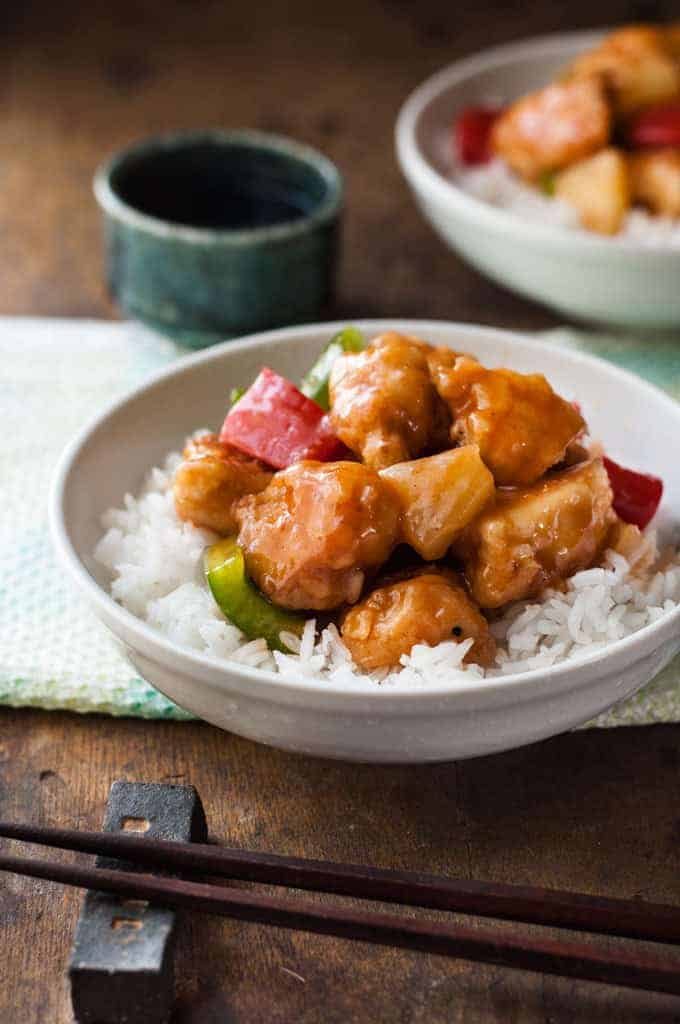
- Serve immediately with rice – or for a low carb, low cal option, try Cauliflower Rice! Garnish with scallions if desired.
Recipe Notes:
Nutrition Information:
LOVE, LOVE, LOVE THIS RECIPE!
This is better than the Take Away. Just need to find a good chicken chow mien recipe now!
Thank you so much 🙂
LOVE HEARING THAT!! PS Have you seen my Chicken Chow Mien? 🙂 N x
No. I entered it in the find a recipe search bar at the top in hopes there would be one there?
I would be so grateful if you could you send me a link please?
Here you go! https://salesdock.info/chicken-chow-mein/%3C/a%3E%3C/p%3E
I will vouch for Nagi’s Chow Mien, it’s the best. I’ve made it with prawns, with chicken and also a combo of both. Absolutely delicious and the Charlie sauce goes perfectly with whatever stir-fry you want to quickly whip up.
I used to search Taste website for recipes, now I always search Nagi’s recipes first.
And my kids love Nagi’s pantry chicken recipe too, which is fab for me because it’s so easy.
Thanks Nagi.
I keep meaning to make a video and update the photos for the Pantry Chicken!!! Is the name silly?? Should I change it?? 🙂
I just made this as we speak for my family, it was an instant hit! I didn’t really know what to expect but it was the nicest sweet and sour chicken I have ever had, thank you so much for sharing 🙂
That’s wonderful to hear Emma! Thanks for letting me know! N x ❤️
just wanted to say hi and thanks for your site – made 3 of your recipes this weekend and they are so clearly written and well described.
this is delicious, was sceptical of the oven stage to crisp up but it worked a treat, and the sauce is wonderful, so many flavours going on and unlike takeaway its both sweet & SOUR, delicious.
You’re so welcome Paul! Glad you enjoyed this! N x
Hi Nagi
Going to make this tonight. I love your recipes, healthier than the take away and saving a bomb!
Do you have a book out I can buy please ?
I’m so flattered you asked June! I don’t – yet 🙂 Hope you love this June! N xx
I love the chicken with rice in the oven healthy and delicious I make it 👍👍
That’s terrific to hear Denissa! Thank you for taking the time to leave a review – N x
I love alll the recipe always something different
This is my second time making this recipe. But this time, I used pork. It turned out great. I did much better this time, getting the excess egg off the meat before coating in the corn starch. Made such a difference and helped negate any lumpy corn starch.
Such a great recipe!! The flavour is really perfect. And I love that it is baked, not fried.
That’s fantastic to hear Sandra! Thanks for leaving a review! N x ❤️
Just made this tonight. It was super easy and delicious like all your recipes! Thanks Nagi.
I’m glad to hear you enjoyed the recipe! Thanks for the great review Judy! N xx
I left the egg liquid in entirely which made the chicken cooked in the oven less crispy but very tender. With inflation food is so expensive I just didn’t want to waste any…which probably means next time I’ll make a bigger batch of chicken so the balance is maintained 😛
I also used a tomato instead of peppers, and that’s one of the brilliant things about your recipes is that much can be substituted for what is available and still maintain the overall deliciousness.
Much love from Montréal, Québec
I didn’t want to waste the egg either, so I put some oil in a pan and let the excess egg drip into it. I followed the recipe, but had a bonus of a bit of fried egg with my rice!
And the recipe was lush OBVIOUSLY. The garlic bit scared the bejesus out of me because I thought it was going to burn so I maybe rushed the veg steps until the sauce was in and I could relax, but it tasted great.
Forgot the spring onions as usual. They were still forlornly on the chopping board when I took the empty plates back into the kitchen. Doh!
Ba! Still LOVELY without the spring onions!!! 😁
SUPER DELICIOUS AND SIMPLE!!!! THANK YOU!!!!!!!!
Whoot! So fantastic to hear that Helen, thank you for letting me know! N xx
Hi Nagi! Stumbled upon your website last week and have tried 3 so far. Easy to follow and love your tips. Especially as it’s Australian so I can get the ingredients. One thing I was unsure about is you do not say whether to chop the garlic or not?
Seriously good! I really enjoyed the flavour of the sauce and was surprised how well the chicken turned out. I would not have thought to bake the chicken. Figured frying was the only way to get crispy chicken pieces.(and I don’t like frying) I used chicken thighs as that is what I had on hand.
I can’t wait to share this recipe with friends .
Whoot whoot! So glad to hear that Sandra! N xx
This recipe deserves 5 * – its a winner and a keeper. My family loved this dish – it was the best home made take out ever!
Really enjoying many of your recipes – thank you.
I’m so happy to hear you enjoyed it Libby! Thanks so much for letting me know. Happy weekend! – N xx
Hi Nagi, I finally tried this recipe last night and the sauce was fabulous! Need some advice: the cornflour on the chicken looked rather lumpy, is that normal? Also, I don’t have oil spray on hand, so didn’t manage to ‘oil’ the chicken before placing it in the oven, is that why the chicken didn’t turn out nice and brown? Do you have any suggestions to replace oil spray? Lastly, the oven temperature, would it be for fan-assisted ovens? Thank you! Love your recipes!
Hi Jenny! I’m so glad you enjoyed the sauce! Was the cornflour lumpy?? Mine doesn’t go lumpy, I never have to even sift it. For oil spray, unfortunately I can’t think of a substitute and yes that would definitely be a factor in the colour the chicken comes out. All I can think is to turn the chicken while baking so most of the sides are in contact with the baking tray which is what will brown it. 🙂 And yes the oven temp is for fan ovens but for this recipe, it doesn’t make much difference, so use the same temp for fan or oven 🙂 Hope that helps! N x
Hi Nagi, thanks for the reply! I might try the stir-fry version instead! Haha. Thanks again!
Hi there! I’m totally new in cooking world, and I found your website helps me a lot. Just wondering when putting the chicken to the oven, what is the temperature that you use to bake? Sorry if my question sounds stupid :s I just want to make sure 😀 Thank you !
Hi Sarah! No problems at all, don’t apologise! In step 1 it says to “Preheat oven to 200C/390F” so that’s the temperature the oven should be when you pop the chicken in 🙂
ah right! Blimey I didn’t realise that. Thank you so much !
Throughout the years I’ve tried countless recipes for sweet and sour sauce hoping to find one that tastes like the restaurant-style sauce served in our area. Well, that was before finding your website. Oh my goodness, Nagi…….your recipe is THE elusive one I’ve been seeking! Woo-hoo. My search is finally over. Thank-you so much for sharing.
I’m so happy to hear that you enjoyed it Marie! Thank you for letting me know! N xx
Omg!! This sweet and sour recipe is amazing!! Love it! THe best home made sweet and sour chicken. Thank you so much for this recipe. I always check your website for recipes ☺☺
I’m so glad Mary!! Quite different to that thick overly sweet stuff some places serve up, isn’t it? It’s the real deal! 🙂 N x
Sweet & Sour Chicken was our dinner tonight, another winner, that’s three for three…
Thank you 🙂
Yay! So glad you enjoyed it Carolyn, thanks for letting me know! N x
Your recipe is amazing, better than take out. Going to use with pork and teach my older son. Loved, loved, it.
Thank you Natasha! I’m so thrilled that you enjoyed it!! N x
I would like to take this to a group. Can i fry the chicken and delay the cookibg in the oven unit i get there/
Hi Donna! I would recommend cooking the chicken all the way through in the oven, then reheat later 🙂
Nagi, your recipes NEVER FAIL,
When our 19 yo daughter discovered what we were eating tonight, she had to Instagram it to her followers ! You see, Sweet n Sour has always been her favourite meal of ALL TIME. and your recipe did not disappoint. It was sensational, even when I forgot the Apple Cider Vinegar, but I saw another follower asked if plain white vinegar was ok. So I went with it, and it was PERFECT. sometimes the cook loses her appetite after all the prep, etc – but not tonight. I kept saying this is amazing – I’m amazing – Nagi is amazing !
I’m eyeing off some leftovers, but 16 yo son arrives home soon from flipping burgers @ Maccas. I know what he would prefer any day. YAY YOU!
AWWWW Vanessa! THANK YOU SO MUCH! I am SO GLAD you enjoyed this!!! PS Your daughter ROCKS!!! PPS Flipping burgers is good learning ground for him! N x