
The RecipeTin Eats’ pizza dough recipe has landed! An easy pizza crust that makes an exceptional homemade pizza – puffy crust with a chewy, flavourful crumb inside. Enough structure to pick up, but not thin and stiff like a cracker.
5 minutes kneaded by hand or 40 seconds flat using a food processor. Top with anything your heart desires – see our Pizza Sauce and favourite pizza toppings! No yeast? No worries – use my Secret No Yeast Pizza Dough.

Pizza Dough recipe
This is the RecipeTin Eats’ family pizza dough recipe. It’s a rare thing when the entire RTE family agrees on something to do with food. So when I tell you that we all agree this is the best pizza crust recipe, that means something!
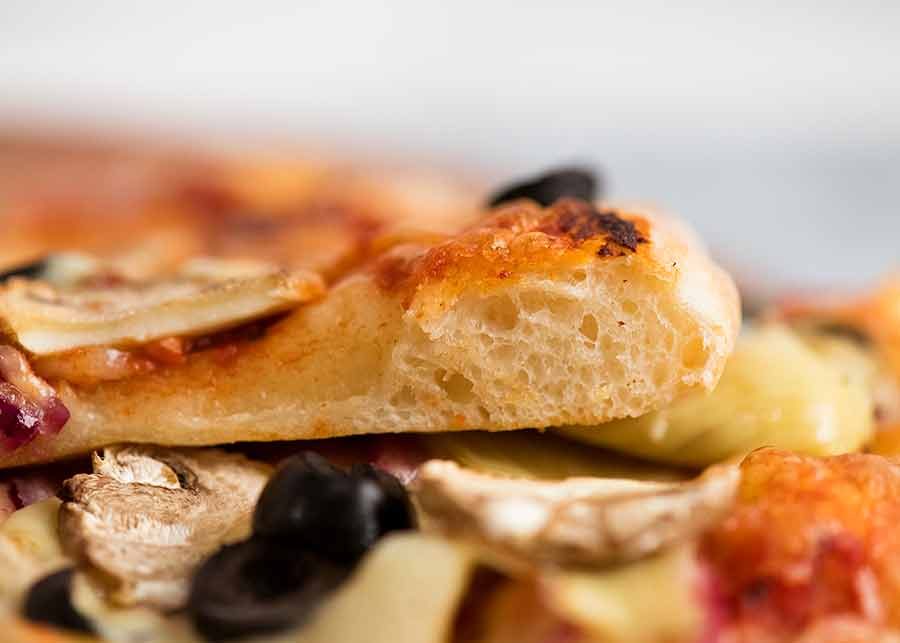
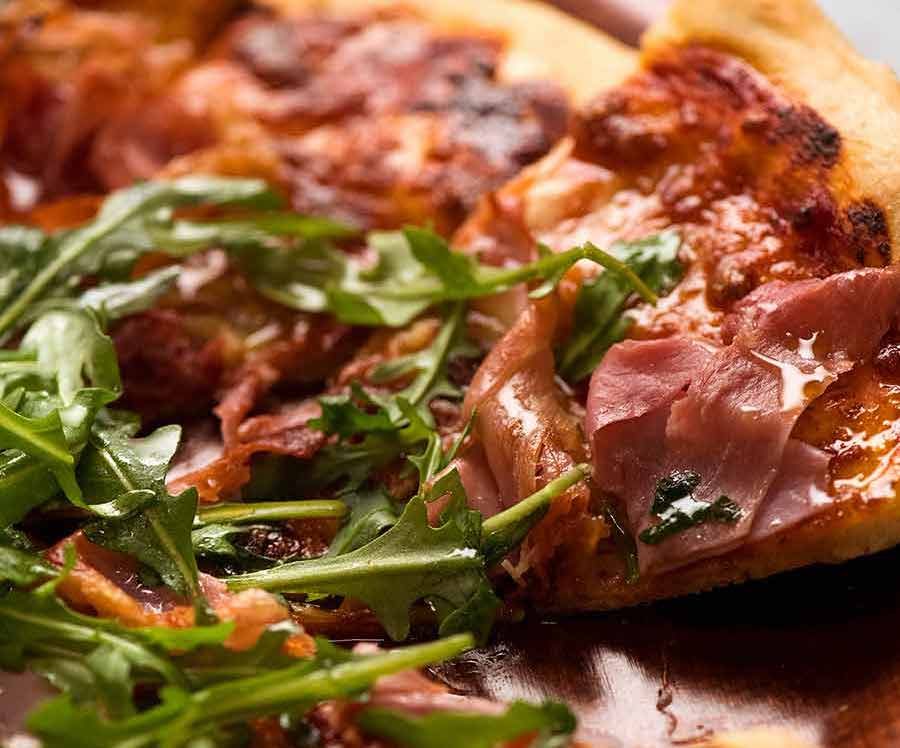
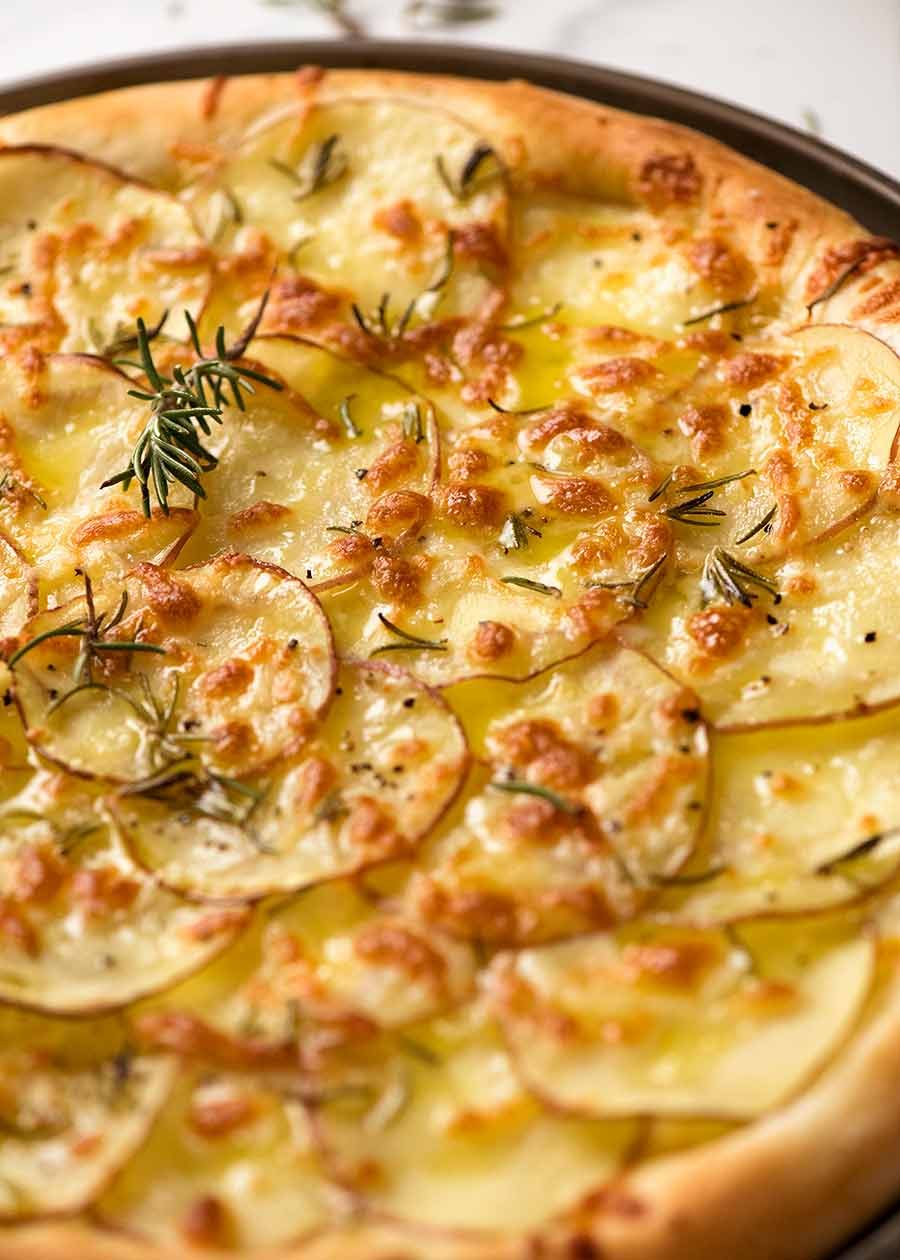
It makes a homemade pizza crust like you get from your favourite wood fired Italian pizza place. Puffy edges that are slightly crispy on the outside, but chewy and moist like Artisan bread on the inside.
The base gets crispy enough so each slice has just enough structure to pick it up with one hand, rather than being a sloppy mess. But it still has that slight bend on the end, so you know the base of the crust is not dry and stiff like a cracker, nor paper thin.
See? Prawn pizza evidence! (Recipe here)

How to make homemade pizza – 3 easy steps
Make dough & Rise 1 – make the dough, Rise #1 for 1 – 2 hours;
Balls & Rise 2 – form 3 balls, then do Rise #2 for 1 hour;
Top & bake – Stretch out to make pizza crust, spread with sauce, toppings of choice, bake 10 minutes!
Useful tip: The dough can be made ahead up to 5 days. And it can sit around for hours once the individual pizza balls are formed. So don’t fret about getting the timing exactly right!
What you need for pizza dough
Here’s what you need to make pizza dough:
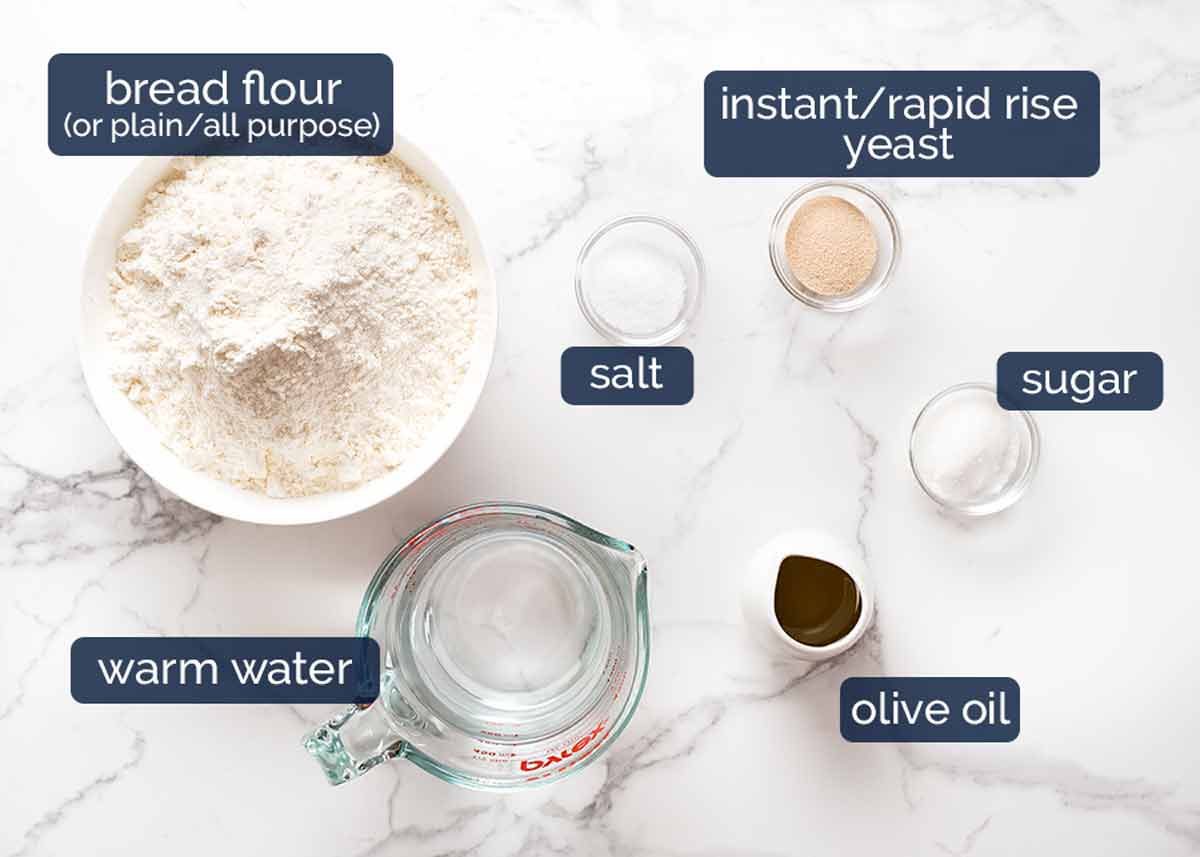
Yeast – instant / rapid rise yeast is what I use because it makes the dough rise faster and eliminates the need to dissolve yeast in water. However, the recipe includes directions for active dry yeast too (ie ordinary yeast powder);
Bread – While plain/all purpose flour will work just fine, the best flour for pizza dough is bread flour or pizza flour which are high protein flours. It makes the crust chewier and creates big holes just like you get from your favourite Italian pizza shops – see photo below. I wouldn’t make a special trip to get bread flour just to make pizzas. But if you are menu planning, then seek it out!
Sugar – helps the dough rise and brown the crust;
Salt – nobody likes a bland, flavourless pizza crust!
Warm water – yeast loves warmth so it helps the dough rise faster;
Olive oil – required to keep the crust tender and moist inside when making pizza in home ovens. Traditional Neapolitan-style Italian pizza dough doesn’t have oil, but that’s because pizzas cook in just a few minutes in fiercely hot pizza ovens that reach 400°C/750°F. Home ovens will max out at about 275°C/530°F or less = longer to bake = crust dries out unless we use oil.
Part 1: How to make pizza dough
It. Is. EASY! And so many options:
Hand knead – 5 minutes
Standmixer – 3 minutes
Food processor – 40 seconds (yes, really!)
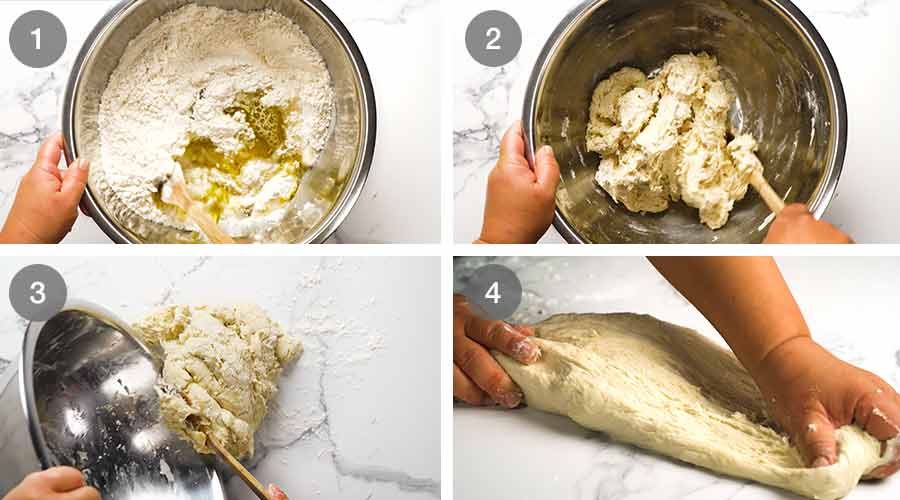
Mix flour, yeast, salt and sugar, then mix in water and oil;
It will come together into a rough dough that leaves the bowl pretty clean;
Scrape out onto a floured work surface and bring it together into a ball; then
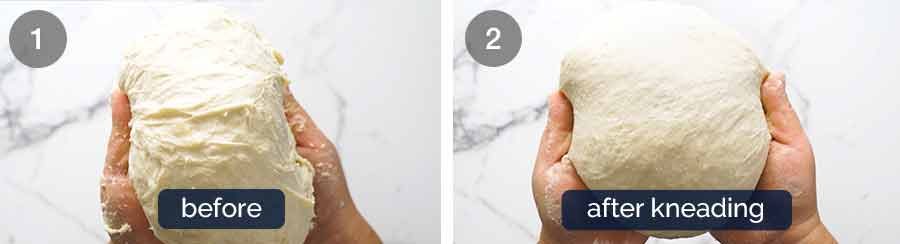
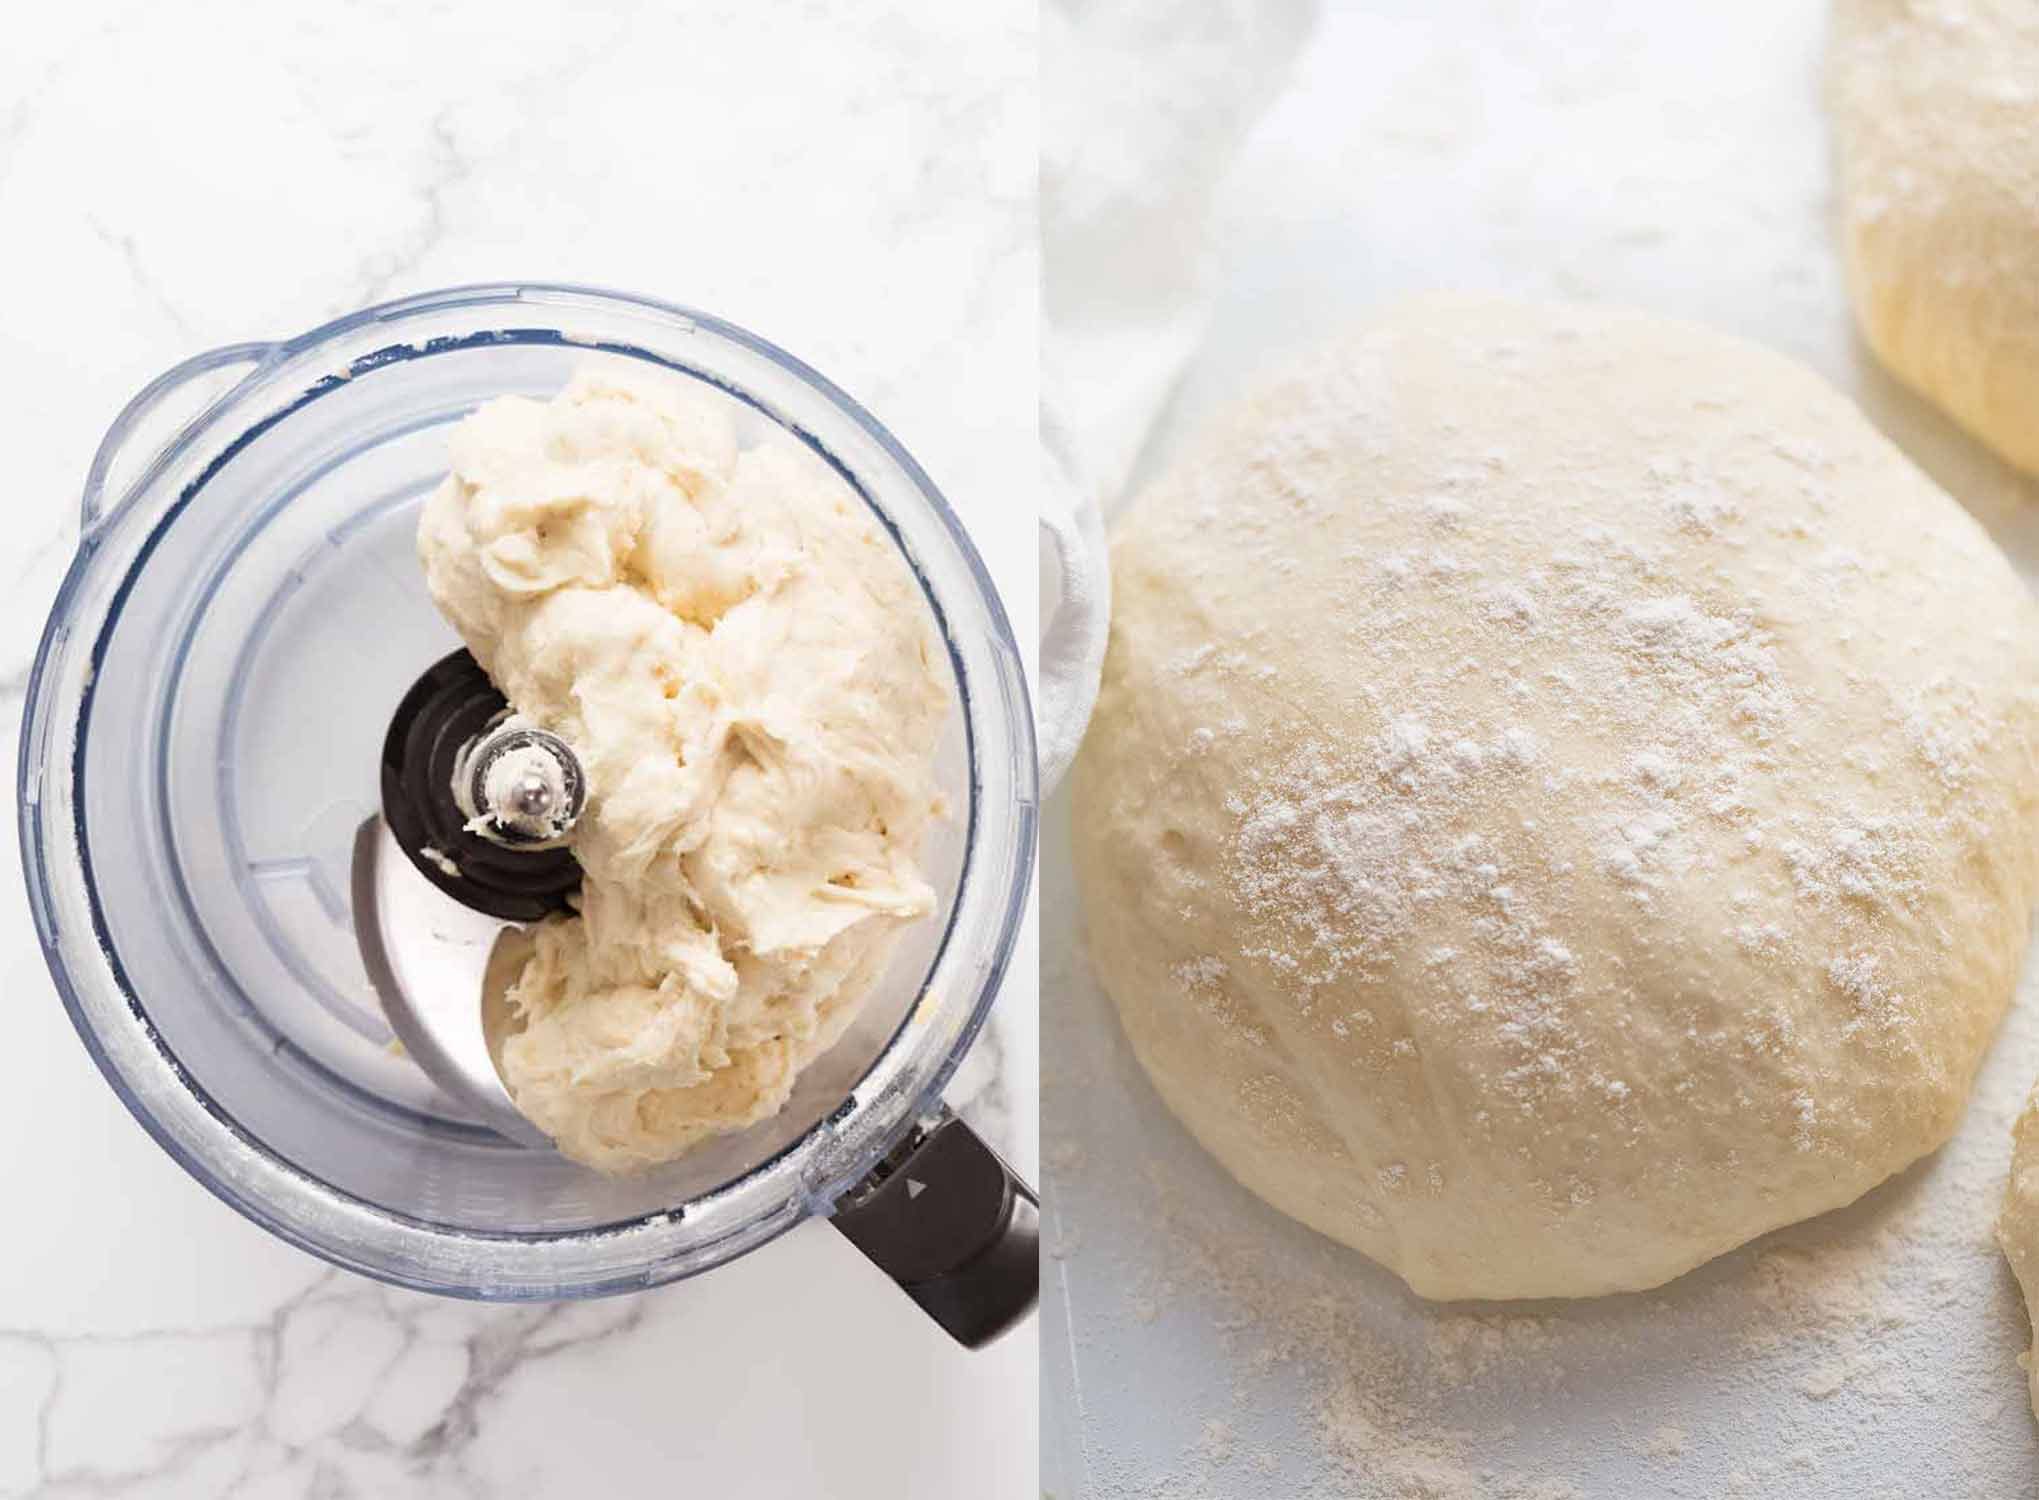
Knead for 5 minutes using your hand or 3 minutes in a stand mixer (see next section for food processor).
This is what the dough looks like before and after kneading. It doesn’t need to be completely smooth like some bread doughs.
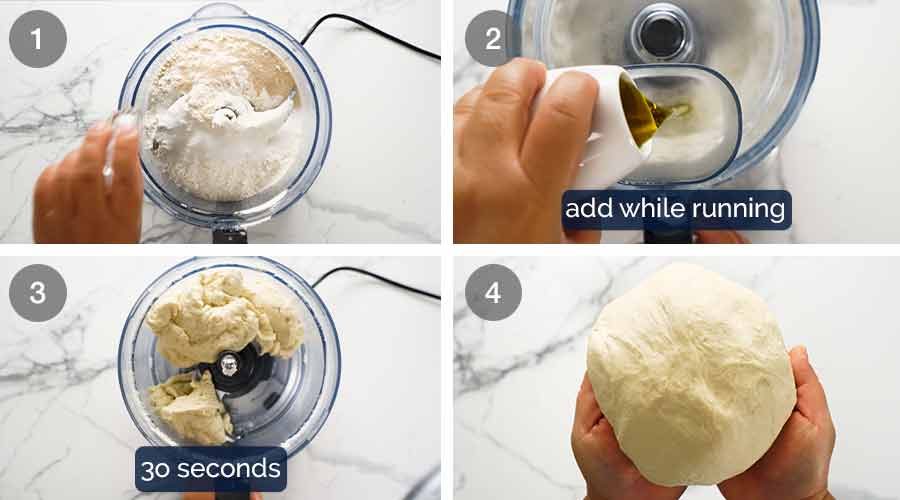
40 Second Pizza Dough – food processor
After years of hand kneading, I’ve discovered in recent weeks that it can be made in a food processor in less than a minute. End result is exactly the same!
The trick is to pour the water in gradually while the motor is running, then just blitz for 30 seconds to develop the gluten (instead of 5 minutes of hand kneading). Unless you have a very large food processor, the dough will not turn into a neat ball inside the food processor – and that’s fine, it’s still kneaded.
Also, the dough pulls away from the edges and blade so the food processor is easy to clean, which makes this method even more appealing!
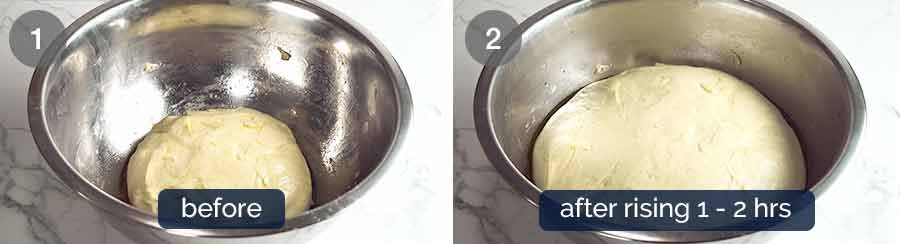
Dough Rise # 1
After the dough has been kneaded using your method of choice, it’s time to let it rise.
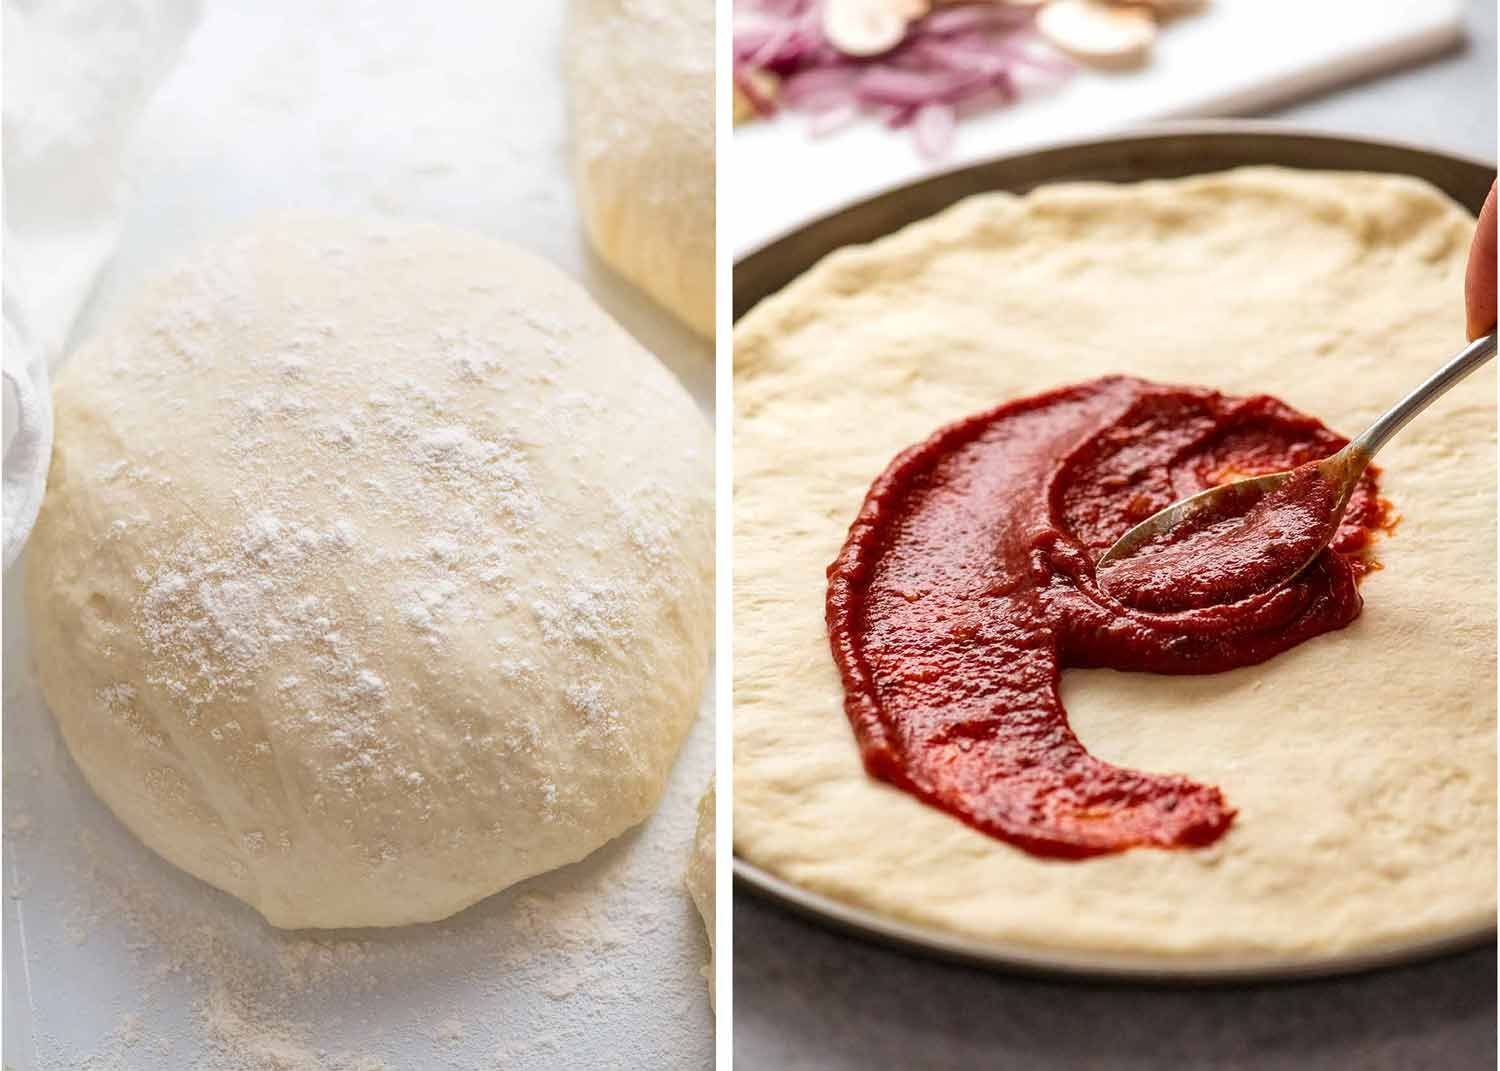
Drizzle the same bowl with olive oil, then put the dough in;
Cover with cling wrap and rise 1 hour in warm place. Once the dough has risen, use immediately or refrigerate up to 5 days for even better flavour!
Optional: Fridge up to 5 days = extra flavour!
The beauty of this dough is that it’s fantastic made and cooked right now, but it’s better tomorrow and even better on day 5! This is because dough develops more flavour over time.
Typically, I make pizza dough the night before, leave it overnight then make it the next day.
Just put the bowl in the fridge with the puffy dough in it, don’t punch it down and deflate. The dough may rise a little bit more in the fridge. If it deflates, that’s ok too.
It can also be frozen. Directions provided for fridge and freezer in the recipe.
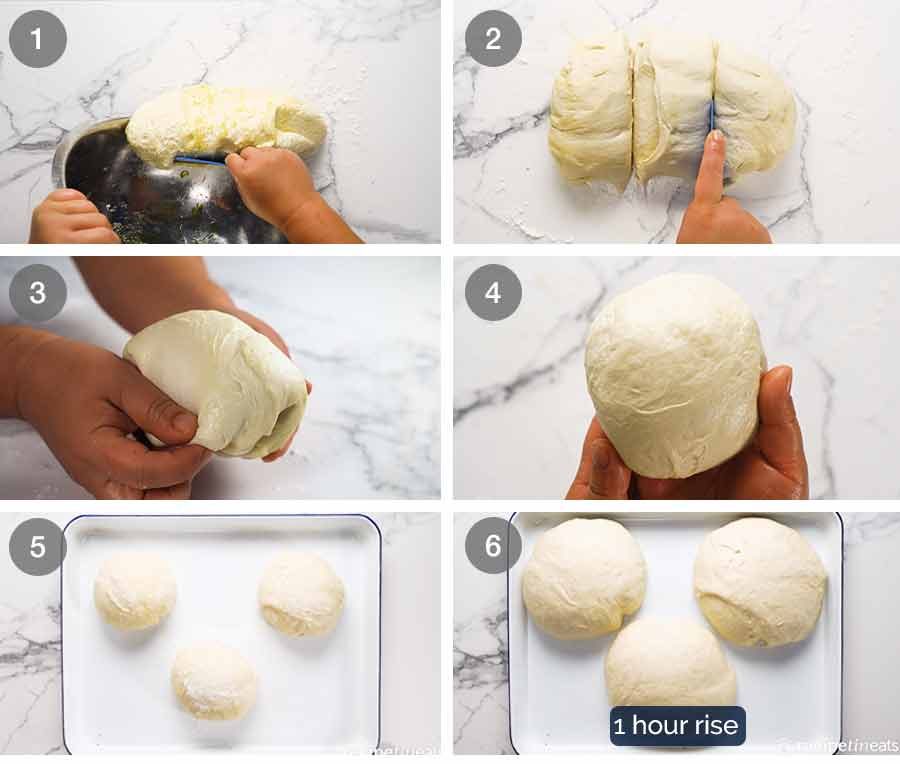
Part 2: Forming balls
If you refrigerated your dough, take the bowl out of the fridge then immediately proceed with these steps starting with cold dough.
Scrape dough out of bowl;
Shape into a log, knocking out all the air, and cut into 3 equal pieces;
Tuck the sides of the dough underneath, money-bag style;
This stretches the dough on one side so you have a smooth surface;
Place on a tray, then cover with a damp tea towel;
Rise for 1 hour in a warm place until almost doubled in size. If your dough was in the fridge, this will take 3 – 4 hours (because the dough needs to come to room temperature first before it will start to rise).
After the balls have risen, you can leave them sitting around like that for up to 5 hours in a cooler room (so they don’t continue rising – if they rise way too much eg 3x or more, it won’t rise in the oven). Just make sure to keep covered with a damp tea towel so they don’t dry out.
Part 3: Stretch pizza base
There’s many ways to stretch dough to make the pizza base and they all work just fine, just remember these 2 golden rules:
Don’t handle the edges so you don’t knock the air out = authentic puffy edges
Use a light touch – if you flatten the dough to death you’ll end up with a dry, super crisp crust. Pizza dough should be stretched, pulled and pushed outwards as opposed to flattening down like when rolling out pie crusts.
Do not stress about forming perfect bases. Patch tears with extra dough. Wonky and bumpy = hidden once baked. Rustic = authentic!
I typically use this easy stretch-on-counter method:
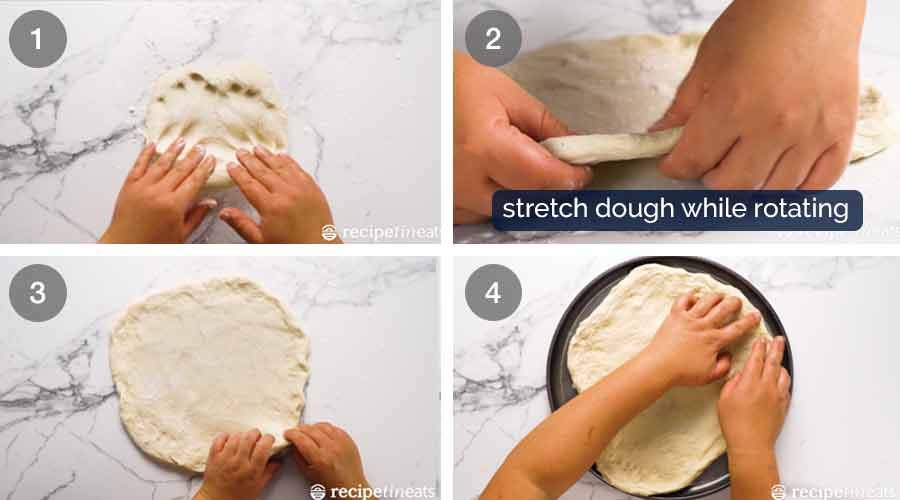
Use fingers to flatten puffy dough dome and stretch it out slightly. I never press down or pinch the edges;
Once you flatten with your fingers / palm, then start using your hands to stretch and pull the dough to make it larger, rotating as you go, until it’s almost about 25cm / 10″ wide;
Drag onto pizza pan, then continue to shape, pulling right to the edge of the pan.
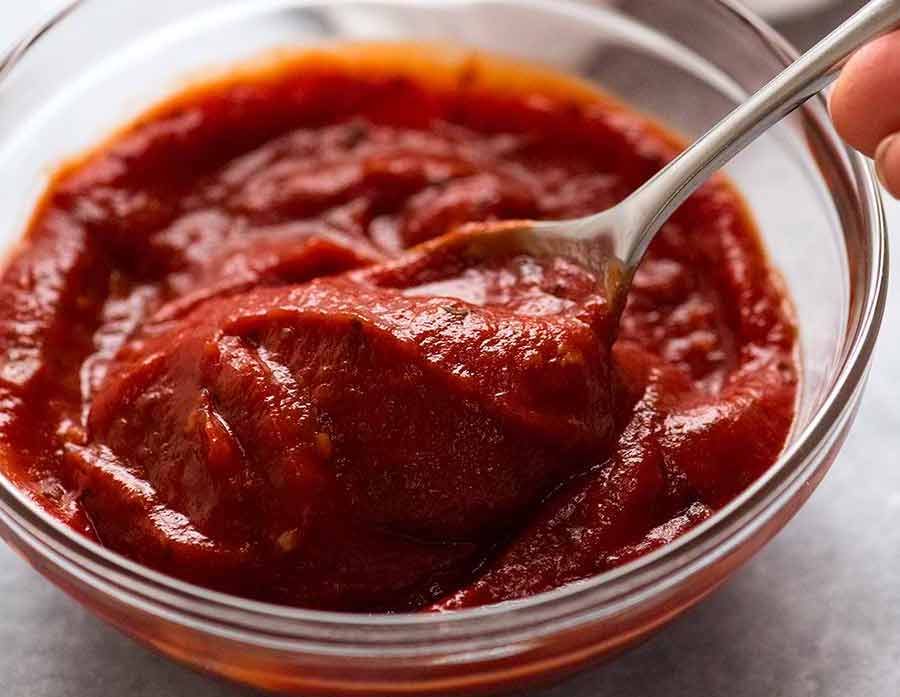
Part 4: The Sauce
Here are our Pizza Sauce recipes. We have three versions:
Cooked down pizza sauce using canned tomato, simmered to cook out water and thicken, then cooled prior to using.
Almost-instant pizza sauce made using tomato paste. I use this one the most because there’s a slight tang that cuts through the richness of the toppings, with salt and sugar added for balance. Plus, it takes seconds to make!
An “in-between” pizza sauce that gains freshness from passata, a hit of tomato paste for some intensity, but without the hassle of any cooking.
Supreme and other pizzas with salty meat toppings are a good example of the type of pizzas that are ideal to make using the Instant Pizza Sauce because the slight sourness from the tomato paste balances out the strong flavoured toppings.

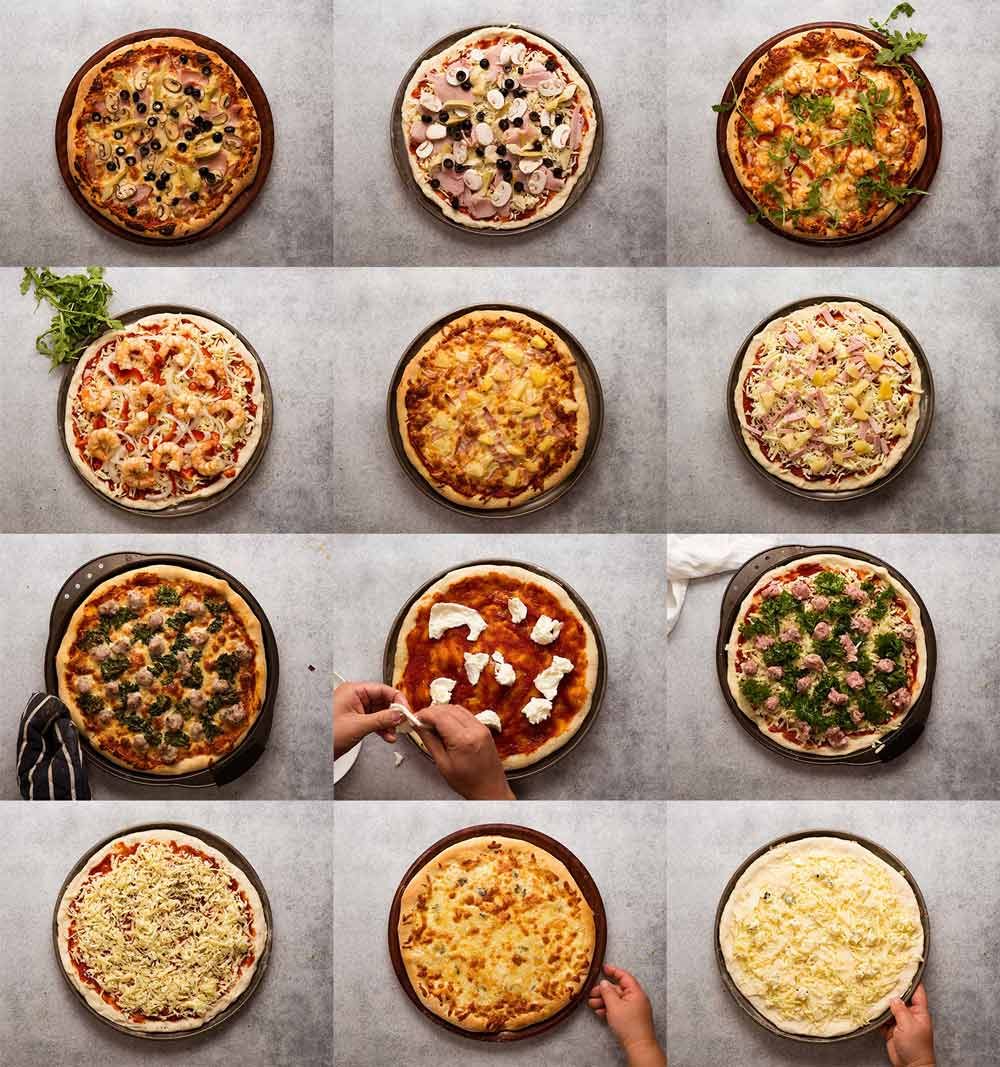
Part 5: Toppings – don’t be greedy!
See the RecipeTin Eats Pizza Toppings menu for recipes for our favourite pizzas.
You can top pizzas with anything your heart desires, but the key thing to remember is this: LESS IS MORE!
Pizza bases like this are not built for fully loading with toppings. It weighs down the dough, prevents the crust from rising, the centre of the pizza ends up soggy and it will be sloppy when you pick it up.
I’m the biggest offender of being greedy with toppings – and I always regret it. So this lecture is really for me!
Useful tip: use freshly shredded cheese rather than store bought which is cut thicker so it’s heavier, so you need more to cover the pizza which weighs the crust down.
Part 6: Baking
Pizza stone > pizza pan with holes > baking sheet.
I use a pizza pan with holes in it 99% of the time for sheer convenience. The holes lets the heat have direct contact with most of the base which makes it crisper than using a normal baking tray, and it’s less fussy to use than a baking stone.
If you use a baking stone, you need to assemble the pizza on a paddle, then slide it onto the preheated stone. (See recipe notes for directions)
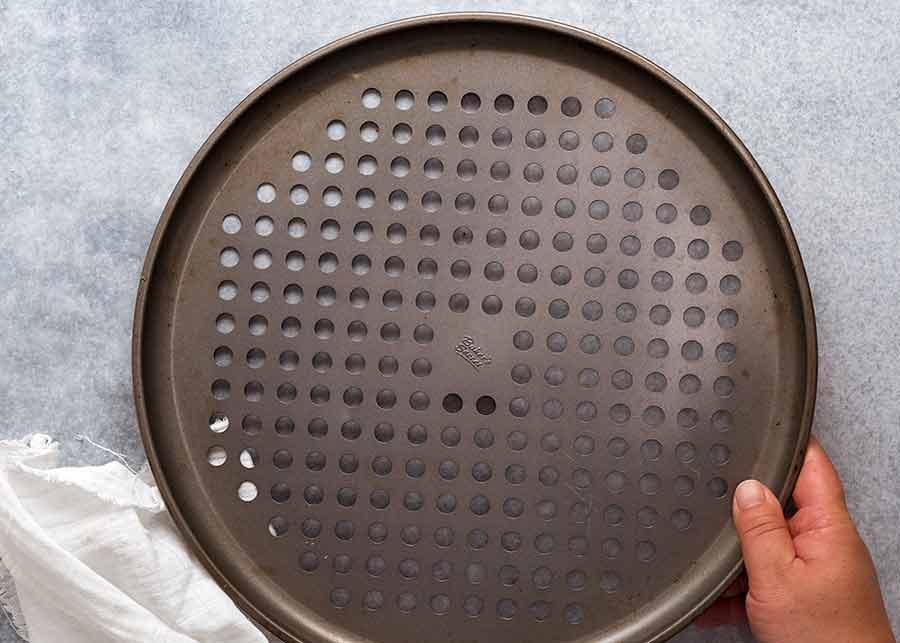
Pro tip: look for pizza pans with extra large holes. Holes = crispier base!

If you use a knife and fork to eat pizza, I’m afraid we can’t be friends…. 😂
Hands all the way. You won’t have grease running down your elbows because they’re homemade so we use a fraction of the oil of Dominos and Pizza Hut. Which, to my logic, means we can have MORE with LESS GUILT.

Parbake make-ahead pizza bases
The pizza bases can be par-baked then stashed in the freezer for handy pizza-on-demand! Just stretch out the pizza bases per this recipe, and bake for just 2 minutes at 275°C/530°F (all oven types), or as high as your oven will go if it won’t go that high.
The pizza bases will be pale and just cooked through in the centre which is what you want. Remove from hot trays onto cooling racks, then wrap in cling wrap and freeze. (Or refrigerate only overnight)
To use, thaw (about 2 hours on counter, or half a day in fridge), top, then bake 10 minutes at temp per recipe.
Note: Freezing straight away is key to keeping the bases fresh, it will keep for a few months and be fresh once thawed as long as it’s properly wrapped or better yet, also in an airtight container. If you refrigerate, it’s fine the next day but noticeably drier the day after that.
Best way to reheat leftover pizza
If you’ve got leftovers, the microwave is always there for emergencies – though you know it’s going to mean a soft crust. The best way is to use a covered skillet – this makes the crust crisp again whilst also reheating the top. The other way is covered on a baking tray in the oven.
And of course, there’s cold pizza, eaten straight from the fridge. I’m not a cold pizza gal, but I won’t judge. Because I truly believe to my very core that no one should tell you how you should or should not take your pizza. Do as you please! – Nagi x
Watch how to make it
Here’s the recipe video to knead the dough by hand. See below for the 40 second food processor method. (PS Accidentally left out sugar, oops!)
And here’s the recipe video for the 40 second pizza dough. After the dough is made, the steps are exactly the same and the pizza crust comes out exactly the same!
Hungry for more? Subscribe to my newsletter and follow along on Facebook, Pinterest and Instagram for all of the latest updates.

Pizza Dough recipe
Ingredients
- 600g (4 cups) bread flour or pizza flour (or plain/all purpose) (Note 1)
- 2 tsp (6g) rapid rise or instant yeast (Note 2)
- 2.5 tsp (15g) salt , kosher / cooking salt (Note 3)
- 4 tsp (20g) white sugar
- 4 tbsp extra virgin olive oil
- 330 ml (1 1/3 cups) warm tap water (330g, Note 4)
For Working:
- 1 tbsp Extra Flour
- 2 tsp Extra Olive Oil
Toppings
- 130g / 1 1/3 cups mozzarella cheese, freshly grated per pizza, (Note 8)
- 1/4 cup pizza sauce per pizza
- Toppings of choice
Instructions
Dough:
- Mix dry: Place flour, yeast, sugar and salt in a large bowl. Mix with a wooden spoon.
- Add wet: Make a well in the centre. Pour in oil and water. Mix to bring together so it comes away from the side of the bowl.
- Knead 5 minutes: Sprinkle work surface with 1/2 the Extra Flour. Scrape dough out of bowl. Bring together into a ball then knead for 5 minutes until pretty smooth (see video for Before v After, Note 5). Shape dough into a ball.
Rise #1:
- Drizzle large bowl with Extra Olive Oil (can use same bowl).
- Place dough in, turn over and rub top with oil.
- Cover with cling wrap, then put in a warm place for 1 – 2 hours until it doubles in size. (Rise #1)
Optional fridge – flavour development:
- After rising, refrigerate bowl with dough for up to 5 days (do not punch down). Flavour gets better with time. (Note 7)
Form small balls, Rise #2:
- Scrape dough out of bowl on work surface lightly dusted with flour. Shape into log, fully deflating dough in the process.
- Cut into 3 equal portions (330g / 11.6 oz each) – one for each pizza base.
- For each dough portion, shape into a ball, tuck the sides under, money-bag style, so you have a smooth surface.
- Place balls, smooth side up, on a large tray – 5cm / 2" from edge of tray, 10cm / 4" from each other.
- Sprinkle balls with a touch of flour and lightly rub to coat surface (so they don't stick to tea towel). Cover balls with lightly damp tea towel. Alternatively, cover loosely with a sheet of baking paper then seal tray with cling wrap, ensuring the dough balls have plenty of space to rise under the cling wrap.
- Leave in warm place 1 hour until almost double in size. (If fridge-cold, this will take 3 – 4 hours).
Stretch pizza base:
- Preheat oven to 275°C / 530°F, or as high as it will go. Put shelf in top third of oven.
- Sprinkle work surface with 1/2 tbsp flour. Place one dough ball on top.
- Without touching the edges, use finger tips and back of fingers to deflate dough gently and spread out into a 20cm/8" round. Then use your fingers and palms to stretch the dough, working around the circle, until it's almost the size of a 30cm / 12" pizza pan.
- Drag onto the pizza pan (or paddle if cooking on pizza stone, Note 8). Then finish stretching it to fill the pan. Neaten up the shape so it's as perfectly round and uniform as possible – the shape you have now is the shape it will bake to! Leave 1 cm / 1/3" of the edge untouched as much as possible (for puffy crusts!).
Topping / Cooking (work quickly!):
- Spread with 1/4 cup pizza sauce, 130g / 1 1/3 cups freshly grated mozzarella, then toppings of choice (see Topping recipes here).
- Bake 10 minutes, rotating at 4 minutes and checking at 8 minutes, until cheese is melted and has some golden spots.
- Cut into wedges, serve immediately!!
- Repeat process for remaining balls to make two more pizzas.
Recipe Notes:
- Mozzarella is the most commonly used. It melts well, gets nice golden spots, and has a fairly neutral flavour so you don’t have overly salty toppings when you add bacon, pepperoni etc.
- To up the flavour, add a mix other cheeses with more flavour that melts well, such as Monterey Jack, Cheddar (don’t use too much, it’s greasy), fontina, gruyere, provolone, Swiss cheese.
- Buffalo mozzarella is used for Margherita pizza, see recipe here.
- Blue Cheese is used for Quattro Formaggio (4 Cheese Pizza) along with provolone, parmesan and mozzarella (and it’s fabulous! Recipe here)
- Emergency – pizza on paper towels, microwave reheat. Soggy base, but does the job!
- Stove – pizza in dry skillet over medium high heat, lid on to warm the top (3 – 5 minutes). Crispy base!
- Oven – pizza on tray covered loosely with foil. 7 minutes at 180°C/350F. Crispy base!
HOMEMADE PIZZA TIPS
- Forgiving dough – if you use weights listed, dough should be perfect. But if too sticky, just use more flour when kneading. Too dry, sprinkle with water. Takes hours longer to rise? That’s fine too. Rises way too quickly, not ready to cook? No worries, put it somewhere cold (fridge, bathroom) to slow/stop the rise.
- Practical Timing – dough rising time can be temperamental depending on humidity, kitchen warmth etc. Best to start earlier in day, and get to Rise #2. Once Rise #2 has been done, the puffed up balls ready for stretching into pizza bases can sit around for up to 5 hours in a COOL room (to stop rising further). Just make sure you keep them covered with a damp tea towel (and dusted with flour so they don’t stick to tea towel) so they don’t dry out. Cling wrap on top would be extra insurance policy.
- Uneven base – don’t fret about your base looking uneven or even if you tear a hole in it – just patch it up. Once cooked and the dough puffs up, everything evens out – and anyway, the “rustic” look is in! And with practice, you will get better stretching base out evenly.
- Rolling pin not the best – it will knock the air out of the dough, and the crust will be crisper as it won’t rise as well.
- Toppings (see here for recipes) – don’t load up too much and don’t use too many “wet” ingredients on the one pizza. Too much toppings = weighs down crust, makes centre soggy.
- Pizza sauce – same as toppings, use less (I use 1/4 cup). 1/2 cup that some recipes call for is way too much – will make your pizza soggy.
- FRESHLY GRATED mozzarella cheese – is best for max surface area coverage and best melt. Store bought grated cheese is bigger pieces, so you need more to get the same coverage = thicker layer of cheese = weighs down the crust.
- Cook immediately once you stretch the pizza base, transfer to pizza pan, top & cook immediately. Don’t leave it sitting around even for 5 minutes, sweats underneath = soggy base.
Nutrition per slice of pizza (assuming pizza cut into 8), base only ie excludes pizza sauce and toppings.
Nutrition Information:
40 Second Pizza Dough
Below is the recipe for the same pizza dough recipe made in a food processor in 40 seconds flat! A fairly recent discovery that our pizza dough recipe we’ve been making by hand for years works 100% perfectly in a fraction of the time using a food processor!
Hungry for more? Subscribe to my newsletter and follow along on Facebook, Pinterest and Instagram for all of the latest updates.
40 Second Pizza Dough – Food Processor
Ingredients
- 600g (4 cups) bread flour , or plain/all purpose (Note 1)
- 2 tsp (6g) rapid rise or instant yeast (Note 2)
- 2 tsp (12g) salt , kosher / cooking salt (Note 3)
- 4 tsp (20g) white sugar
- 4 tbsp extra virgin olive oil
- 375 ml (1 1/2 cups) warm tap water (375g, Note 4)
For Bowl:
- 2 tsp Extra Olive Oil
Instructions
- Fit food processor with dough blade, if you have one.
- Place flour, yeast, sugar and salt in large food processor (8 cups/2L+). Pulse twice.
- With motor on low, pour oil in quickly. Then pour water in slowly over 10 seconds.
- Continue blitzing for 30 seconds – dough will come together, but won’t be a neat ball (that’s ok).
- Take dough out and shape into a ball.
- Follow recipe above for Rise #1, shaping, cooking etc – this dough is exactly the same as the above dough.
Recipe Notes:
Life of Dozer
I’m surprised the pizza was still there when I turned around.
I’ve attempted many pizzas over time, with a number of different dough recipes but this one is the only one so far that gives predictable, repeatable results. Absolute winner with the family.
OUTDOOR PIZZA OVEN SUITABLE!
We are in Aust. & have Ninja Woodfire Outdoor Oven. Made dough 3 times now, it’s flawless! Used a cheap stand mixer with dough hook, add dry ingredients (use bread flour) put on low speed, then slowly pour in water & oil, leave mixer to knead for 6-8mins then continue with Nagi’s instructions. We cook Artisan Style on pre heated Pizza Stone at 370 Degrees Celsius for 2mins 40secs, results in crispy base with leopard char bubbled crust. TIP:- Semolina sprinkled wooden pizza paddle/peel to launch into oven, metal peel to remove from oven on to a board. Let pizza settle for a minute or 2 before cutting. MAGIC! Thanks Nagi x
I made this last week and it is the BEST dough….Used the frozen one few days later and still yummmm Thank you Nagi
Love this recipe. I let it ‘sit’ for 3-5 days before I use it and it really does make a difference. But you know what I love even more? Dozer!
This was my first-ever attempt at making pizza. I used the food processor method, and it worked well. I cooked it on Grill Mode in my Woodfired Grill (no smoke). It was just a pity that I forgot to measure my pizza tray. It hung out of the grill a cm! I just rotated it and it worked fine. Not ideal, but what a forgiving pizza dough! Crisp base and nice chewy texture. Thank you, Nagi!
How do people make this work? I measured everything exactly. There is not enough liquid for that amount of flour! The dough was so dry. Added a bit more water, but the dough was just tough – not soft at all. Let it sit for 2 hours and it barely rose. Bizzare fail – I’m so confused lol
Success! I did the stand mixer method, 1 hour rise followed by 45 minutes. Worked out to perfection. It was very similar to the pre-made frozen bases you can buy in Aus (without all the preservatives and thickeners aka synthetic chemicals). Nice fluffy crust and crispy base. I love making things that, in this generation, we have been raised to buy in a packet. Healthier, less waste, less money. More wins.
Made this many times since first discovering it this year. Always turns out well, even if I don’t adjust for the weather. I use the dough setting on my bread machine, so easy. Thank you!
This is my go-to pizza dough recipe. Turns out great every time. I appreciate the thorough instructions and detailed notes. It is easy to make a quick, economical pizza at home for a fraction of the pizza takeout price. Thanks, Nagi!
Amazing stuff. Love it
My pizzas always end up with a soggy base. I used the 40sec dough, it didn’t matter my second rise went well over time.
My 10yo who loves making pizza stretched and assembled the bases, patched a few holes just as Nagi suggested, into the oven as high as it would go and they came out with a crust that was perfect thickness and cooked even all over.
There was only 2 slices left out of 2 pizzas which is a testament to the recipe. As always Nagi has provided.
Best pizza ever ♥️ thank you! I love Nagi recipes, they allways a hit.
Amazing. As usual. Best homemade pizza I’ve ever made. 🙌
Yes, this really is the best pizza dough I’ve ever made. I don’t always do the second rise if I’m in a hurry, still works fine. Pillowy soft and puffy.
We’ve made this several times and the crust is really tasty. We do prepare it at least a day ahead.
We really love the New York pizza sauce recipe also.
This is hands-down, the best pizza ever.
Easy recipe. Good “same-day” pizza dough. I’ve made a lot of pizza – deep dish, thin crust, Roman & Detroit styles but my wife says she may like this one best. Thanks, Nagi.
Great first go however I think I need to improve the dough was a bit dry and found it hard to make the base thin enough. Any suggestions appreciated
I made the food processor version & let it sit in the fridge overnight. I have made maybe over 50 different dough recipes & this one beats them all!
The base is so crispy & the texture is a perfect balance. Best of all when sliced, the base does not go
soggy or collapse as you’re eating it (i used a perforated pan).
I found it a tad too sweet (like chain pizza joints), so next time i will reduce the sugar by half.
If you like loading your pizza, i reduced my oven temp to 220c as a higher temperature overcooked the crust too quickly, whilst the middle needed more time.
First timer for making a pizza dough here.
I made it in my food processor. 30sec…WOW!!
I thought it didn’t rise enough (left it sitting for 8 hrs) in my warmest spot.
Anyhow decided to bit the bullet & use it anyhow.
I put mine mozzarellaht onto an oiled tray & streatched out from the middle to fit the tray. Felt lovely to touch & stretch & didn’t recoil.
Our toppings: pizza sauce, mozarella, salami, chilli (from a tube from Woolies) dabbed over pizza, basil (from a tube from Wollies) also dabbed around to pizza. Some parmigano & Fennel seeds.
To die for.
The dough is dead pan simple to make & turned out perfect for me.
If you can’t find the perfect dough then you haven’t tried this site. Go ahead so yourself a favor.
Can hardly wait for left overs tomorrow.
Next time I will change up the flower mix & use 20 – 25% Semolina.
I also made sure the edges are brushed with oilive oil.
10 min pizza was perfect & ready to eat.
Nagi you are a genius. 👏👏
If you go to print the recipe, and use the print page to adjust number of portions, only the fluid amounts are adjusted. (300 ml becomes 220 ml while the weight remains the same when going from 3 pizzas to 2.
I am now a pizza Master! Never made a pizza dough before, 3-4 times now and have always turned out great following this recipe and cook method. I love a good crust and great way to use up stuff in fridge. Even used a homemade sauce. Not bad for an old dude!