
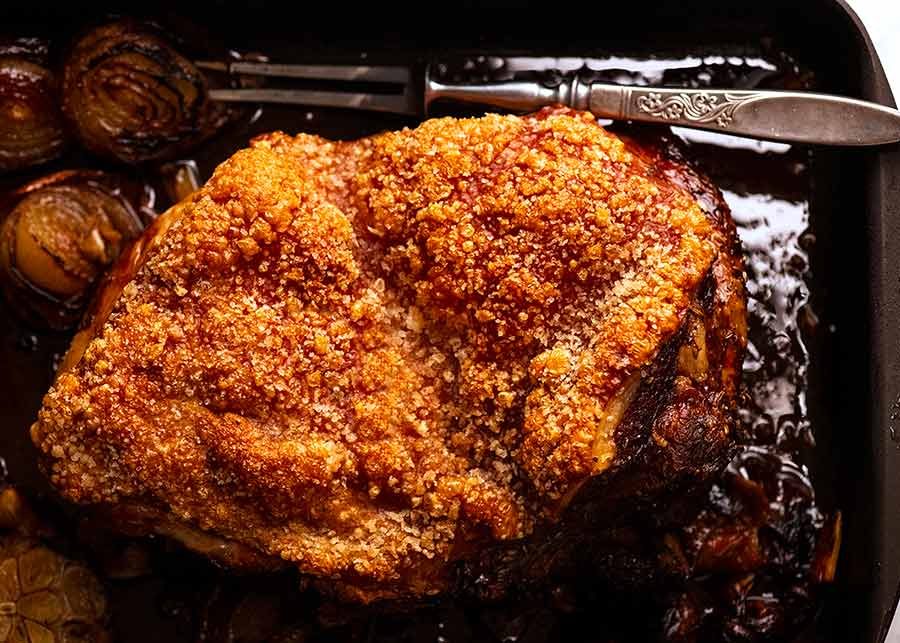
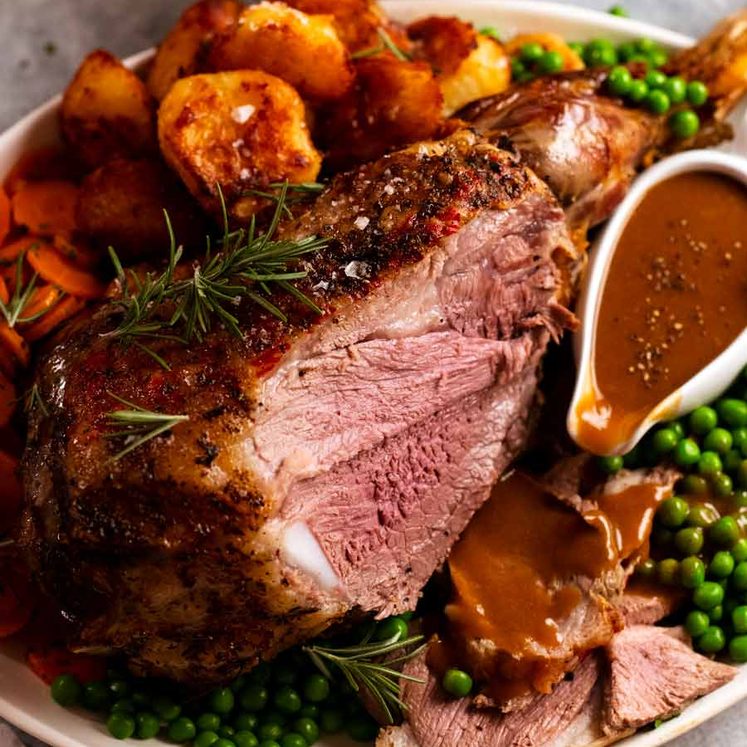
It’s your dream come true: The best ever Pork Roast with ultra-tender flesh and ultra-crispy pork crackling! This pork shoulder roast uses a simple but highly effective method to make pork crackle really crispy. Every. Single. Time. And without scoring the skin!
Served with a homemade gravy for pork, this is The Roast Recipe I pull out that’s a guaranteed hit, always.
The perfect Pork Roast
This perfect Pork Roast has:
Slow-cooked, tender, juicy, flavour-infused flesh;
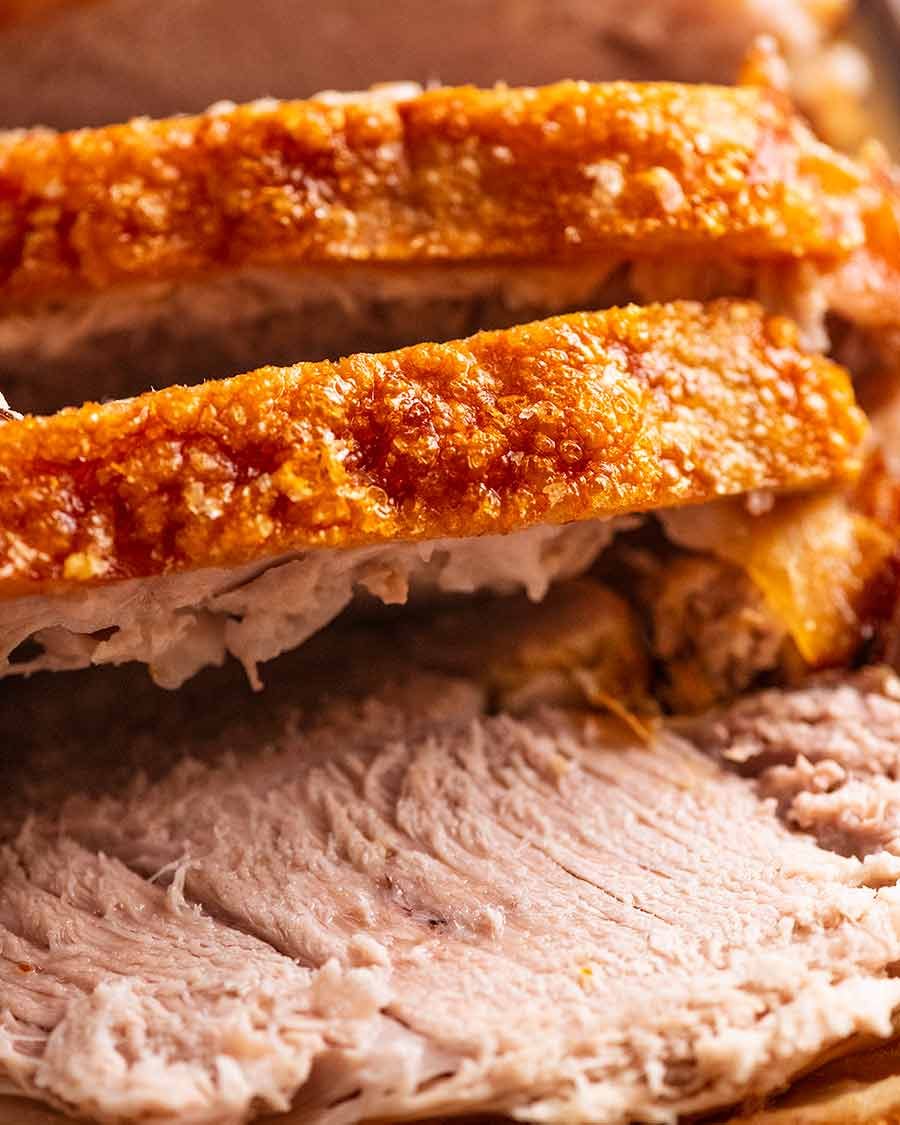
Super-crispy, bubbly pork crackling all over – no rubbery or chewy patches at all; and
Served with it an incredible homemade gravy made with the pan drippings.
It’s made without fussing with blow dryers, boiling hot water, or leaving the pork to air dry in the fridge overnight.
It’s simple to make without any special equipment, and works – Every. Single. Time. (But you don’t need to take my word for it. Read the reviews!)

My secret tips for perfect Pork Roast with Ultra-Crispy Pork Crackle!
Forget all the fussing other recipes recommend for perfect pork crackling! Just follow these easy steps:
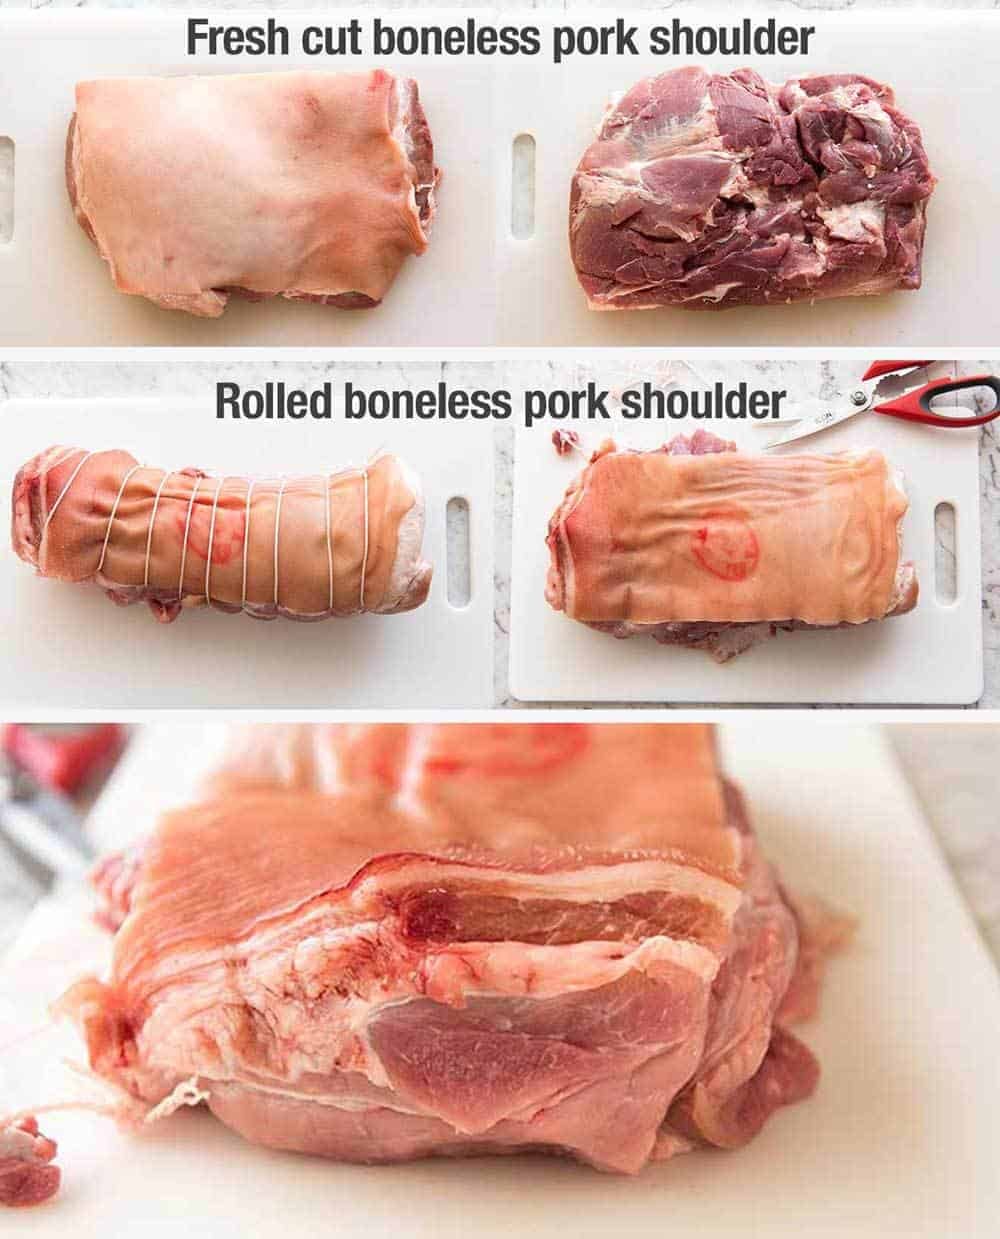
Unrolled boneless pork shoulder (skin-on of course, for the crackling!). Give pork loin a miss – it doesn’t crackle nearly as well!
Dry skin – Ensure skin is dry
No scoring – No need to score the skin. In fact, scoring can compromise crispy skin if not done properly!
Roast uncovered for the whole time (to keep the skin dry)
Long and slow – Roast on a low first to slow-cook the flesh until tender, then high to finish the crackling
Keep the skin surface level by using scrunched up balls of foil. Because level surface = even high-heat distribution = better crackling!
Ever notice how the sides of rolled pork never gets as crispy as the top? That’s because the highest part gets best exposure to heat. So for perfect crispy crackle all over, LEVEL THE PORK using balls of foil!


Best pork for crackling roast pork is boneless pork shoulder
The best pork for roasting and crispy crackle is:
boneless pork shoulder;
freshly cut by butcher rather than purchased vac packed from the grocery store (usually rolled and tied or netted);
has dry flat skin; and
no need to score the skin. But if it’s already scored, it’s fine.
But don’t worry! If your pork is rolled/netted or pre-scored, this recipe still works perfectly. It is just that the crackle can’t come out quite as perfect as pictured…. but still better than any other method you’ll try!
In a section further down below, I explain at length why pork shoulder is the best cut for pork roast.
But in summary, this is the cut of pork with flesh that can sustain the 3 hour cook time required to get a really good crackling. The meat becomes tender and juicy because it’s a slow cooking cut of meat. Whereas on the other hand, a leaner cut like loin or leg will dry out before the crackling becomes crispy.
As for scoring (ie cutting diamond shapes in the skin) – it isn’t necessary for great crackling, as evidenced by all the photos and the recipe video. In fact, scoring poses a risk to crispy crackling because if you (or the apprentice butcher at the supermarket) accidentally cut through to the flesh, the juices will bubble up onto the skin as it cooks, wetting it, and you’ll end up with rubbery rather than crispy skin in that area.
Want to roast pork belly?
See this Chinese Crispy Pork Belly recipe. Hands down the best method for crispy pork belly. Full stop!
What you need to make roast pork
Here’s what you need to roast the pork:
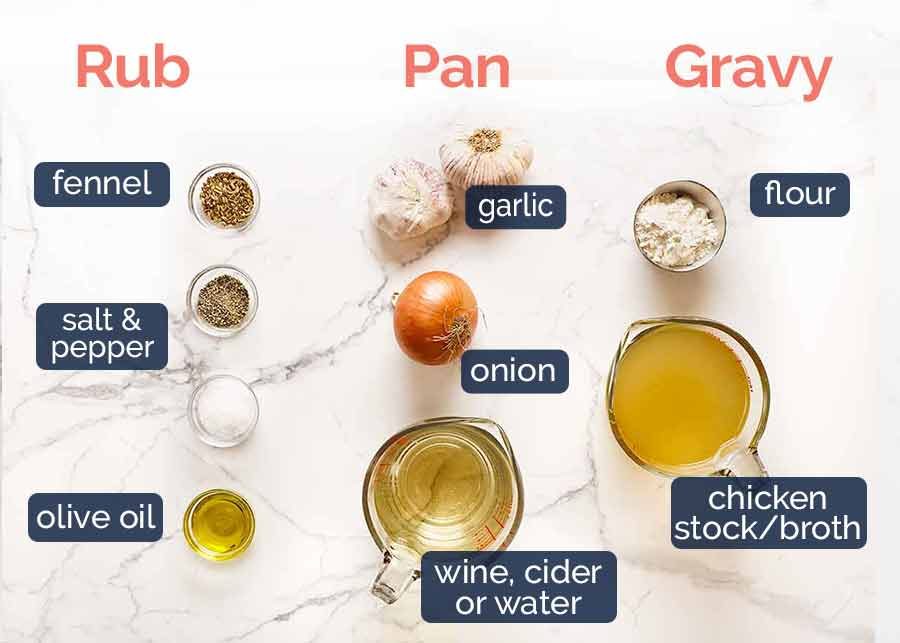
Fennel – For flavouring the flesh. Fennel and pork are great friends, and it is quite simply the best rub for pork, in my opinion!
Salt and pepper – Most of the salt goes on the skin. You need a LOT of salt on the skin. In fact, salt is what helps the skin go bubbly-crispy rather than hardening into an impenetrable hard, flat sheet of skin;
Oil – To make the seasonings adhere to the flesh and skin, as well as being a heat conductor;
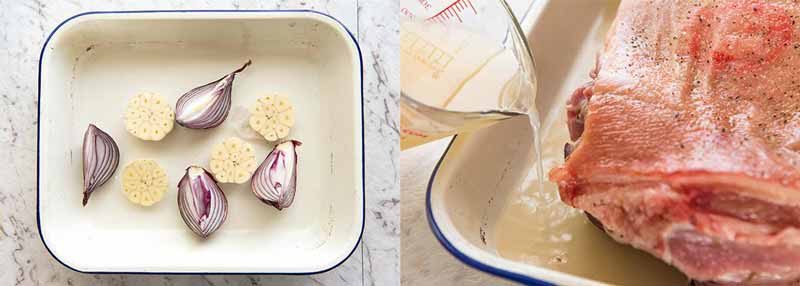
Garlic and onion – The pork sits on top of these as it roasts. They serve 3 purposes:
Flavour the flesh of the pork even more;
Keeps the base of the pork elevated out of the pan juices so it cooks evenly (meat submerged in liquid cooks faster than exposed meat); and
Adds incredible flavour into the pan juices to make an epic gravy for the pork roast!
Wine (else alcoholic or non-alcoholic apple cider, or water as a last resort) – This is used in the roasting pan and serves 3 purposes:
The liquid keeps the pan juices from burning during the long roasting time (ie. the meat juices and fat that drips from the pork). If the roasting pan juices burn, this will turn your gravy bitter. Nobody wants bitter gravy with their pork!
Creates a steamy environment for the flesh so it doesn’t dry out during the slow roast. It means we don’t need to cover the pork (which discourages crispy skin); and
Creates some moisture in the oven which keeps the pork skin supple enough during the low temperature, slow roasting phase to allow the bubbles to form inside the skin before hardening into a crispy crackle during the final blast of high heat to form the crackling. Without some form of liquid in the roasting pan, the skin comes out like a hard, flat sheet of skin that while crispy, has very few bubbles and is tougher;
Flour – To thicken the gravy; and
Chicken stock/broth – The liquid for the gravy. We also use the pan juices which is loaded with pork flavour. I prefer chicken to beef stock because it has a more mild flavour, so we can really let the pork flavour from the roasting pan juices shine through.

How to make Pork Shoulder Roast
Making a pork shoulder roast with perfect, bubbly crackling from end to end is very straightforward if you ensure you follow all the steps. Do not try to speed things up by increasing the temperature, and do not skimp on salt. Just follow the recipe as written! (Pretty please 😂)
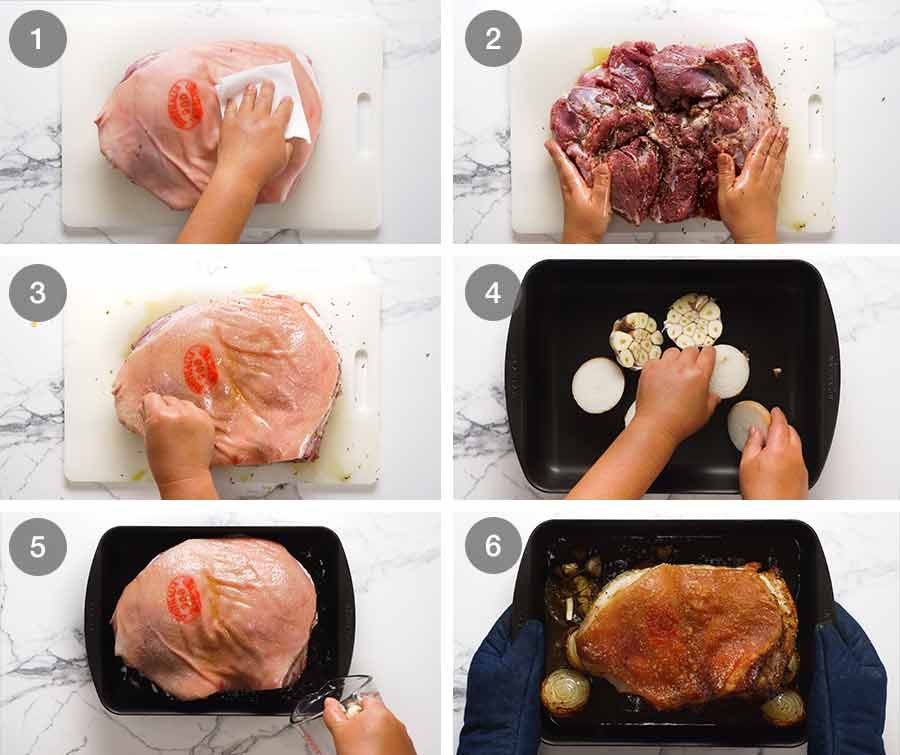
1. Prepare Pork for Roasting
These steps are depicted in the step photos above:
Dry skin – Pat skin dry using a paper towel;
Season flesh – Season the flesh sides of the pork with salt, pepper and optional fennel, with a drizzle of oil;
Salt skin – On the skin side, drizzle with oil then sprinkle evenly with salt. Remember, salt = the desirable crispy bubbles rather than hard/flat skin. So don’t leave any unsalted patches!
Garlic and onion halves – Place these in the pan, cut side up, then place the pork on top, skin side up;
Wine – Add wine into pan (see recipe for subs), being careful not to wet the skin;
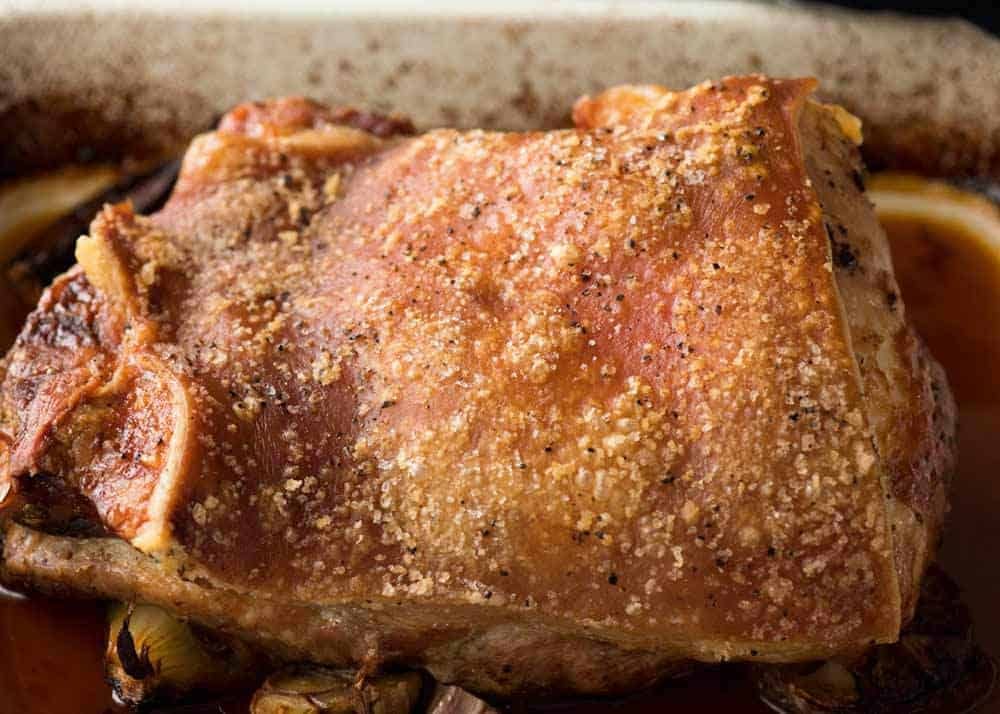
Slow roast – Roast uncovered in a low oven 160°C/320°F (140°C fan) for 2 1/2 hours. This is the slow roasting time during which the flesh becomes tender and juicy. The skin will not be crispy yet – in fact, it should still be soft and rubbery at this point.
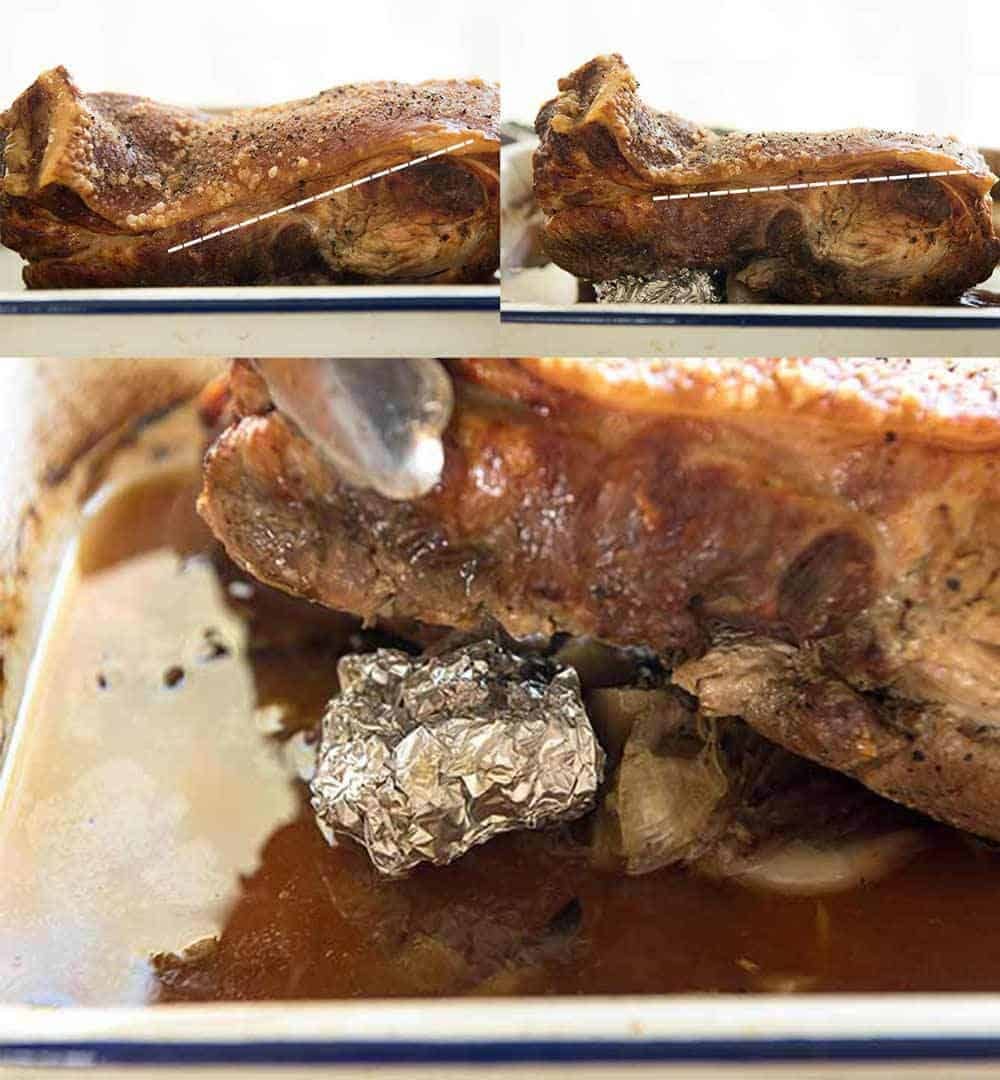
2. Level the pork (secret to evenly crispy crackle!!)
After 1 1/2 hours in the oven, the skin surface that might’ve been flat going into the oven is likely to be a bit wonky. This happens naturally because pork shoulder is a sinewy, tough cut of meat, so it buckles as it slow roasts.
At this stage, we need to use scrunched up balls of foil to prop up the pork in parts so the pork skin is as level as possible. This is because perfect pork crackle from edge to edge requires an even distribution of heat on the pork skin.
If you don’t do this? The lower parts of the skin will take much longer to become crispy, and sometimes it doesn’t at all.

The extent to which you will need to do this depends on how much your pork buckles. Sometimes, one edge of the pork can twist so it’s almost vertical! Just level out the surface of the pork skin as best you can, and later on we can use patches of foil to protect parts that crisp up faster than others.
Once you’ve levelled the pork, return it to the oven for another 1 hour at the low temp – so the total low temp slow roasting time totals 2 1/2 hours.
Pork roast cooking time
Roast at 160°C/320°F (140°C fan) for 2 1/2 hours to make the flesh tender and juicy, then at 250°C/485°F for 30 minutes to make the crackling crispy.
Note: This pork roast is slow roasted, so the flesh is almost fall-apart tender (like with Pulled Pork) but it’s not quite at that point, it can still be carved like traditional pork roasts.
3. Blast it – and then rest it
Now it’s time to CRANK THE HEAT! Turn up the oven to 250°C/485°F, or as high as your oven will go if it won’t go this high. Blast the pork for 30 minutes, rotating the pan as needed to encourage even crackling.
Here’s what the pork looks like before and after the hot blast:
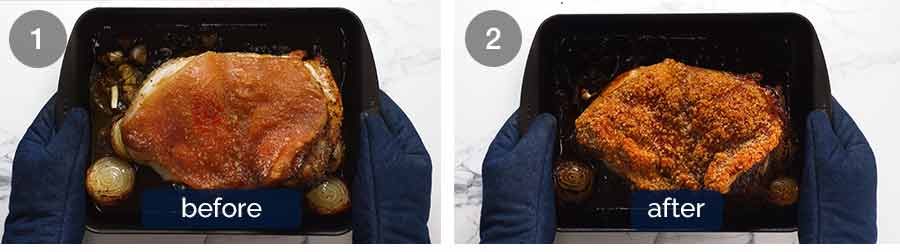
Oh wait, you can’t see the crackling properly. HERE YOU GO!!

TIP: Foil patching
Any elevated parts of the pork skin will go crispy and golden before the lower parts. So just use patches of foil secured with toothpicks to protect those parts that are done, and return the pork to the oven and keep cooking until the entire surface of the pork is crispy!

Resting is essential!
Resting is when you let cooked meat sit out of the oven for a while before cutting it. This is imperative to let the juices redistribute evenly throughout the meat, otherwise they will just flow away when you slice the pork and you end up with meat that is drier than it should be.
The larger the piece of meat and the longer you cook it, the longer it needs to be rested. In this case, the pork is best rested for 15 – 20 minutes to ensure the meat is super juicy, as it should be!

Rest the pork loosely covered with foil to keep it warm. Don’t worry, this will not soften the crackling in the slightest, even if you leave it covered for hours. The crackling is that thick and crispy!!
If you do not cover with foil, the meat dries out on the outside during the rest time. I specifically tried it once to check.

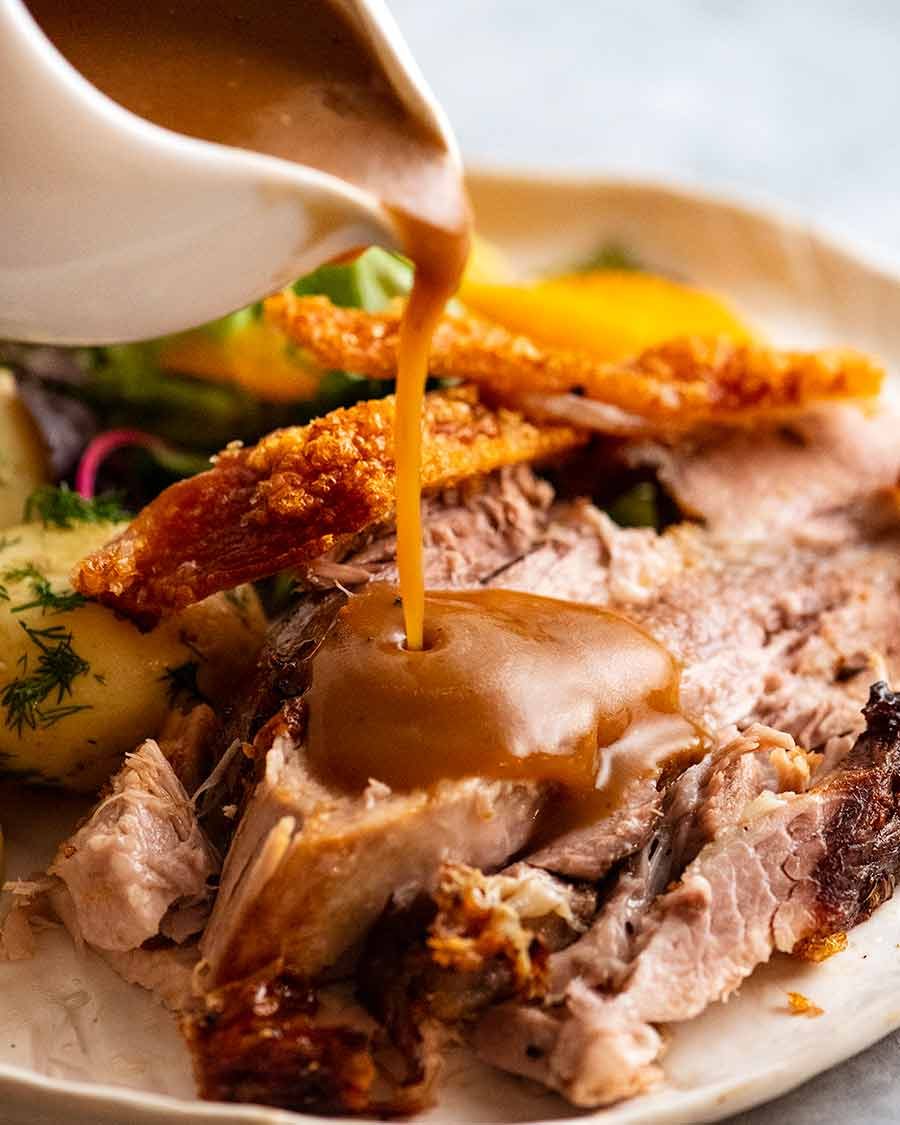
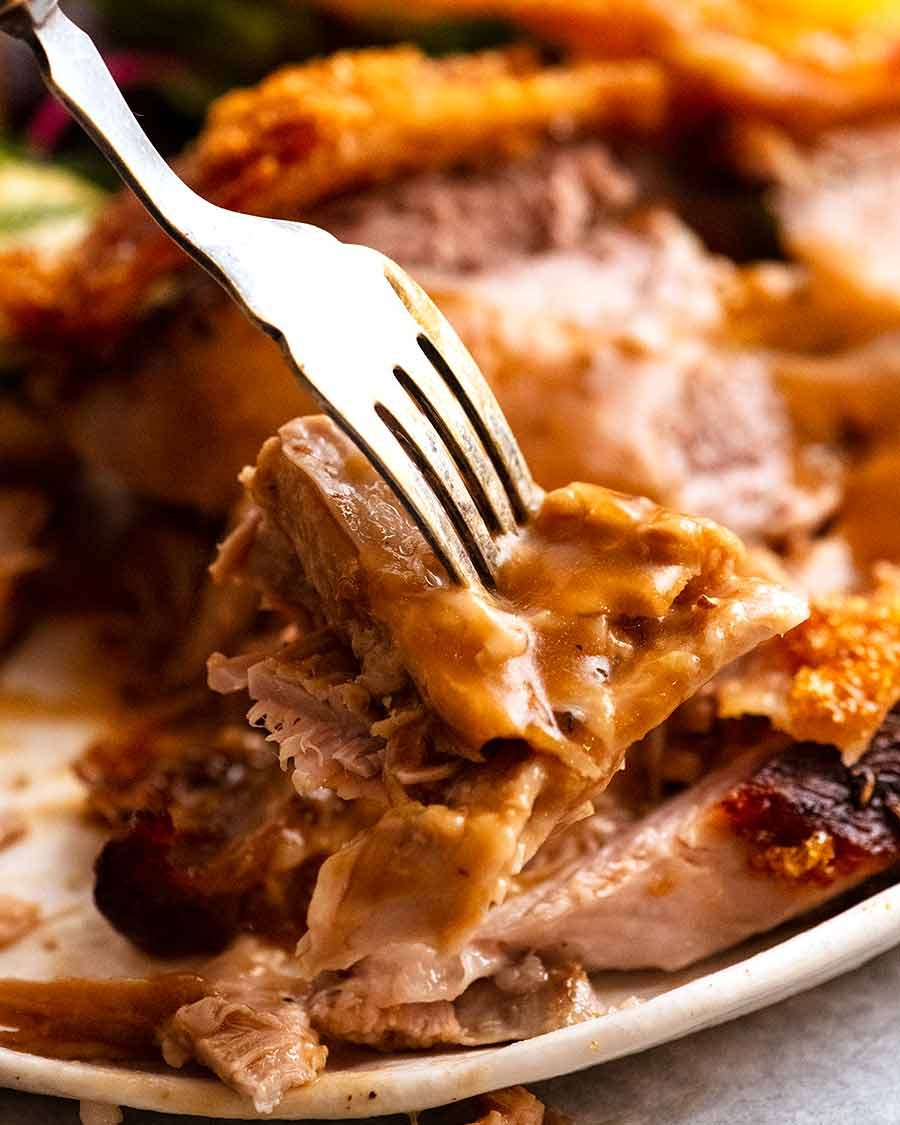
Serve with gravy for pork roast!
This roast pork recipe comes with a gravy made using the drippings in the roasting pan which is absolutely loaded with flavour. The gravy is gold! So don’t skip it!
And surely it goes without saying… never pour gravy onto crispy crackling! All that effort for epic crackling only to douse it and make it soggy?? Nooooooo!!!
Move the crackling to the side, then douse in gravy!!!
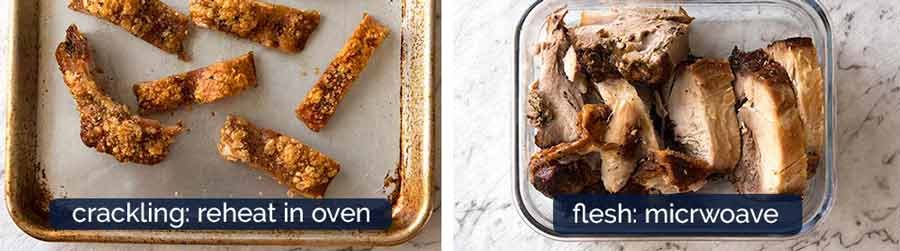
Best way to reheat pork crackling
If you’re like me and always over-cater, you’ll have leftovers. The best way to store pork crackling is to separate it from the flesh. Yep, stay with me on this.
Reheat the pork in the microwave under cling wrap, in a moist environment. Try using leftover pork for epic Bread Bowl Sandwiches or make Cuban Pork Sandwiches!
The crackling is so crispy, it will still be crispy even when cold, straight out out of the fridge. To heat it up, just reheat on a tray in the oven. If you reheat it with the meat in the microwave on the other hand, the surface goes soggy and it’s just not as much fun.
And with that, you are now armed with the steps you need to make the ultimate pork roast with guaranteed crispy crackling.
This is a recipe I first published several years ago, so many, many people have now tried it. So if you are in any doubt about this method, have a browse of the comments!
Ordinarily I would now move straight onto the recipe video and the recipe. But because this is a master recipe and a good piece of pork is not cheap, I am also sharing background information about the method I use.
There’s a lot of detail, so it’s strictly for fellow food nerds!!! Or, for those of you who just want to understand the logic so you can be 100% confident this recipe will work.
If you just want to get cooking, skip straight to the recipe!
BACKGROUND: Why this Pork Roast recipe works
The objective
All too often, you see pork roasts and rolled pork loins with a bit of bubbly crackling on the top, some crispy but flat, really hard crackling on the sides and disappointing patches of rubbery, chewy skin.
I like my Pork Roast with tender juicy flesh and perfect bubbly, crispy pork crackling all over. No rubbery patches at all!
The key factors
These are the key factors that drive how I cook my Pork Roast:
The observation that crackling is always better at the top of rolled porks, and not so great on the sides.
How rubbery bits tend to be in the valleys and creases on the skin or the lower edges. ie: Flatter skin = more even heat distribution across the skin = better crackling
The greatest enemy of crispy pork crackling is moisture; and
A pork shoulder needs to be slow cooked to make it tender, juicy and infused with flavour. Cook it too fast and it will be tough and chewy.
If you’ve made it this far, get ready for an onslaught of some pretty detailed information! Here’s the background to why I make my pork roast the way I do. 🙂
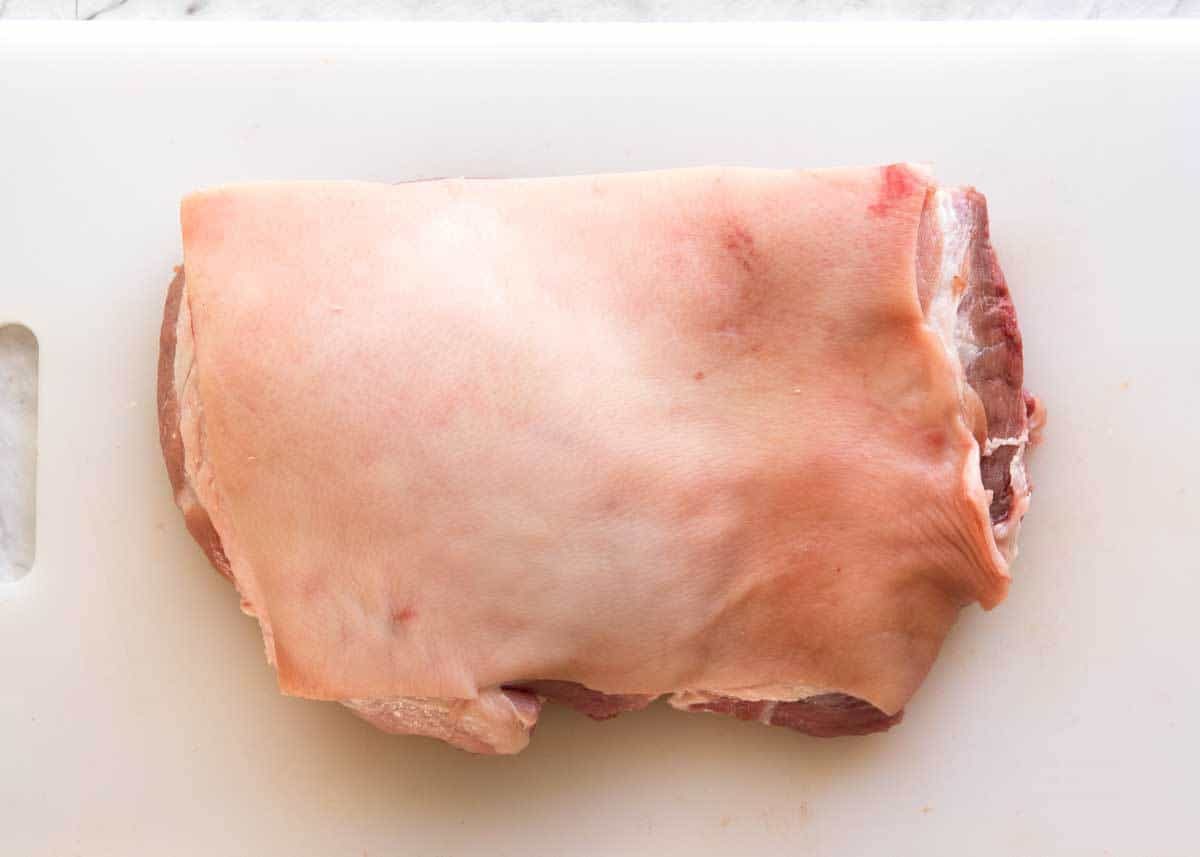
1. Best pork – unrolled, boneless pork shoulder
Unrolled, boneless pork shoulder cut fresh by your butcher is the best cut of pork for the ultimate pork roast because of the shape and cooking qualities. Here’s why:
The pork (and therefore skin) is relatively flat without the bone = better crackling because heat distributes evenly across the rind surface;
Meat is always juicier when cooked with the bone in. BUT we’re using pork shoulder here which is beautifully marbled with fat so you don’t lose juiciness for the sake of crackling;
The flesh side can be rubbed with seasonings then cooked on a bed of onion, garlic and white wine to infuse the pork with flavour;
The meat is made for slow cooking which not only means tender flesh at the end, but the skin has plenty of time to dry out during the low temperature roasting phase before cranking up the oven at the end to make the crackling bubbly and crispy
It’s best to get a fresh cut, boneless pork shoulder if you can because the skin is smooth and flat. Whereas if you buy a rolled pork shoulder which you then unroll, there will often be wrinkles. See below for comparison.
This recipe will work fine with rolled pork (ie trussed with string or netted) and Pork Neck, aka Scotch Fillet Roast (Collar Butt for those in the States) but because they are shaped like a log, this usually results in good crackle on the very top but just ok-to-mediocre crackle on the sides. Do not use this recipe for Pork Loin or Pork Tenderloin, they will dry out. For a pork belly roast, see here.
2. No need to score the skin. But if it’s already scored, it’s fine.
You do not need to score for crispy, bubbly crackling. The crackling of this recipe is based around that very fact! 🙂
Scoring helps because with scored skin, the fat under the skin bubbles up while baking.
But if you score the skin and accidentally cut through to the meat, the juices will bubble up while roasting and will cause patches of rubbery skin. Why run the risk, when it’s not required?
PRO TIP: All too often, grocery store pork is cut by inexperienced butchers so the scoring is done poorly. This is often the cause for crackling that ends up with rubbery patches.
3. Dry skin = superior crackling
This isn’t a ground breaking stuff here, it’s pretty common knowledge.
But the problem is, pork shoulder bought from supermarkets usually come vacuum-packed, which soaks the skin in juices.
So if your pork was vac-packed, the best way to ensure really dry skin is to pat it dry with paper towels then leave it uncovered in the fridge overnight, or at least 3 hours.
The dry skin test: Run your fingers across the surface. Does it glide smoothly? Great, it’s dry. Is it tacky like when you touch your own skin on a hot, humid day? It’s still wet – keep dabbing/drying!
4. Infuse flesh with flavour and keep it moist.
This pork roast is slow-cooked so the fat marbled in the pork roast melts and the tough connective tissues become beautifully tender.
I rub the flesh with salt, pepper and fennel (because pork loves fennel!) then place it on a bed of garlic and onion in the roasting pan which serves 3 purposes:
Elevates the pork slightly which helps with even cooking;
Adds more flavour into the flesh; and
Creates super-tasty pan juices which is used to make a gravy.
I also add a liquid into the pan which keeps the flesh extra moist. My first choice is white wine, followed by dry apple cider. For non-alcoholic options, apple juice, non-alcoholic apple cider, chicken and vegetable broth are all things I’ve used in the past that I’ve liked.
5. Roast uncovered for the whole time
If you cover it, it creates a steamy environment which pork crackling does not like!!
Roasted uncovered, the skin isn’t subjected to the moisture from steaming so it gets a kick start for the crisping and drying out of any residual moisture. This is another factor that helps guarantee crispy pork crackling!
6. Low heat then high heat
Juicy, slow cooked meat requires long, slow cooking at a lower temperature, whereas developing crispy crackling requires very high heat.
So we start this pork on a lower temperature for 2.5 hours to cook and break down the tough meat to make it beautifully juicy. This is less time than other recipes you may see because it’s a boneless pork shoulder.
This is what the pork looks like partway through roasting, before crisping up the crackling:
7. Foil balls to level the skin to guarantee crispy crackling
During the slow roast phase, the pork shoulder will look a bit warped. That’s natural – it’s a dense cut with lots of connective tissue that tightens as it cooks, and that’s what happens when it’s roasted without being tied with string to keep shape. And that is why shoulder is usually sold rolled and tied/netted!
Now remember: Flat skin = even heat distribution = best pork crackling
So at this stage, LEVEL THE SKIN before blasting with high heat. Pull out giant flappy bits of meat to the side and use balls of foil to level out the surface of the skin as much as you can before we blast it with heat to make it puff and bubble.
Here’s an example of how I did my pork – the photo on the left shows how low the front side is, then on the right, it is more levelled out overall after propping it up with a ball of foil.
8. Crank up the heat
At the end of the low temp slow roasting time, the pork flesh has slow cooked and broken down so its nice and juicy. But the skin is still rubbery though you will see the start of a few bubbly bits, as pictured above.
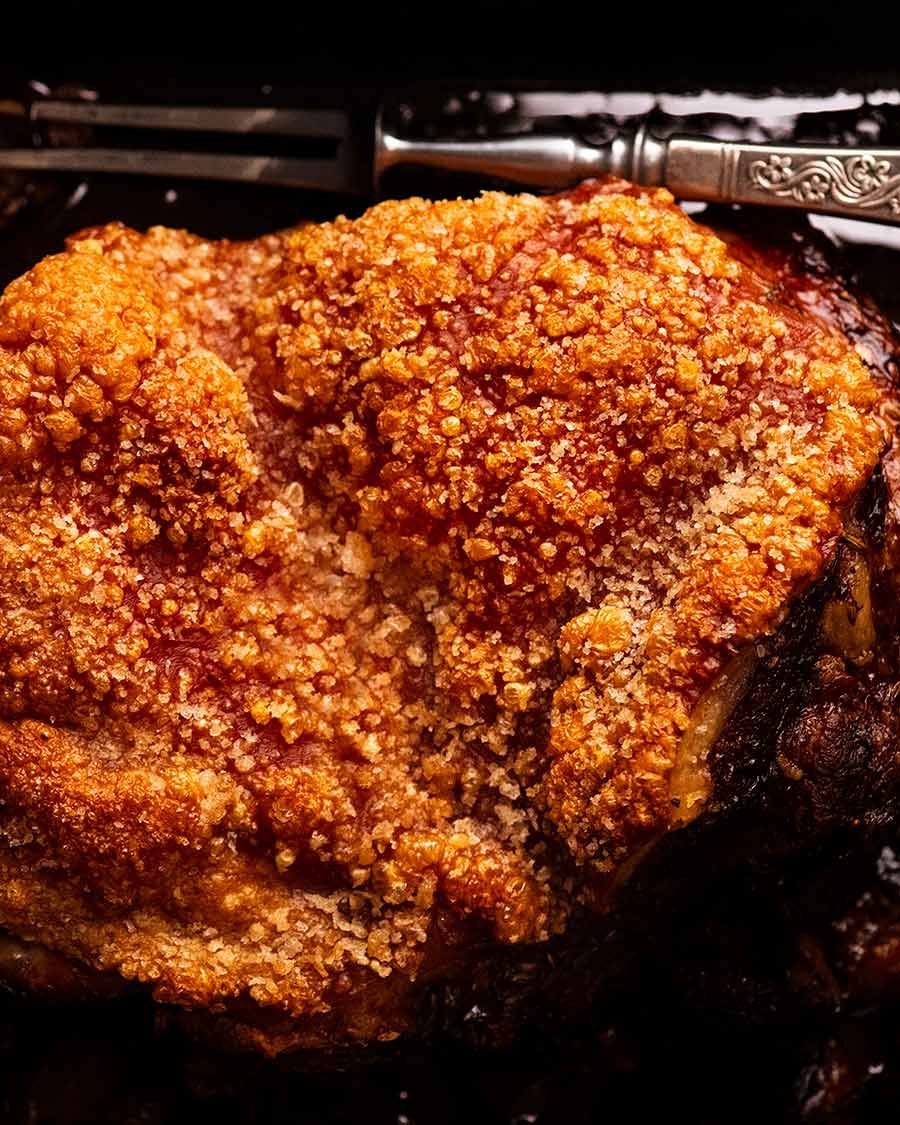
So now it’s time to crank up that heat to make the skin bubble up all over and make it ULTRA CRISPY like THIS:

There’s not even a speck of rubbery skin on that pork. Most of it has bubbled up beautifully and the small parts that haven’t are still ridiculously crispy.
And the flesh is so tender!
And with that, I am done! Everything I have learned in pursuit of the best pork roast, all written up in one (very big!) post, to share with the world!
Soooo … what’s on the menu for supper this weekend?? Just the usual Spag Bol … or a crazy-juicy Pork Roast with Crispy Pork Crackling…..? 😉 – Nagi x
Watch how to make it
Juicy meat assurance! I’ve seen some comments on social media that the meat looks dry in the video. I can assure you it is most certainly not – read comments below to confirm this! The recipe calls for pork shoulder which is a cut of pork ribboned with fat that becomes tender and juicy when slow cooked like we do in this recipe. Put it down to poor filming – and the next time I make it, I AM going to film those cut shots again so you can see how juicy the meat is!
Hungry for more? Subscribe to my newsletter and follow along on Facebook, Pinterest and Instagram for all of the latest updates.

Pork Roast with Crispy Pork Crackling
Ingredients
- 3 kg/ 6 lb boneless skin on pork shoulder, NOT scored , unrolled / netting removed (Note 1 & 6)
- 3 tsp cooking / kosher salt (NOT salt flakes or table salt, Note 7)
- 1 1/4 tsp black pepper
- 2 tsp fennel seeds (or other herb/spice of choice)
- 1 tbsp+ 1 tsp olive oil
- 1 garlic bulb , halved horizontally
- 2 onions , halved (brown, white, red)
- 2 cups dry white wine, or alcoholic or non-alcoholic cider (Note 2)
Gravy:
- 1/4 cup flour (Note 5)
- 2 cups chicken broth/stock , low sodium
- Salt and pepper
Instructions
- Dry skin: Pat the skin dry with paper towels. If time permits, leave in the fridge uncovered overnight (even 1 hr helps). If not, pat extra well.
- Preheat oven to 220°C/430°F (200°C fan).
- Season flesh: Sprinkle pork flesh with 1 1/2 tsp salt, all the pepper and all fennel seeds and 1 tbsp olive oil. Rub into flesh, right into all the crevices and cracks.
- Salt skin: Flip pork, drizzle skin with 1 tsp oil, then rub all over with fingers. Sprinkle all over with remaining 1 1/2 tsp salt, taking care to get even coverage. Un-salted patches will not become bubbly crackling, it will be a hard flat sheet.
- Garlic & onion bed: Place halved garlic bulbs and onion in roasting pan. Place pork skin side up on top of them.
- Wine: Carefully pour wine into the pan, being sure not to wet the skin. Transfer to oven.
- Lower oven: Immediately turn oven down to 160°C/320°F (140°C fan).
- Slow roast: Roast for 2 1/2 hours.
- Level at 1 1/2 hours: Check pork after 1 1/2 hours to see if the pork is warped and the skin's overall surface is significantly unlevelled. If so, adjust to make the skin surface as level as possible using balls of foil and moving large dislodged pork pieces to the side (key tip for crispy crackling, Note 3). Then return to oven for the remaining 1 hour.
- Check pan & salt on skin: If pan is drying out, add some water. If there are bald patches on the skin without salt (eg it fell off), spray lightly with oil spray (or brush lightly with oil) then sprinkle with salt. (Remember, salt = bubbly skin!)
- Increase heat: Turn oven up to 250°C/485°F (all oven types), or as high as it will go if your oven won't go this high.
- Make skin crisp: Return pork to oven for 30 minutes, rotating pan as needed, until skin is crisp and bubbly all over. If needed, use foil patches, secured with water soaked toothpicks, to cover parts that are done and keep crisping up remaining patches.
- Rest: Transfer pork to serving platter, tent loosely with foil (don't worry, crackling stays super-crisp) and rest for 20 minutes (stays warm up to 1 hour). Then slice using a serrated knife.
- Serve with gravy. Don't pour gravy over crackling – pour it off to the side! See note for reheating.
Gravy:
- Transfer fat to saucepan: Skim off 3 tablespoons of fat from the roasting pan and put in a saucepan.
- Strain pan juices: Place strainer over bowl and scrape in all the remaining pan juices (including onion and garlic). Press out juices, then discard onion & garlic. Skim off excess fat from surface and discard – no need to be exact here!
- Gravy roux: Heat the saucepan with the fat over medium heat. Add flour and cook for 1 minute.
- Add liquids: Pour stock in while whisking so it's lump free. Then pour in strained pan juies.
- Thicken: Simmer until thickened to syrup consistency – about 3 minutes – it will thicken more as it cools a little while serving. (Note 4 for colour tip)
- Season: Adjust salt and pepper to taste. Pour into serving jug. Serve with pork.
Recipe Notes:
2 – 3kg / 4 – 6lb: Cook times per recipe
3.5 – 4.5kg / 7 – 8lb: Add 30 – 45 minutes to the slow cook time and add 1 cup extra liquid (helps keep the flesh more moist + ensures pan doesn’t dry out) * Smaller piece = more warping = less stable = risk of tipping over and skin getting wet. 7. Salt – must use cooking salt / kosher salt here, not table salt and not sea salt flakes. Table salt is too fine, flakes don’t work as well. Cooking salt / kosher salt are larger grains and make the best bubbly crispy crackling. 8. Reheating leftovers – Separate meat from crackling, cool crackling uncovered. Store separately. Reheat meat in microwave and crackling in oven at 160C/320F for 5 to 8 minutes. Making ahead – Best served freshly cooked, the meat is just not as juicy if reheated. If you want crackling pork roast that can be made ahead, I recommend pork belly (fattier meat = reheats near perfectly next day with 100% perfect crispy crackling). 9. Nutrition per serving, assuming 10 servings and that all the gravy is used. This does not take into account any fat skimmed off the pan juices before making the gravy so it’s higher than reality 😉
Nutrition Information:
Originally published April 2018. Updated with new photos, new recipe video and rewritten post. No change to recipe but writing has been tidied up!
BEST OF SUNDAY SUPPER ROASTS
Garlic Herb Butter Roast Chicken – or try this amazing Slow Cooker Roast Chicken
Beef Standing Rib Roast (Prime Rib) with Red Wine Sauce
Life of Dozer
Now that’s true love……

Excellent guide for a novice cook. The Youtube well worth watching. Five guests who know their food were very complimentary and as I would not have thought to do most of your instructions, like the onion props, the fennel underneath, and the changing temperature – bought an oven thermometer for the job – £3.50 worth spending. Can’t thanks you enough
what temperature do you cook the pork to before putting under high heat?
Gruezi from Switzerland
Sooo…
Tried the roast for the first time.
It was my second crispy pork roast ever. (The first one was a fail.)
But this time: SUCCESS!
Even with some obstacles.
It was a vacuumsealed, scorced organic pork shoulder, that nobody wanted to buy…2times prize reduced.
And it was sooo goood…
I brushed oil into the deep cuts so the meat juice could not escape through the cuts.
And let the skin dry in the freezer for 3days.
Crispy, soft, tender and flavourful meat. A delight for the kids, cats and hubby and me!
Cant find pork shoulder with skin on – Butcher keeps saying it’s a Pork Picnic that I’m looking for….is he right?
Hi Bobbie – pork cuts names are confusing! If you are in North America, you can use a boneless skin-on picnic cut OR a smaller 6lb boneless skin-on Boston butt for this dish (but it might take longer to cook as it’s thicker than the picnic cut). You do need the skin on to make the crackling. Both would work. In Australia, they call the picnic cut a boneless rolled shoulder. Just tell your butcher you want it from the front leg shoulder area (back legs are hams!) and you should get the right cut. N x
Cooking for 2 is a challenge, but I reckon I’ve nailed it by using a loaf tin. With slow cooker roasties, I’m ready to roll this afternoon! I can’t post a pic, but looking good at the prep stage!
Awesome Sue! Great idea!! N x
Will this recipe work with a boneless pork shoulder WITHOUT the skin on? I’ve called all over my area and they do not sell this piece of meat with the skin on. Hoping to make it this weekend. Thank you!
In USA, only the picnic, bone-in, pork roast has the thick skin. At least that is my experience.
Hi i am trying out your Roast Pork shouler Recipe. However my oven does not have roast function. Only have bake, FAN bake , Pizza bake, FAN grill, grill. So which mode do i choose?
Roast is same as bake. So fan bake would be recommanded.
Hth.
Not sure what I’m doing wrong, but all the wine (and extra wine and water I added) all evaporated. I also hardly got any pan juices, not enough to make gravy. The first time I made this it was perfect, but the last 2 not so. Any suggestions what’s gone wrong?
Hi Kristen – did you change the pan size? Or use a smaller piece of pork than the first time? N x
Sorry I missed this! No I used the same one, but I used the resting juices and it was better. Is there an approximate amount of juice, like say 1\2 a cup?
Thank you!
Recipe says 2 cups 🙂
Hi Nagi, I’ve made this amazing roast a couple of times before and it turned out absolutely perfect!! Am making it again tonight, however the shoulder today is rectangular shaped rather than square. Do you think I’ll need to make an adjustment to the cooking time or will it be fine to cook as per normal? Thank you!!
I forgot to say the meat is shaped approximately 12×4 inch!
Best crackling ever. The family loved it. Perfectly cooked, juicy pork. It’s a winner.
I am so glad you enjoyed it Sara! CRACKLING ROCKS!!! N x
Truly great, melt-in-your-mouth pork crackling has always eluded me – until this recipe!
It’s foolproof. Used it three times and every time it has been just perfect!
I’ve since tried many of your other recipes including the beef brisket and the ragu. Worked flawlessly every time. Above all I love that you use metric measurements and often specify notes that are relevant to aussie users. Thanks Nagi!
So glad you enjoyed it Perry! N x
Just made this crispy port roast for the 5th time. Absolutely perfect. Used the apple cider and it was delicious. Thank you.
Thanks! N x
I tried this recipe about 3 weeks ago and it made the difference. We have mostly been getting fair results with other methods but this one worked a charm. The crackling didn’t even make it to the table. We scoffed the lot. We did however cook the joint at a lower and slower (4 1/2 hours @100c(fan)) rate but cranked the heat up for 30mins at the end. This is our new go-to method. Much thanks.
Also makes fantastic gravy.
Made this last night and it was the best roast pork with crackling I’ve ever made. Crackling was perfect
This is so good! Nagi always has the best recipes, seriously she is my go to for recipes every single time I need help she just nails it. Thanks Nagi, I hope you read these comments because you’ve helped me for years! Thanks from me and my family.
Hi I have a pork shoulder that is 3.37 lb. How long should I cook it for? Excited to make this!
Hands down the best roast pork I have ever cooked! Amazing, thank-you so much!
As much as i love the recipe, it was so hard to find in this page, spent 15 minutes trying to work out where to look
I’ve been making this pork roast for a while now. But my family here weirdly don’t like the fatty bits, pork crackling so I usually leave out the air drying bit, I just pat it dry and discard the fat once cooked which is heart breaking for me. The meat is still lovely I must say. But yesterday, I was so busy so I just have to season the pork and leave it to air dry for a while (3 hours). Oh boy, the pork crackling that I got from just that air drying was amazing! My family still don’t eat the fatty bits but I’m definitely not skipping the air drying next time because it’s a treat for the chef, thank you nagi!
CRACKLING!!!It’s soooo good…I would NEVER skip it! N x
Sorry, Nagi, but I can’t understand recipes that measure in ‘cups’. Just checked my shelves, and I have six different sizes of cup – one holding 3x the volume of another! Let’s use ‘real’ amounts, shall we? like decilitres, grams etc? (PS Pork is in the oven as I write!
Hi Andy, if you’re ever unsure – click the metric toggle and the amount will be converted into mls for you which is a standard no matter where you’re located! N x
A cup is an internationally recognised measure which you will find if you look it up is equal to 250 ml.
That’s actually incorrect Howard, cups differ in amount depending on where you’re located! I have a metric toggle on my recipes though which converts the recipe into mls and grams which is an international standard and the same no matter where you’re located. N x
No , Howard is correct. In Australian usage a cup is ALWAYS 250 ml.